
How to Mix Vocals
Introduction
Ever heard a modern hit with badly mixed vocals? Probably not. That’s because they just don’t exist. The hard truth is, if your vocals don’t sound great, your music might never get noticed.
But just knowing this doesn’t make mixing vocals any easier. Vocals are tricky. They’re usually the loudest part of a mix, so there’s not much room for mistakes. Plus, since we all know how the human voice should sound, any flaws stand out right away.
If you’re having trouble getting your vocals to sound professional, these five tips are a great place to start. Keep reading to learn the secrets to mixing vocals like a pro.
1. Comping and Modifying
The first step to mixing vocals isn’t actually mixing—it’s editing. If you’re only responsible for mixing, the artist will probably handle this before sending you the session.
But if not, it’s your job to help create the best vocal sound possible from the available takes. This process is called comping.
Comping might look a little different depending on which DAW you’re using, but the idea is the same: you choose the best parts from multiple takes and piece them together so they sound natural, cohesive, and showcase the best overall performance.
Besides comping, other editing tasks might include trimming sections where the vocalist isn’t singing, or adjusting breaths that stand out too much.
How much you trim the breaths is a matter of taste—it often depends on the style of music and, ultimately, how it sounds in the mix. Sometimes you want them, sometimes you don’t. Either way, editing breaths is easy with a plugin like DeBreath.
While comping should always come first, the other detailed editing tasks can be done later if you need a break from the creative work.
Switching between different types of tasks during the mixing process can be really helpful for keeping your ears fresh and your perspective clear.

2. EQ
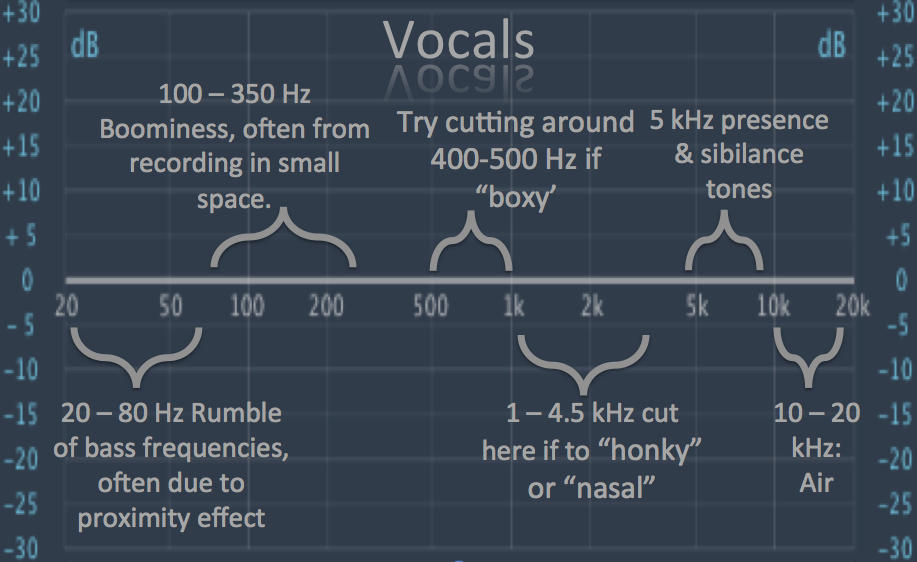
“Magic” Frequencies for Mixing Vocals
Understanding how different frequencies affect vocals lets you make quick, precise adjustments with less guesswork. Here are five key frequency areas to focus on when EQ’ing vocals:
- 120 Hz: Fullness
- 240 Hz: Boominess
- 5 kHz: Presence
- 4–7 kHz: Sibilance
- 10–15 kHz: Air
Try experimenting with each of these frequencies or bands to see how they affect your vocal mix. If a vocal sounds muddy, try cutting a bit around 240–250 Hz. Of course, we’ll just mention the high-pass filter here, since it’s usually the first thing you do anyway.
You might be aiming for a perfect balance in the frequency spectrum, but don’t be afraid to try different options. A slight boost with a low-shelf filter on the low end, or using a high shelf for the highs, might give you even better results.
For example, in hip hop, vocals often have more low-end power, while in today’s popular music, there’s usually a bit of extra sheen on top.
If sibilance is especially harsh, sweep between 4 and 7 kHz to find the most problematic frequencies and tame them. As always, listen carefully and use whatever works best for your personal style. Ultimately, it’s up to your taste to mix vocals in a way that suits your genre.
Vocal Range
A singer’s vocal range is the span of musically useful pitches they can produce. Singers are categorized by their vocal range as follows:
- Soprano: C4 – C6 (261 Hz to 1046 Hz)
- Mezzo-soprano: A3 – A5 (220 Hz to 880 Hz)
- Contralto (Alto): F3 – F5 (174 Hz to 698 Hz)
- Tenor: C3 – C5 (130 Hz to 523 Hz)
- Baritone: F2 – F4 (87 Hz to 349 Hz)
- Bass: E2 – E4 (82 Hz to 329 Hz)
These letter and number combinations indicate the note location—C4, for example, is Middle C on a piano.
When it comes to EQ’ing and mixing vocals, knowing these ranges gives you an idea of where the fundamental frequencies of each voice type are found.
So, if you’re mixing a soprano, you’ll know the lowest frequency range to start working from. Keep in mind, these ranges don’t mean you shouldn’t use frequencies above the listed upper limits.
You can always use a high-pass filter to remove unnecessary low frequencies from vocals and enhance the clarity of the upper vocal register.
Harmonics also extend well above these fundamental frequencies, often reaching as high as 8–10 kHz. So, a soprano singer may have frequencies present even in these higher ranges.ies lower out utterly above the 1100 Hz mark and the resulting sound wouldn’t seem natural.
Male Vocals vs Female Vocals
You might wonder, “How do I mix a female vocal compared to a male vocal?” In reality, we haven’t found gender to be a challenge when it comes to mixing vocals.
While there are some subtle differences in vocal cord structure between genders, and men and women may speak with different patterns and intonations, we treat every voice as unique when mixing.
For example, we once worked with a male artist whose vocals were very high, so we mixed them accordingly. Similarly, we’ve mixed female vocals that had a surprising amount of low-to-mid-range frequencies. Always mix a vocalist based on their individual voice, not their gender.
3. Compression
Once you’ve nailed down the tone of the vocal, it’s time to tighten up the dynamics so the performance stands out at the front of the mix. There are plenty of compressors out there commonly used on vocals—each with its own unique character and way of handling dynamics.
It’s typical to apply between 3-6 dB of compression using a peak limiter-style compressor, like the CLA-76 or the SSL E or G Channel compressors. The compressor should only kick in to tame the loudest peaks; it shouldn’t be working throughout the entire vocal performance.
Next, you’ll want to set the attack and release times on your compressor. Here’s an easy way to find the best settings:
Start with the slowest attack and the fastest release times.
Slowly increase the attack time until you begin to shave off the initial transient of the vocal, then back it off a little.
Then, gradually decrease the release time until the compressor starts to “breathe” in time with the song.
It’s common to compress so that the needle shows 3-6 dB of gain reduction during the loudest peaks, and just before it returns to zero, the next peak gets compressed again.
You don’t want to squash all the life out of the vocal, but you do want to add energy and power. Finding that sweet spot takes a trained ear and lots of practice. Mixing vocals becomes second nature after you’ve done it on plenty of songs.

Serial Compression
Serial compression is another technique you might want to try. This involves using two compressors in a row, and it’s important to find the right settings for each one. Both compressors should work together in harmony to achieve the best results.
When using multiple compressors, be careful not to overdo it. We like to have the first compressor handle the technical side—set the threshold so it provides just enough gain reduction to balance things out. Then, use the second compressor to add some vintage character to the vocal and smooth out any remaining imbalances.
Always pay attention when you’re applying compression. If you’re unsure about what you’re doing, you can easily ruin the signal! But if you know how to use this technique, you can achieve professional-sounding vocals, and this is a great way to do it!
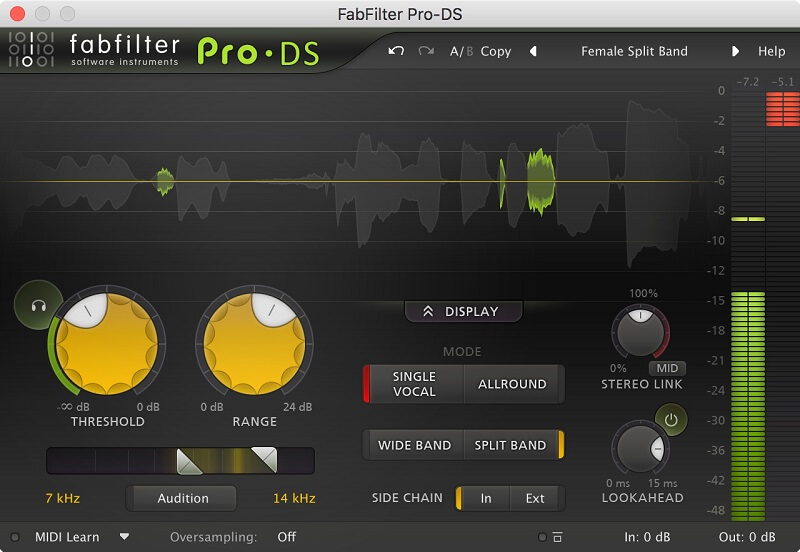
4. De-esser
When mixing vocals, boosting certain frequencies can sometimes make the “s” sounds in a vocal track too sharp. This harshness is called “sibilance.” Here are two solid ways to fix this problem using a de-esser. Remember, de-essing is important—done well, it can make a vocal sound great, but if overdone, it can ruin the take.
- Gently cut the harsh frequency with an equalizer. This frequency is usually around 8kHz. If your EQ has a spectrum analyzer, watch for a spike in the high frequencies when the singer makes an “s” sound.
That spike is the frequency you should reduce. Small fixes like this are essential when mixing vocals if you want them to sound polished and controlled.
- The downside to the first method is that you’re cutting out that frequency for the whole vocal take, which can make the overall vocal sound less bright.
To solve this, try using a dynamic equalizer instead. A dynamic EQ can cut or boost a frequency only when it passes a certain threshold, using settings like attack and release—similar to how a compressor or de-esser works.
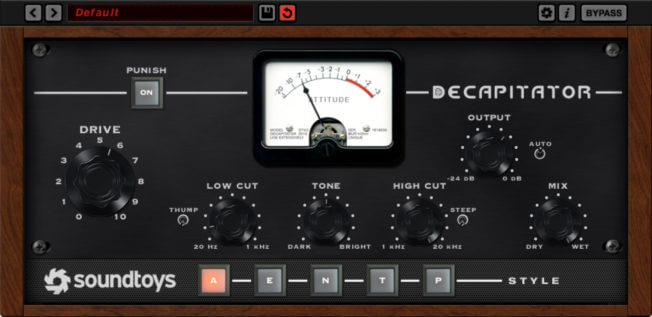
5. Saturation/Distortion
Adding just a little bit of saturation and distortion can really thicken up a vocal and help it cut through a busy mix by adding extra harmonics.
In analog recording, saturation came from preamp gain, the circuitry in the mixing console, and the tape machines themselves. Luckily, modern plugins make it easy to recreate these types of saturation right inside your DAW.
The preamp section in the Scheps 73 plugin works well for this, as does the ‘drive’ control on the NLS Channel console emulation.
If you want a more aggressive sound, try sending the vocal to an aux channel and applying saturation and/or distortion more heavily. Then, blend the affected channel in to taste. Remember, a little goes a long way!
6. Effects
When we use a time-based effect like reverb, we’re trying to create a space for a mix element to sit in. Often, we add reverb to bring our vocals forward, but end up making them sound more distant instead.
The quick fix? Pre-delay. Most reverb plugins include this setting, which works by adding a user-defined delay between the dry (original) and wet (reverberated) signals. This lets you hear the space and depth you want from the reverb, without pushing the dry vocal back in the mix.
You can also get creative with delay in lots of ways. A common approach is to automate the delay on certain words or phrases. For example, if you want a particular lyric to repeat, keep the delay bypassed until you reach that word, then automate the effect on.
Another tip is to EQ your reverb and delay returns. Usually, you don’t want your reverbs and delays occupying the exact same frequency range as your dry vocals. Try bandpassing your effects return—say, between 600 Hz and 4 kHz—so your wet and dry signals aren’t competing for space in the mix.

Other Effects
There are many different ways to process your vocals with effects, and the creative choices are all yours. Try experimenting with effects like chorus, flanging, pitch shifting, vocal doubling, multiband compression, limiting, and other creative options.
Automation can also make a big difference. Try automating effects throughout your vocal performance to add excitement and movement, or to highlight certain words or phrases. There are so many possibilities!
How to Mix the Vocals Properly
Follow these steps and you’ll end up with incredible-sounding vocals.
The more you practice, the better your results will be. Before long, your vocal tracks will sound just as polished as the ones you hear on the radio.
Keep working at it and you’ll achieve amazing results!
Just remember these steps when mixing your vocals:
- Remove any unwanted room resonances using an EQ
- Tame harsh sibilance with a de-esser
- Control your dynamic range by using serial compression
- Shape your tone with another EQ
- Add a sense of space with some reverb or delay
- Enhance your sound with creative effects
Extra Vocal Mixing Tips
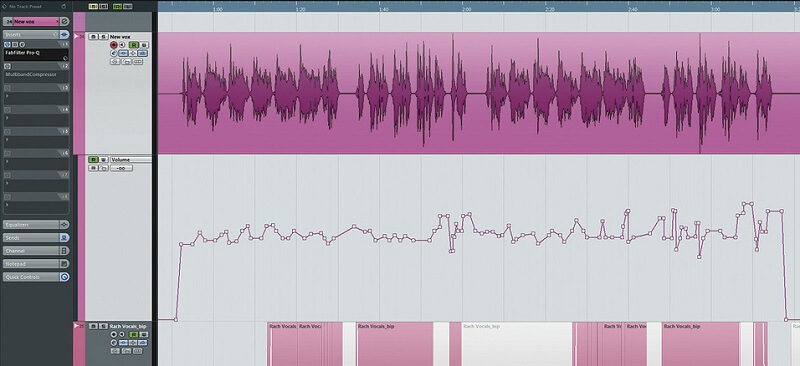
Automation
Automation is the cherry on top of your vocal mixing process. Simply adjusting the volume of the vocals throughout the track can be a highly effective way to bring them to life as the song develops.
Likewise, automating subtle changes in reverb, delay, or saturation to match the growth of the song can add a gentle lift, helping the music or lyrics have a greater impact on the listener.
Try out this technique in subtle ways so that the effects are more emotionally ‘felt’ than obviously heard.
When mixing vocals, it’s okay to jump around between steps. If you hear an idea in your head, act on it! If you open your session and listen to the raw track but can already imagine how the EQ and compression should sound, go for it!
Don’t ignore your inspiration.
Ducking
When we talk about “ducking,” we mean lowering a channel’s volume—not anything to do with waterfowl! In audio, ducking automation is set up so that when the volume of one channel goes above a certain level, another channel’s volume is automatically reduced for a set amount of time.
Ducking is useful with lead vocals, as it can automatically turn down the volume of another instrument whenever the main singer starts.
For example, imagine a song where a lead instrument is very prominent at the beginning. With ducking, as soon as the singer starts, the lead instrument’s volume is lowered to make space for the vocals.
Ducking is a “nice-to-have” feature in a live setting, but it’s definitely not essential. Most of the time, we’ve mixed live shows without using a ducker. It just means we had to manually adjust the faders now and then, which we’re totally fine with.
Have the Vocals in Multiple Channels
A vocalist will usually sing with a different tone or volume for each part of a song. Because of this dynamic vocal style, it’s difficult to use the same EQ or compressor settings for every section.
For example, the compressor settings that work for the verse might not be suitable for the chorus.
One solution is to split the vocals across multiple tracks. Create separate vocal tracks for the verse, chorus, breakdown, and so on. This approach gives you more flexibility to process each vocal part in the way that suits it best.
Duplicate / Pitching
Duplicating and pitching vocals is an easy and effective way to “beef up” your vocals, adding clarity, character, and tonal richness. While this technique is most commonly used in electronic or pop music production, it can also be applied to many other modern genres.
This vocal mixing method involves duplicating your vocal track and then pitching the duplicate either +12 or -12 semitones.
Pitching the duplicate up by +12 semitones adds a higher, layered vocal that gives more depth and crispness to your sound. Pitching it down by -12 semitones brings extra depth and energy to your vocals.
Remember to add compression and reverb to the duplicated track, and lower its volume so the vocals don’t end up sounding crowded or artificial.
Tuning
Usually, vocal performances will have some pitch and tuning imperfections. While that’s not necessarily a bad thing, you may want to touch up any questionable notes with pitch correction software.
After applying pitch correction, it’s a good idea to commit or print the effects (non-destructively). This will set the new audio in place and help save processing power during mixing.

Mix the Vocals in Context
Avoid mixing your vocals in solo! The goal is to make your vocals sound great together with all the other elements of the track. It’s hard to make good mixing decisions if you’re only listening to your vocals by themselves.
It’s also a smart idea to bring your vocals in early. This way, you can make processing choices based on how they sound with everything else in the mix!
Listen In Context
Before diving into the details of mixing vocals, it’s important to think about how the vocals fit within the whole track. Something that sounds great on a soloed vocal might not work as well once all the other instruments are in the mix.
To avoid this issue, make your main EQ adjustments to the vocal while other parts of the track are playing in the background. You can also switch the solo button on and off as you work, listening to how your changes affect the entire mix.
Mix Every Part Around The Vocals
The alternative to the previous point is that changing other parts of the mix can also affect the vocals. A common mistake many beginner engineers make is overlooking the fact that lead vocals are the most important element in a mix. Because of this, they might wait until the end of the process to bring the vocals in.
This approach can create extra work later on, as the mixing engineer may unintentionally bury the vocals under other elements. Instead, bring in the vocals early and mix everything else around them to make sure the vocals stand out.
A well-mixed track won’t require much adjustment to the lead vocals to help them sit properly in the mix.

Conclusion
These suggested strategies are a great starting point for mixing your vocals. They offer helpful information to guide you toward making better mixing decisions. Remember to experiment—try changing the order of your plugins and adjusting different settings to see what works best.
Most importantly, avoid overdoing it. Learning to mix vocals with fewer moves and plugins often gives you a more natural sound. We hope these tips help you achieve more professional-sounding vocals and improve your mixing skills.


You are the best of all the times
My mixing sounds greater than before
Thanks so much
Thanks for the love!