
What is Compressor Attack and Release
Introduction
Compression can be tricky to understand, even if you already know about threshold and ratio settings. And if your attack and release times aren’t set just right, it can be tough to get the effect you want.
This quick guide will show you a really useful trick we learned from a friend a couple of years ago. It helps you dial in your attack and release times perfectly. While it’s mainly designed for drums, the same ideas can work for any sound.
The key here is to really understand all the parameters on your compressor so you know exactly how to set it. If you’re not sure what you’re doing with the knobs, it’s usually better to leave compression to someone else until you get the hang of it.
We always encourage you to experiment to see which settings work best for your sound, and to pay attention to how each change affects what you’re working on.
If you know what you want to achieve with compression, it won’t be hard to get there. With some careful listening and a bit of basic knowledge, you’ll be on your way to successful experimentation.
Keep reading to learn more about attack and release settings, and how to get the best results from this article.
What are Compressor Attack and Release Settings
Attack and release time settings control how quickly a compressor responds to changes in your audio. With a bit of understanding, you can use these settings to shape your tracks in any way you want.
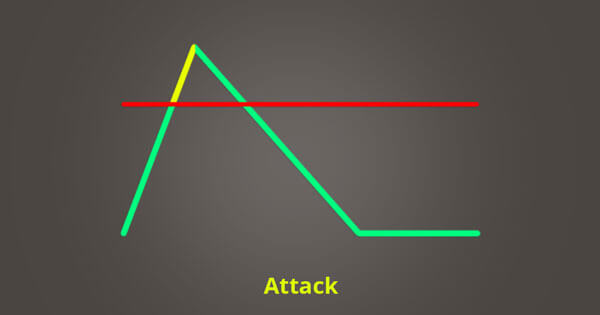
Think of the attack setting as the compressor’s reaction speed. It determines how quickly the compressor starts working after your signal goes above the threshold.
These times are shown in milliseconds, so you can measure and set the attack and release times precisely to get the sound you’re after.
Fast Attack
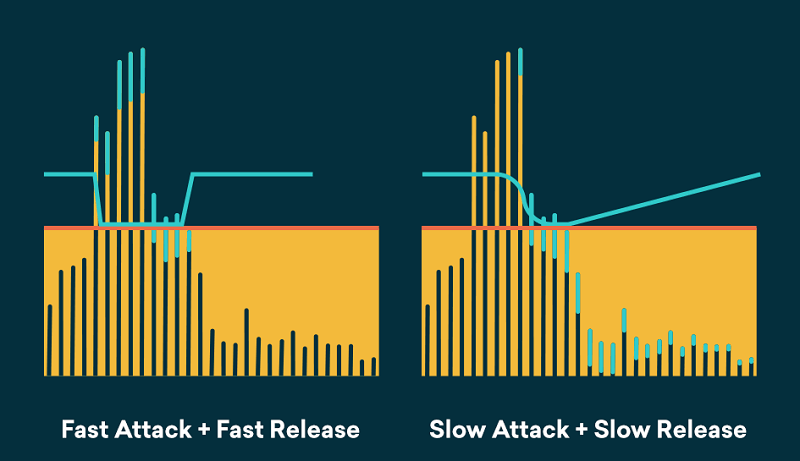
With a fast attack time, the compressor kicks in virtually instantly, which is nice for those who’re making an attempt to stop signals from clipping or tame unruly peaks. As for tone, quick attack times can be used to tighten up sloppy performances and make things really feel a bit extra polished.
Setting the attack time too quickly could suck the life out of a performance or push an instrument again within the mix making it sound farther away from the listener.
Fast attack speeds also can trigger audible distortion or artifacts, particularly when dealing with bass frequencies. To stop this, strive to use a compressor with a built-in high-pass filter to bypass the bass frequencies.
Slow Attack
With a slow attack setting, the compressor allows some of the initial signal to pass through before it starts working. This can help emphasize the impact of a sound, making it feel bigger and more aggressive.
However, slow attack times are not ideal for controlling dynamics. In fact, using a slow attack can actually make a performance with uneven dynamics even more inconsistent.
Fast Release Setting
The release setting controls how quickly the compressor stops affecting a signal. Fast release times are great for increasing the perceived loudness of a track.
At low levels of gain reduction, quick release speeds generally sound the most natural. However, when used with high ratios, fast release times can make tracks sound grittier and more aggressive.
Just be careful—using heavy compression with a fast release time can cause an unwanted pumping effect.
Slow Release
Slow-release speeds are great for smoothing out dynamic performances. They can also be used to push an instrument back in the mix, making it sound farther away from the listener.
However, if the release time is too slow, a compressor can suck the life out of your performance, making it sound dull and flat.
Definitions
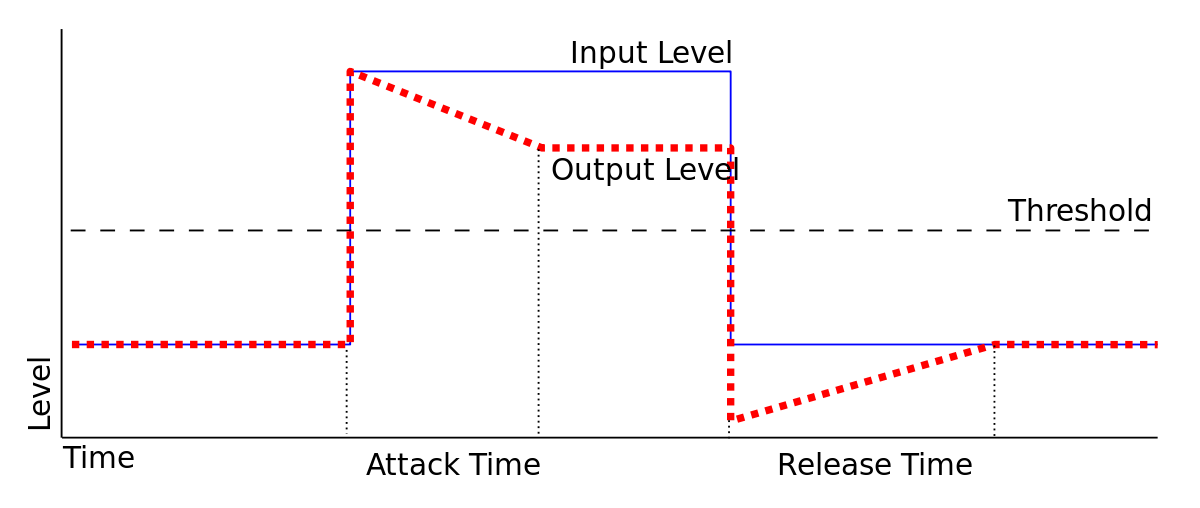
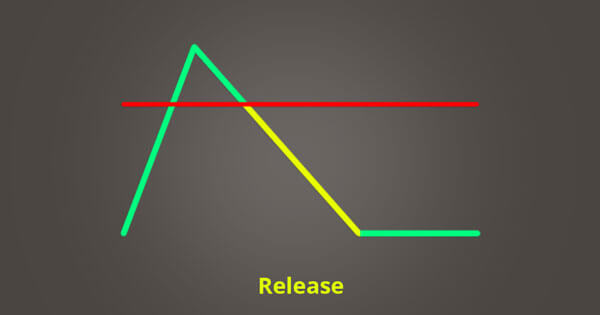
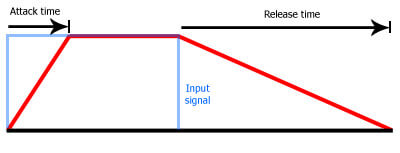
Attack time is the amount of time it takes for a compressor to fully apply gain reduction (or lower the level), mainly based on the compression ratio.
Attack controls how many milliseconds (ms) it takes your compressor to apply the full amount of compression to your audio signal once it goes over the threshold. A short (fast) attack time makes your compressor quickly apply the complete compression as soon as the signal crosses the threshold, which is usually good for taming sharp transients.
A long (slow) attack time causes your compressor to gradually apply the full compression once the signal passes the threshold. If the signal briefly peaks above the threshold and quickly drops back down, it might never get fully compressed.
Setting a long attack time lets your compressor ignore transients and focus more on the tail end of sounds, leaving the initial transients untouched.
Release time is the amount of time it takes for the compressor to bring the audio level back up to where it was before any compression started.
Release controls how many milliseconds (ms) it takes for your compressor to stop reducing the gain once your audio signal drops below the threshold. A fast release will make your compressor stop reducing the gain quickly as soon as the signal falls below the threshold. Using a fast release along with a fast attack is usually best for peak compression.
A slow release will make your compressor stop reducing the gain gradually after the signal drops below the threshold. Using a slow release helps keep the compression smooth and clear, and is usually best for long, sustained sounds like a bass guitar.
How to set the perfect attack and release times for a compressor?
Each frequency range benefits from having its own unique attack and release times. With a multiband compressor, you can assign completely different compressor settings—like threshold, compression ratio, attack, and release times—to each frequency band.
For example, if your multiband compressor has three bands (bass, mids, and highs), you can set three different compression settings, one for each band.
Mastering the attack and release settings, along with the others, is crucial for truly understanding compression. So, what exactly are compressor release and attack times? These are just two of the key settings to get right.
The challenge is figuring out how to choose the best attack and release times for each compression band.
There are some common guidelines used by professional audio engineers for setting release and attack times. One method is to base these settings on the song’s beats per minute (BPM).

What is an attack and what is a release? Attack and Release are two parts of the same control range—they determine how quickly the compressor starts (attack) and stops (release) reducing the gain of your signal.
You already know that when your signal goes above the threshold, the compressor uses the attack and release controls.
Attack and release settings decide whether the compressor hits full gain reduction immediately or more gradually. These are probably the most important settings for getting natural, musical-sounding compression.
If you set the attack too fast, you’ll squash your transients. If the release is too fast, you might get an unnatural pumping effect.
Make sure you have a clear idea of which parts of your sound you want to keep dynamic, and set your times to achieve that. Good compression starts with a plan for what sounds need which kind of processing.
Tip: Use a compressor’s VU meter to watch how the needle moves. Is it following the rhythm of the music? If so, you’re probably close to finding the right attack and release times.
There are other settings for controlling compression that I won’t cover here. However, once you truly understand these two settings, you’ll have a solid foundation for achieving effective compression.
Conclusion
Using a compressor can be tricky at times, especially when you’re adjusting the release and attack settings. The ideal release and attack times really depend on the specific signal you’re working with. You might find yourself experimenting with slower attack times, faster releases, or any combination in between.
Along with the threshold, ratio, and make-up gain settings, you can really make your signal stand out. Our advice is to always pay attention to the gain reduction meter and adjust the output gain accordingly. The goal is to keep the output level equal to the input level so that the overall volume stays consistent.
If you don’t use compression correctly, it can drain the energy from your signal, reduce its perceived loudness, and even ruin the sound. So, take your time when working with a compressor and don’t rush the process.
Check out our guides to learn more about each of these settings—they’ll help make things clearer. Use compression only when it’s needed to control your levels. Thanks for reading this article and for sharing it with others. The more people who see it, the more can learn something new!


[…] Reference: TheMixingTIps.com […]