What Is Audio Headroom
Introduction
Whether you’re an engineer or a musician, headroom is extremely important—not just for mastering, but also when buying an amplifier or recording songs at home. If you’re a musician or producer looking for clear information about headroom, you’ll find everything you need right here.
It’s widely recognized that if your mix’s master output has no headroom, there’s little room left for improvement. To make your music stand out today, you need a high-quality mix and master. Achieving the best results requires you to consider headroom at every stage of the production process.
Dynamic range and headroom are two crucial qualities of a great mix. Dynamic mixes have plenty of variation between loud and quiet sections, creating shifts in energy that keep things interesting. To preserve these important dynamics, it’s essential to optimize headroom during every step of your mix.
This article will give you everything you need to know about maintaining good headroom wherever it’s needed. Let’s get started.
What Is Audio Headroom?
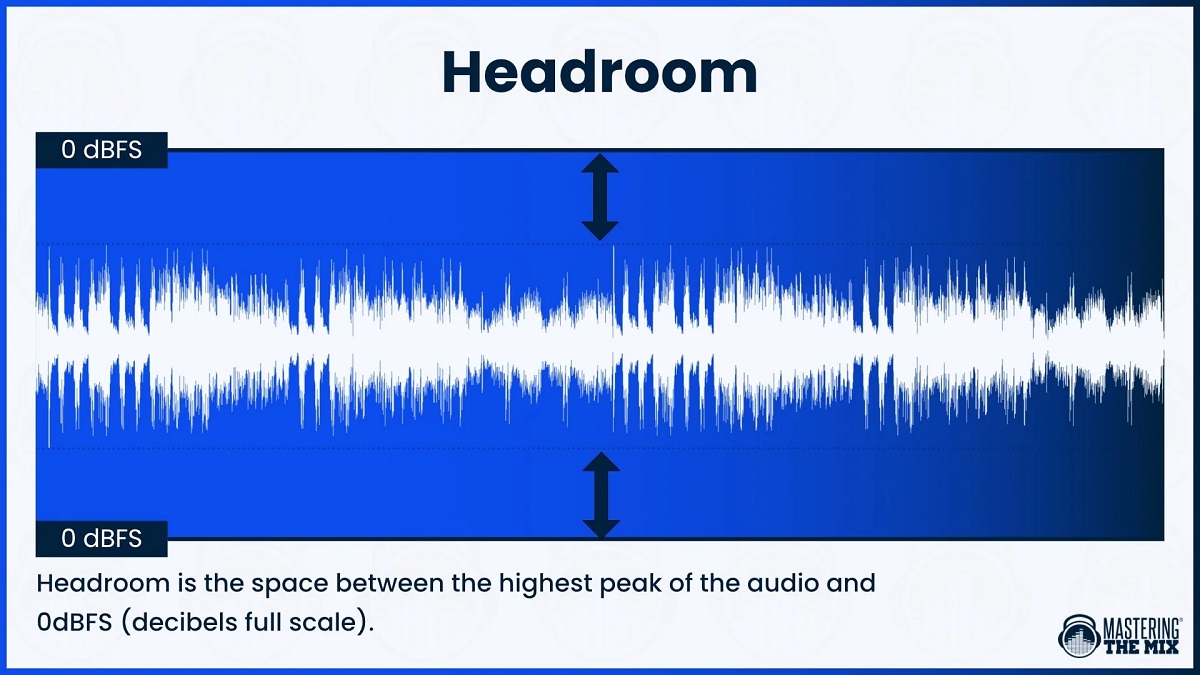
In audio engineering, headroom is the difference between the loudest peak level (the transients) and 0 dBFS (decibels full scale). This is essentially a space you leave unused, serving as your safety zone.
Headroom usually refers to the area between your highest peaks (transients) and 0 dB, not the space between the average signal level (RMS) of your track and 0 dB (which can still cause clipping). Many people get confused about this distinction.
Every recording medium has a limit to how loud a sound level it can record. If you go past this limit, the tops of your signal’s waveform get abruptly cut off. When this happens, parts of your audio are lost, resulting in harsh distortion and unpleasant artifacts.
Poor headroom can cause a problem called clipping. In your DAW, the channel meter will usually show 0 dBFS as the clipping point. The headroom is the space between your signal and this clipping point. The headroom above the nominal level is simply the difference between these two levels before any clipping occurs.
Headroom for Recording
The definition of headroom can still sound complicated, even when put simply. So, why does it matter, and why do we need it?
When you play any instrument—especially those that sense how hard you press—the volume changes with your playing. This not only lets you control the emotional feel of your performance but also gives you control over many other aspects.
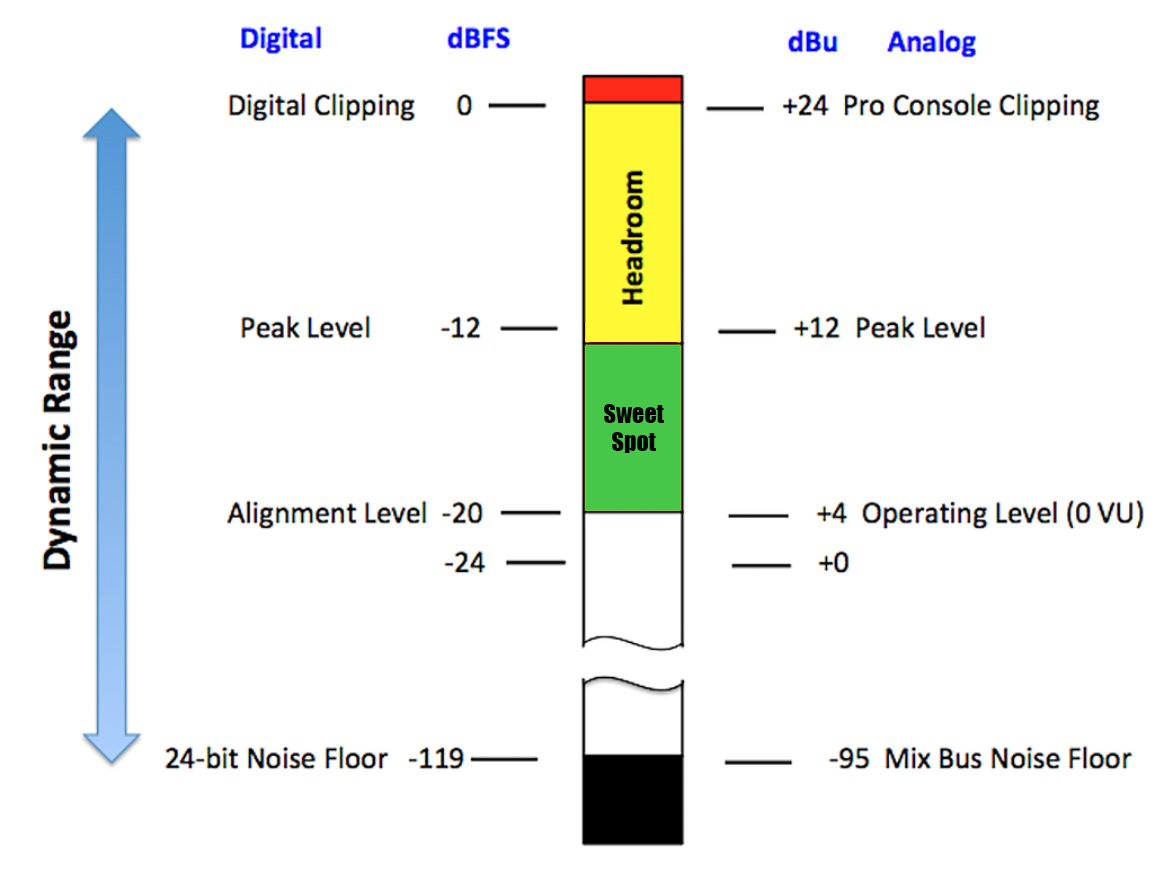
The main goal is to set your average recording volume at a “sweet spot” where you get the best quality recording. This way, as much detail as possible from your performance is captured.
If your recording level is below -18dB, the noise will be quieter; if it’s above, the noise will be louder. When you’re performing, it’s impossible to predict exactly how loud things will get. If you record at the highest possible level, you’re almost sure to get unwanted distortion (clipping) at some point.
By aiming for this “sweet spot,” you get the best sound quality for the longest time and leave yourself about 18dB of headroom—a safety margin in case things get unexpectedly loud. Performers with lots of dynamic range need even more, sometimes up to 30dB, so they won’t have to hold back or play less naturally.
Headroom for Mixing
There can be some confusion around the term “headroom” and phrases like, “make sure to leave some headroom.” What this really means is that your highest peaks shouldn’t be right up against the clipping point. In other words, don’t use up all the headroom that your system allows. But why is this important, and how do you actually do this when mixing?
First, let’s talk about why leaving headroom during mixing matters. If you start a mix with your peak levels already close to the clipping point of 0 dBFS, you can quickly back yourself into a corner.
Unwanted distortion can sneak in for a lot of reasons—maybe you bumped up the level, or maybe one part of the song just gets louder on its own. If you’ve already started automating levels or adding bus compression, the problem can get messy fast. To fix this, you can lower the master fader or pull down all the individual faders. The best solution, though, is to set your levels with plenty of headroom right from the start.
When you leave enough headroom while mixing, you can adjust the crest factor of your mix without worrying about clipping. Basically, the crest factor is the difference between your average and peak signal levels.
Headroom for Mastering
Headroom is a crucial part of audio production, even if it isn’t the most exciting aspect. Understanding what headroom means and how to measure it is very helpful for any engineer.
When it comes to the question, “How much headroom should I leave for mastering?” there are a lot of different opinions. Some mastering engineers say no headroom is necessary as long as the track doesn’t clip. However, this topic deserves a closer look—along with the mastering process in general—to fully understand what’s best.
Although the exact amount of headroom to leave for mastering is debated, a good guideline is to leave between 3dB and 6dB. This range gives the mastering engineer enough space to process your mix without causing clipping or distortion. If you want a louder master, you’ll probably need to use more compression.
As a result, your mix will have more controlled transients and a smaller dynamic range. With less dynamic range, your mix’s peak will be higher (around -3dB), which means that when the mastering engineer adds processing, there’s less risk of clipping. You can think of this as having a less dynamic mix that can be mastered louder without making things harder for the mastering engineer.
On the other hand, if you want your master to be quieter, it will usually have a wider dynamic range because there’s less compression overall. In this case, it’s a good idea to set your maximum peak to about -6dB, giving the mastering engineer even more room to work.
Your Equipment Headroom
Amplifiers don’t control power with their gain knobs. If you’re using a mono power amp, you can usually run it at full gain all the time (just like the monitors in your studio probably do). The input knobs actually control how much audio reaches the amplifier.
There is always full headroom, so the system can handle sudden transients whenever they happen. However, you have to be careful not to turn up the input level so much that you run out of headroom.
Unlike power amplifiers, loudspeakers don’t have much headroom. If you send them too strong a signal, the sound may get distorted or the speakers could be damaged. Modern powered speakers help protect themselves with built-in limiters that keep the signal level safe.
With passive speaker systems and separate power amplifiers, you can run into problems because the speakers and amps in analog setups don’t communicate with each other.
Room for Breathing in a Dynamic Mix
To achieve a great mix, it’s essential to start with a dynamic production—one where the energy changes throughout the track. It’s highly recommended to resist the urge to reduce headroom by pushing the faders higher, or worse, by adding a compressor or limiter to the main bus just to increase volume.
You might need to experiment a few times before you can consistently leave enough headroom in your workflow. The reward will be a much better mix. Your mastering engineer will also get better results if you provide a mix with plenty of headroom! The best way to keep your mix breathing is to make sure your levels stay below 0 dBFS.
With this much headroom, the mastering engineer can create a dynamic master without relying on heavy compression or limiting. Remember, your mix doesn’t have to be loud to sound loud—achieving that final loudness is mostly handled in mastering.
Tips To Keep Good Headroom
It’s a good idea to lower the volume of your tracks. Doing this is the easiest way to solve the headroom problem. Despite this simple fix, not many people follow this advice. By simply turning down your tracks in your digital audio workstation, you can instantly increase headroom and clarity.
If you think about headroom from the very start, you’ll face fewer surprises later on. Turning down all your tracks before you start mixing will help you finish your mixes faster and get better results.
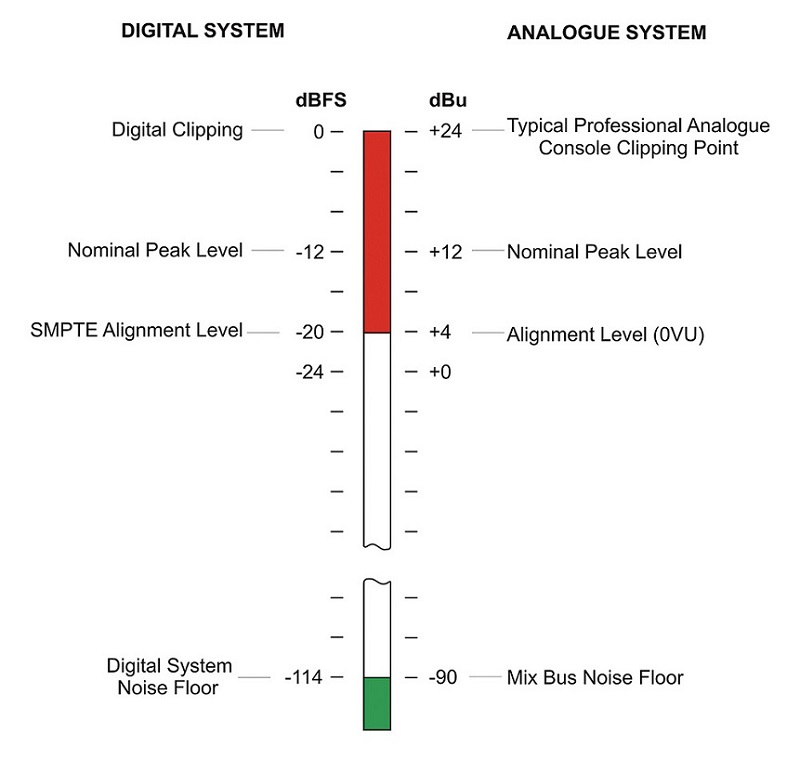
When digital audio first started to replace analog, many engineers kept their old habits. In the analog world, you had to record the input signal as loud as possible to keep it above the noise floor—especially when recording to tape. Even in 16-bit digital formats, recording too quietly could introduce a noticeable noise floor if you had lots of tracks.
But with 24-bit resolution, these issues are solved. The noise floor is so low in 24-bit that you won’t lose resolution or have a noise problem. This means you can safely leave yourself plenty of headroom—about 15 to 20 dB—between your peaks and 0 dBFS.
Make sure to control the transient-heavy elements in your mix. It’s generally best to use gentle, effective compression to keep dynamics under control. This approach will make the mastering process easier and help you avoid harsh limiting at the end. Instead of applying a lot of compression at once, use small amounts throughout the mixing process.
You might also wonder how to measure headroom. When someone asks for a certain amount of headroom on a master, it’s usually measured in dBTP, or dB True Peak. This measurement doesn’t just look at the signal’s peak—it also checks for peaks between the digital samples. In other words, dBTP is based on the amplitude between samples within your audio signal.
Conclusion
Gain staging and headroom go hand in hand. Take some time to learn about gain staging so you can create proper headroom and let your track breathe. Once you understand this process, you shouldn’t have any issues moving forward, and your tracks will sound just right.
Remember, don’t worry if your mix sounds a bit quiet—that’s what the mastering engineer is there for. If you deliver a well-leveled mix, they’ll have no trouble making it sound loud and polished on any audio system.
If you have any questions about what we’ve covered here, feel free to ask in the comment section below. We’re always here to help!