Studio Monitor Placement
Introduction
Studio monitors are the best tool for spotting flaws in a mix. However, simply owning a pair doesn’t mean much on its own.
While studio monitors are better for music production than consumer speakers like hi-fi systems, it’s important to think about the room where you’ll use them and how you’ll position them on your desk.
A great set of speakers can make anything sound good, but studio monitors are built to reveal the imperfections in your mix. Still, poor room acoustics and sound reflections can make it hard to hear those flaws, even if your monitors are set up correctly.
For this article, let’s assume your room acoustics are already taken care of and you’re now ready to set up your monitors and start mixing.
If your room isn’t acoustically treated yet, you can check out articles on our website about DIY acoustic treatment units and tips for placing them to properly treat your room.
Why Placement is Important
The importance of creating a good listening environment cannot be overstated. Proper placement of your studio monitors is crucial for making mixes that sound great on any speaker system.
Positioning your monitors correctly allows you to hear your music accurately. On the other hand, placing your monitors incorrectly can cause problems with your room’s frequency response.
A poor listening environment will prevent you from hearing your music as it truly is, which can lead to bad mixing decisions. To get the best results, keep these tips in mind when setting up your studio monitors.
Keep in mind that not all studios are the same, so some best practices may not apply in every situation. However, these tips are a great starting point for creating a comfortable and accurate listening environment.
1. Room Dimensions
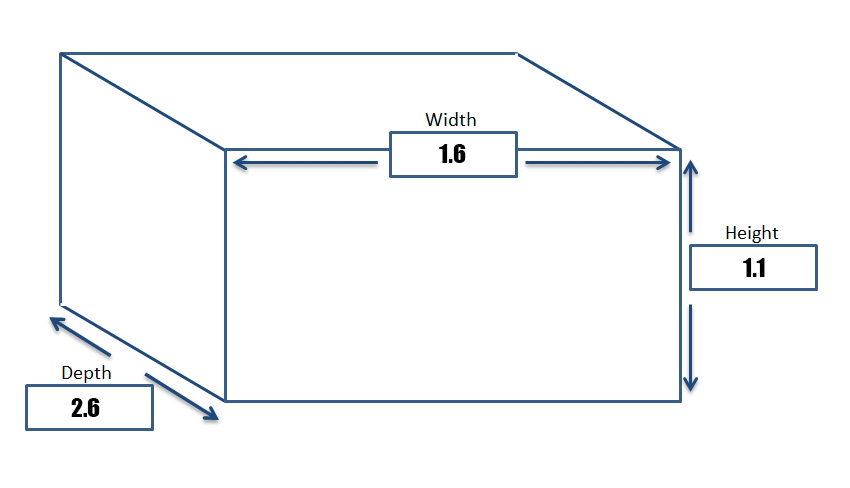
There is a lot of debate about what the ideal room size for recording studios should be. Generally, bigger rooms are better, but you don’t need a huge space to get good results. A room with acoustically pleasing proportions uses the Greek Golden Mean ratio of 1:1.6:2.6 (height x width x length).
According to the “golden rule” for studio dimensions, if you have an 8-foot ceiling, the ideal room size would be 8 feet tall, 13 feet wide, and 21 feet long. Larger rooms give sound waves more space to travel, which helps create a more controlled environment and allows the sound to settle naturally.
Small rooms can have problems with standing waves, wall reflections, and low frequencies. Standing waves happen when sound bounces off the walls and reflects back into the room. You can read more about standing waves in this article here.
These issues can make certain frequencies sound louder or softer, and can also make the room sound “boomy” or “dead.” That’s why acoustic treatment is especially important in smaller rooms.
This advice is especially helpful if you’re building a mixing room from scratch. Figure out the average size you need for your equipment, then use the golden rule formula or a room calculator to shape your space for the best sound.
2. Find Your Listening Position
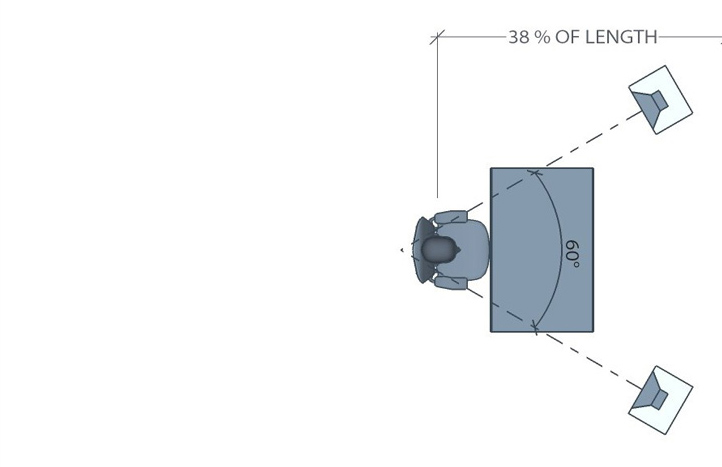
Divide your room vertically into three equal sections: the front, the center, and the rear. For music production, your listening setup should be located in the front section. Position your monitors so they are aimed directly at your listening spot.
Standing waves, or room modes, are resonances that occur between surfaces in a room. When these resonances happen, there is a point of maximum sound pressure near the surfaces. To avoid these problem areas, place your listening position at least one meter away from any wall.
Arrange your listening setup symmetrically from left to right. Always position your monitors so they are facing you. To minimize issues caused by sound reflections, it helps to raise your monitors above the floor.
However, at low frequencies, you should avoid placing your speakers at exactly half the height of the room, since ceilings are also usually reflective at these frequencies.
One more important tip: avoid setting your mixing position at the exact center of the room. This is where all sound waves converge, resulting in muddled sound. Since every reflected and direct sound meets at this spot, it’s best to keep your mixing position away from the room’s dead center.
3. Monitor Positioning Angle
When it comes to placing studio monitors and speakers, the angles you use are one of the most important factors. Properly angling your speakers can greatly improve the accuracy of your mix, helping it sound much closer to what you’re aiming for.
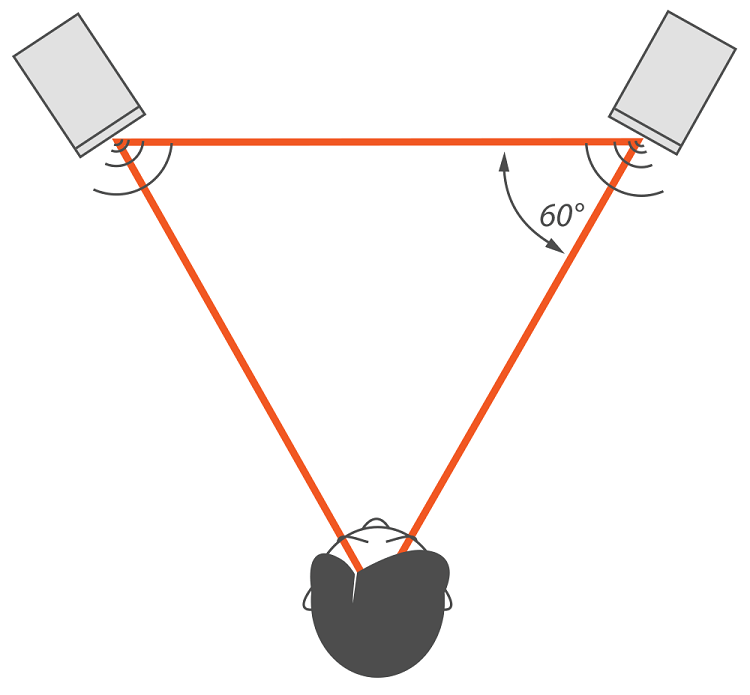
The 60-degree rule says that your speakers should be positioned so that they form a 60-degree angle with each other, creating an equilateral triangle with your listening position. Setting up your speakers this way ensures coherency—meaning the sound waves from both speakers reach your ears at the same time and place.
Sometimes, angles between 30 and 90 degrees are used to spread the sound more widely. However, a 60-degree angle is generally best for achieving an accurate mix. It’s also important to get the listening distance right when angling your studio monitors. The speakers should be just outside the first reflection point of your head to be most effective.
By following these guidelines, you’ll make sure your speakers—and therefore your mix—aren’t affected by delays or unwanted reverb. Setting up this primary listening point is crucial for both your mix and the sound you hear from your monitors, giving you all the benefits your speakers have to offer.
4. Height of the Monitor Spot
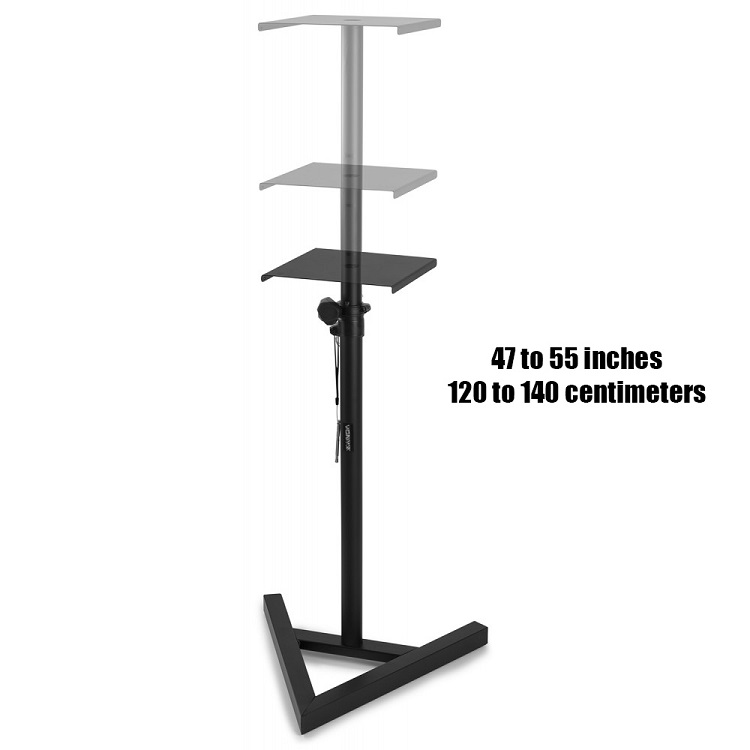
It’s recommended that your studio reference monitors be positioned at least 47 inches (120 cm) above the floor. If you need to angle your tweeters slightly away from being directly in line with your ears, make sure not to place them right in the center of the room.
Free-standing studio monitors without a tilt-down function are usually set between 47 and 55 inches (120 to 140 cm) high. When you’re in your listening position, the tweeters from both the left and right speakers should aim directly at your ears.
If you really want to tilt your speakers toward your listening position, keep them at least 15 degrees off vertical. Remember, your frequency response will change as you move forward or backward with tilted speakers, so keep this in mind when you move around while mixing. Every movement can give you a slightly different impression of your mix.
In recording studios with flush-mounted main monitors (that aren’t tilted down), the midrange drivers are usually set between 57 and 58 inches (145–148 cm) above the floor. This setup ensures that people can be in the sweet spot whether they’re sitting or standing, as long as the speakers are mounted vertically.
Many people believe that speakers should be placed exactly at ear level, but we actually recommend positioning them a bit higher. There are plenty of sources supporting this approach, and even some of the most respected acoustics engineers follow this method.
5. Space Behind The Monitor
Is your monitor not producing enough bass? The distance between your speakers and the room walls can have a big impact on bass performance. Low-frequency speakers are usually omnidirectional, meaning bass waves travel in all directions and can create a rumbling mess.
As bass waves move backward from your speakers, they hit the wall in front of you and bounce back. When these reflected sound waves combine with the sound coming directly from your speakers, you get acoustic interference.
At certain frequencies, if your speakers are placed one-quarter wavelength away from the wall, wave cancellation can occur. This can cause a big dip, notch, or null in your frequency response, making your bass sound terrible.
We recommend using room calculators to help you find the best spots for your speakers and your listening position. These calculators will also help you figure out the ideal distance between your speakers and the rear wall, giving you the best possible sound.
It’s always a good idea to place your monitors at least 1 or 2 feet away from the rear wall (less than a meter). If your room allows for this setup, go for it. Another helpful tip for reducing bass muddiness is to choose speakers with front-facing bass ports.
5.1 Avoid Wall Monitor Mounts
Mounting studio monitors directly on a wall is not recommended. Walls can introduce extra reverberation, distort certain frequencies, and even cancel out important elements of your music. You won’t get crisp, clear sound if your monitors are too close to a wall. It’s important to leave some space between your monitors and the walls.
The main issue with wall-mounted monitors is that they tend to exaggerate low-frequency sounds. This often leads to overestimating the amount of bass in your mix—an easily avoidable problem if you keep your monitors off the wall.
If you’re working in a small room with padded walls and minimal acoustic problems, you can place your monitors 1 or 2 feet away from the walls. However, this is really the minimum distance you should allow if you want to avoid negatively affecting your monitor’s sound quality.
5.2 Try Monitor Stands
If you place your speakers directly on your desk, you might not get clear, balanced audio. This is because sound waves from the speakers bounce off the hard, reflective surface of your desk before reaching your ears. The desk—and any surface your monitors sit on—also absorbs vibrations from the speakers.
Loose screws can start to rattle, and other subtle noises may crop up, making your audio less clear and mixing more difficult. Your desk probably has a resonant frequency, too. As you turn up your monitors, the desk can start to vibrate in sympathy, boosting certain frequencies and coloring your sound.
Most speakers also end up below ear level when set on a desk, which isn’t ideal. Monitor stands help by raising your speakers closer to ear height and reducing early reflections. However, if you’re limited on space or budget and can’t use traditional stands, you might need to keep your speakers on your desk.
Conclusion
To sum up, how you position your monitor speakers in your mixing studio has a big impact on your audio quality. Make sure to keep your monitors away from walls and corners to avoid unwanted reflections and resonances that can harm your sound.
Also, position the tweeter of your monitor at ear level or slightly above by adjusting the height. Listening from this spot ensures you hear higher frequencies clearly and gives you the best listening experience.
Don’t forget to consider your room’s acoustics when setting up your speakers. You might need to use acoustic treatment to reduce unwanted reflections and standing waves that can negatively affect your audio quality.
Overall, taking the time to set up your monitors properly can greatly improve your audio output. Feel free to reach out if you have any questions about this topic.

