Microphone Specifications
Introduction
Microphone specifications are created to help users better understand each microphone and its features. By looking at a microphone’s specs, you can learn about its basic functions and how it will work with your equipment. Knowing how to interpret these specifications is important.
While there are some similarities, specs can be measured or calculated in different ways. Also, technical terms might mean slightly different things depending on the brand, which can make comparing specs tricky.
Different microphones offer different features based on their specifications. This article will give you an overview of what each microphone specification means. Let’s start by looking at the most important specs you should consider when choosing your microphone.
1. Frequency Response Curve
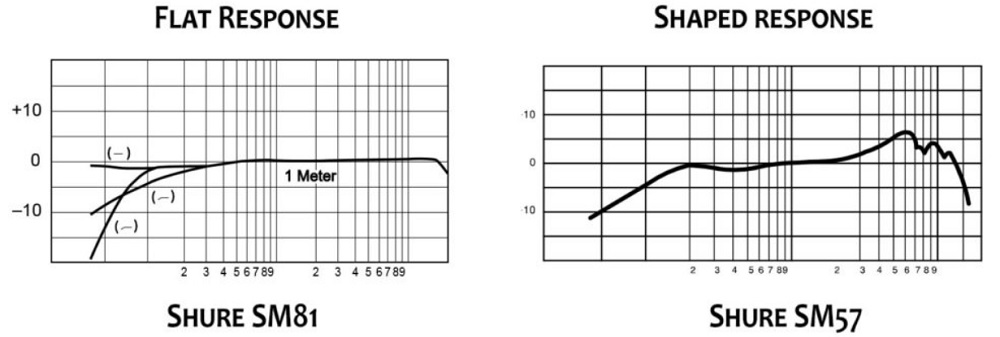
A microphone’s frequency response graph shows how accurately it reproduces the sounds it receives. Ideally, a microphone would capture and convert sounds into electronic signals perfectly, resulting in a one-to-one reproduction. In reality, though, some sound vibrations are lost during recording, and not all information makes it through.
Frequency response graphs help you visualize how well a microphone captures different sounds. If a certain frequency comes out a bit weaker than it went in, you’ll see a dip in the graph. If it is reproduced a bit stronger, you’ll notice a slight bump.
Once you know which products you like or dislike and have their frequency response charts, you can compare them to other options and gain a lot of insight. This knowledge helps you choose the best microphones for specific sound sources and guides you in editing the sound after you’ve picked your mic.
2. Microphone Polar Patterns
Polar patterns show which areas around a microphone are most sensitive to sound. You can even visualize these patterns in three dimensions. The polar pattern of a microphone plays a big role in determining the best way to use it.
To get the best results from your recordings, it’s important to understand the basics of polar patterns. Each pattern provides different levels of sensitivity depending on where the sound is coming from.
By selecting the right polar pattern, you can reduce unwanted sounds from bleeding into your recording, control how much room sound you capture, adjust the frequency response, and manage the proximity effect. All of these things can be achieved simply by choosing the appropriate pattern.
Imagine the microphone is surrounded by a 360° field. Its maximum sensitivity is at 0°. In polar pattern graphs, circles with smaller diameters indicate a 5 dB decrease in sensitivity.
Most of the time, you’ll use cardioid microphones. These mics work well for most common situations. They’re perfect for recording monologues, solo podcasts, online interviews, and are also the best choice for lead singers.

3. Microphone Sensitivity
Sensitivity refers to how much output a microphone produces from a given amount of input. When choosing a microphone, sensitivity is only important to a certain extent. Generally, a microphone with higher sensitivity will give you a louder signal.
However, in most cases, microphone sensitivity doesn’t matter much because you’ll be using a preamp anyway. If you’re using a USB microphone, it already has a built-in preamp. This means that no matter how sensitive your microphone is, you can adjust the output volume using a preamp. So, even microphones with lower sensitivity can achieve the same output level.
Sensitivity only becomes important if your preamp can’t provide enough gain for your microphone. In this case, your audio will be quiet and you’ll need to boost it in post-production. Still, this problem can be fixed with the right equipment.
Condenser microphones are usually very sensitive, so sensitivity is rarely an issue with them. Even low-budget audio interfaces with built-in preamps can give condenser microphones more than enough gain. On the other hand, dynamic microphones need much more gain than condensers. Some preamps can’t provide enough clean gain to support dynamic microphones properly.
4. Self Noise
Self-noise is a characteristic that mainly affects condenser microphones. Dynamic microphones, on the other hand, do not generate self-noise. Essentially, self-noise measures the inherent noise produced by a condenser microphone itself.
A microphone’s volume is determined by the volume it generates on its own. Because microphones are relatively complex electrical devices, they naturally emit some sound in any environment. However, it is always preferable for the device to produce as little sound as possible.
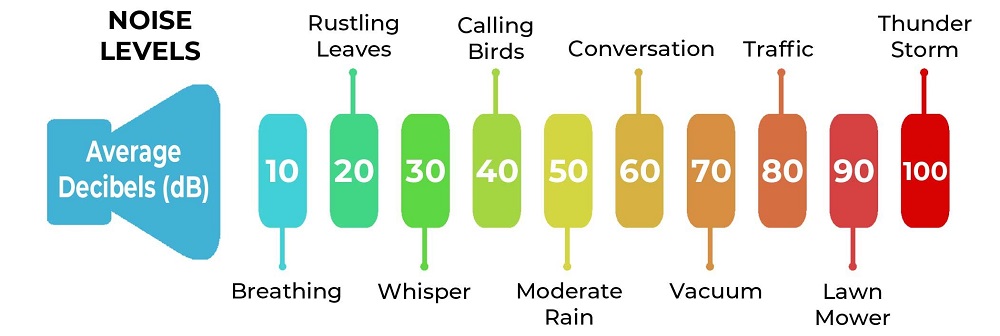
A noise level below 20 dB-A is considered excellent, while anything under 15 dB-A is outstanding and typically indicates a high-quality microphone. The signal-to-noise ratio (SNR) is another way to describe how much noise, or quietness, comes from the microphone. By comparing the signal’s loudness to the self-noise (measured in dB), you can accurately assess the microphone’s performance.
Condenser microphones generally have higher self-noise than dynamic or ribbon microphones. However, the self-noise of dynamic and ribbon microphones is so low that it is rarely specified.
Unlike dynamic or ribbon microphones, a condenser mic’s output is much greater than its own (thermal) noise. This means that for quiet sound sources, condenser microphones still offer a favorable signal-to-noise ratio.
5. Decibel Scale
Human hearing is measured using the decibel (dB) scale, which is based on a logarithmic system. This means that each step on the scale represents equal-sized increments to our ears, even though the numbers themselves are not evenly spaced. Most microphone specifications also use the decibel scale for this reason.
Logarithmic scales are common because our senses—including hearing—respond in a logarithmic way. On such a scale, each step involves a fixed ratio rather than a fixed difference. This allows us to perceive changes more naturally.
With the decibel scale, the smallest change people can usually notice is about 1 dB. A change of 3 dB is clearly audible. In terms of how loud something sounds, a difference of 10 dB is generally felt as “twice as loud” or “half as loud.”
Overall, the steps on the decibel scale are perceived as being roughly equal in size. In everyday life, the highest dB number you’re likely to encounter is around 200 dB, and these numbers typically start with the digit 1.
The dB scale is a relative scale, which means it measures changes rather than absolute values. A change of 0 dB means there’s no difference. A positive dB value means an increase, while a negative dB value means a decrease.
To make decibels an absolute measurement, a reference value is used. For example, sound pressure level uses a reference of 20 micropascals (µPa). This means that 0 dB actually represents a sound pressure of about 20 µPa, which is the threshold of hearing at mid-frequencies.
6. SPL
A microphone’s SPL (maximum sound pressure level) specification tells you the loudest audio signal it can handle without distorting the sound. Generally, as long as you’re not trying to record something extremely loud—like a nearby explosion—anything above 120 dB should be enough.
When inspecting a microphone, it’s important to check the SPL at which something called Total Harmonic Distortion (THD) occurs. THD refers to slight changes in the recorded audio compared to the original sound source. This is usually measured as a percentage (often 1% or less—the lower, the better) and shows that at this SPL, only very small amounts of distortion are present.
7. Impedance
The output impedance of a microphone is one of its most important characteristics. This measurement, as seen from the microphone, indicates its AC resistance. Generally, microphone impedance falls into three categories: low (50 ohms to 1,000 ohms), medium (5,000 ohms to 15,000 ohms), and high (20,000 ohms and above).
A microphone line matching transformer is designed to match the low-impedance output of a microphone to a high-impedance input (such as 50,000 ohms). To ensure a low-impedance and balanced connection, the microphone cable should be kept as short as possible and positioned close to the electronic input.
A high-impedance microphone should not be used with a long cable. Any distance longer than about 20 feet will result in a loss of high frequencies and a decrease in output level. However, using low-impedance microphones and cables allows you to run longer cable lengths without experiencing significant signal loss.
Low-impedance microphones are commonly used in professional settings. Most professional microphones have output impedances between 50 and 500 ohms, though some may fall outside this range. In general, it is best if the output impedance of the microphone is much lower than the load impedance (ideally, one-tenth or less).
Conclusion
It’s very important to know the specifications of any microphone you plan to buy, so you can be sure it will meet your needs. Most microphones—whether they’re condenser, dynamic, ribbon, or another type—come with a specification sheet or manual where you can easily find these details.
Each of these specs highlights a different aspect of the microphone’s performance, helping you understand its capabilities and make the right purchase decision.
If you have any other questions about the microphone specifications we’ve covered here, please let us know in the comments. We’re here to explain further and help you out!