How To EQ Snare Drum
Introduction
Snare drums are often one of the trickiest elements in a drum kit for music producers—no matter the genre. Since the snare is a key part of both the drum set and the overall song, getting it to sound just right is essential.
When we analyze other tracks, we always pay close attention to how the snare drum sounds and how it’s EQ’d. Alongside other processing techniques, EQ is especially important because it shapes the frequencies and gives the snare its final tonal character.
In this article, we’ll focus specifically on EQing snare drums and how to shape your snare sounds to fit your style. We’ll cover the basics, along with some extra tips to help you achieve a great snare drum sound. Let’s dive into mixing!
Cleaning the Snare Drum
Subtractive EQ Settings
In the frequency spectrum, using subtractive EQ helps give snares a clearer sound and allows them to take up more space. This makes room for other instruments to fill in the frequency ranges where snares aren’t as dominant. You don’t need any fancy tools for this—any transparent third-party plugin will work, including your DAW’s stock EQ.
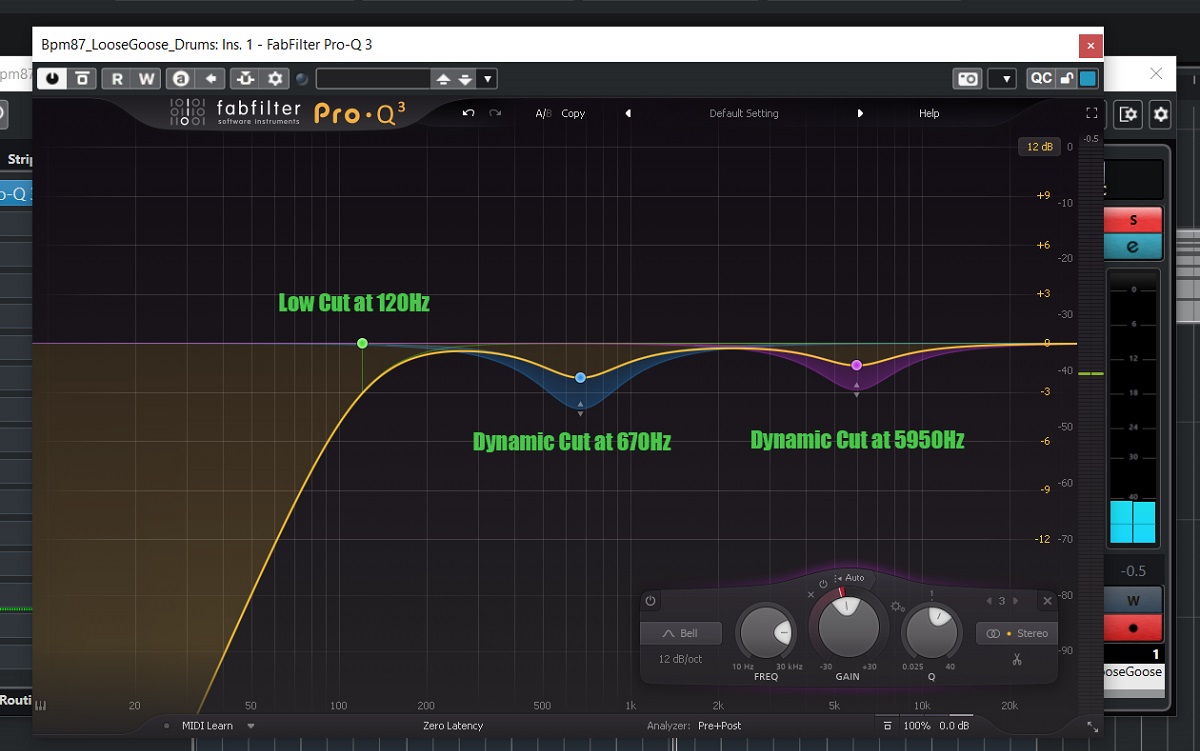
Most of the time, the first step is to remove any rumble. If you want to cut out frequencies below 120Hz, set up a high-pass filter (HPF). However, many snare samples already have these low frequencies removed, so adding an HPF might just introduce unnecessary phase shift.
Snare drums often sound boxy, especially when recorded live. This boxiness is usually caused by midrange frequencies. To fix this, try reducing frequencies between 500 Hz and 800 Hz. Once you cut enough of these problem areas, the bass and other instruments should start to sound clearer. Boxiness is a bigger issue in live recordings, while it’s less common in samples.
Sometimes, a snare can sound harsh or have an annoying ring. To fix this, try reducing frequencies between 4kHz and 8kHz. Sweep around this range until you find the sweet spot. If the issue is a ringing sound or the snare feels too dark, use a dynamic EQ instead of a static one for better control.
Additive EQ Settings
Once you’ve removed any unwanted frequencies from your snare, you might want to add some compression—if necessary—before enhancing the sound further. At this stage in mixing snares, consider using EQ plugins to add color, or, if you have access, try an EQ hardware unit. Many hardware emulation plugins add a bit of natural saturation, which can help your snare cut through the mix.
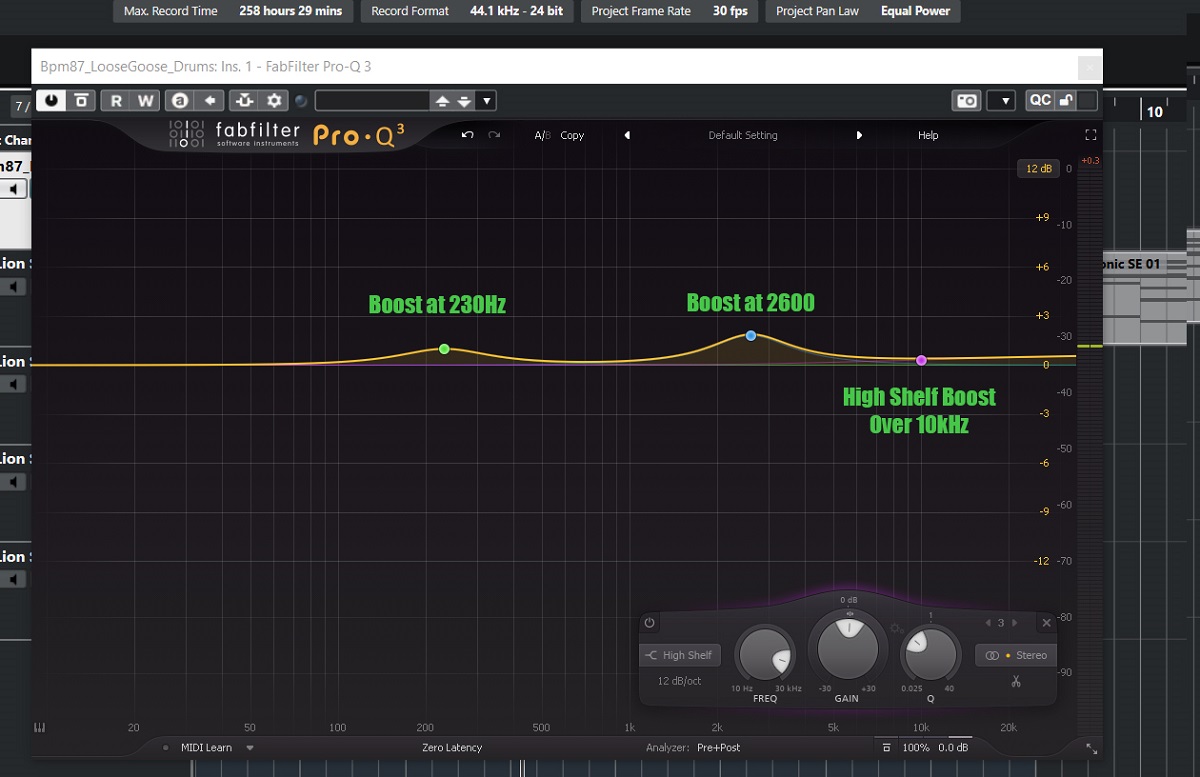
If your snare sounds too thin, try boosting frequencies around 150Hz to 250Hz. This will give the snare a warmer, fuller sound. Be careful not to overdo it, as too much boost in this range can mask the bass and make the mix sound boomy.
Look for an equalizer that can boost these frequencies. If it has a stepped and dedicated band in this range, that’s even better—these types of EQs often add some natural warmth.
To add punch and clarity, boost the frequencies between 1.5kHz and 4.5kHz. This helps the snare stand out in the mix, making it more present. Just be careful that this boost doesn’t mask the vocals or guitars. For best results, use a small, wide boost rather than a narrow one.
If your snare sounds dull or dark, try boosting around 7kHz to 10kHz to brighten it up. This will improve the definition of the snare and make it more noticeable in the mix. Experiment with both shelf and bandpass filters to see which one sounds best for your particular mix.
Check for Phase Issues and Tuning Accuracy
Before you start EQing, your first step should be to figure out whether the snares were recorded live or are samples. If you’re working with live snare recordings, always check the phase first. Phase cancellation can make your snare sound weak and lack punch, so this is an important step you shouldn’t skip.
Phase issues aren’t limited to live drums—you can also run into phase problems when layering different snare samples to create a bigger sound. Make sure to check the phase relationship between all your layered snares to ensure they’re working together, not against each other.
Some producers question whether tuning drums is worth the effort, thinking it’s too time-consuming. In our experience, though, tuning drum sounds actually saves time in the long run. When your drums are in tune, they fit together much more easily, and you won’t waste hours searching for samples that work well together.
Of course, experience is key in this process. The more projects you complete, the better you’ll understand what to listen for when choosing the right kick or snare samples. You’ll also develop a deeper understanding of the genre you’re working in, which will help you make better decisions.
A common mistake for beginners is to pick the loudest or heaviest kick or snare and stick with it no matter what. But with a bit of practice, you’ll quickly learn to tell—just by listening—whether your drums are working well together. In the video below, you can see how to tune your snare so it matches the song you’re working on.
Saturating for Shaping Final Frequencies
You can add warmth to a snare track by gently applying distortion. In this case, you don’t want the distortion to be obvious—instead, use it to thicken the snare and soften its transients.
The best way to do this is with parallel processing. Just like with other parallel effects, you can put a saturation plugin on a duplicate of the snare track, on an aux send, or use the dry/wet knob right on the snare track itself. For this technique, you’ll probably want to keep the effect level pretty low. Experiment with each method to see what works best for your mix.
Choose a plugin that can emulate both solid-state and tube analog saturation, and that works well for “fattening” a snare. This technique is very effective: blending in a slightly distorted signal with the dry snare track will subtly soften the transients and add extra body to the snare’s frequency spectrum—something you can’t achieve with EQ alone.
Conclusion
When it comes to snare EQ settings, cutting and boosting frequencies, and some extra tips for shaping your frequency curve, this article has you covered. The same goes for the kick drum, but that will be a separate article since snare and kick drums have different frequency ranges.
There’s no need to add extra words just to make this guide longer—everything you need to know about EQing the snare is right here. By following these tips, you’ll achieve a punchy, rounded, and true snare sound. We’ll cover other processes in future articles, so stay tuned!
If you have anything to add or notice something we missed, please let us know in the comments. We’re always happy to listen, elaborate, and update!