What is Sample Rate, Bit Depth, and Buffer Size
Introduction
This blog post is going to be straightforward. We’re going to talk about sample rate, bit depth, and buffer size—and how to set them correctly for your project. Getting these settings right from the start will put you on solid ground and give you a strong foundation to build on.
You should sort this out before doing anything else in your DAW. If your DAW lets you, set these as the default for every project so you don’t have to adjust them every time.
We know this can be confusing if you’re new to audio engineering. But after reading this, everything will be clear and easy to understand. We won’t waste your time with fluff; we’ll get straight to the point so you know exactly what to do. Let’s dive in and start from the very beginning.
What is Sample Rate?
The main term we often hear about is the sampling rate or sampling frequency, which both mean the same thing. Some common values you might have come across are 8kHz, 44.1kHz, and 48kHz. But what exactly is the sampling rate of an audio file?
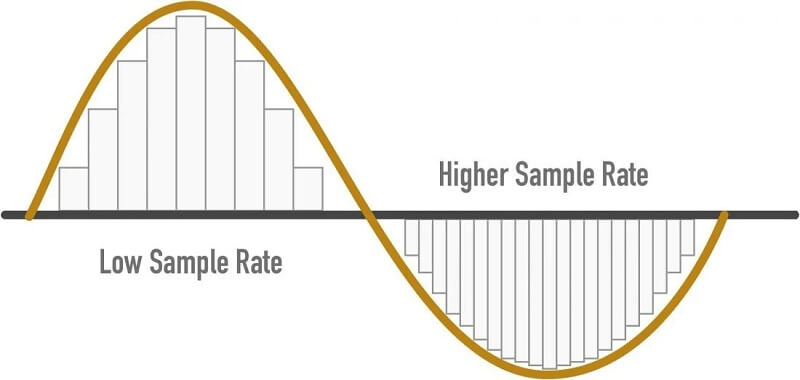
The sampling rate refers to the number of audio samples recorded every second. It’s measured in samples per second, or Hertz (abbreviated as Hz or kHz). An audio sample is simply a number representing the value of the acoustic wave at a specific point in time.
It’s important to note that these samples are taken at evenly spaced intervals in time. For example, if the sampling rate is 8000 Hz, it’s not just about having 8000 samples in one second; each sample must be taken exactly 1/8000 of a second apart. In this case, 1/8000 of a second is called the sampling interval (measured in seconds), and the sampling rate is just the inverse of that.
For audio, the minimum number of samples per second needed to clearly represent speech is 8000 Hz. Using a lower rate can result in speech that is hard to understand for several reasons, including the fact that similar sounds may not be distinguishable from each other.
The most common sampling rates are 8kHz (often used for phone calls), 44.1kHz (standard for music CDs), and 48kHz (typical for movie audio tracks). Lower sampling rates mean fewer samples per second, which results in less audio data since there are fewer points to represent the sound.
Stick to the most common sampling rates: 44.1 kHz or 48 kHz. If you’re mainly working on music production, 44.1 kHz is the standard choice.
However, if you plan to work with video, 48 kHz is usually better. Almost all video cameras record audio at 48 kHz, so recording at the same sampling rate will help keep your audio in sync.
What is Bit Depth?
Bit depth is measured in binary digits (bits). With each increase of 1 bit, the accuracy of the recording doubles. The bit range is an important factor that determines the overall quality of a recording.
If the bit depth is too low, the recording won’t be accurate, and many quiet sounds will be lost. For example, MP3s in your music library that were converted from analog audio to digital signals using pulse code modulation (PCM) with a high bit depth will have a wider range of frequencies than those encoded with a low bit depth.
Bit depth is directly related to the dynamic range of a PCM signal. Lossy compression audio formats, however, do not use bit depths in the same way. Pulse-code modulation (PCM) is the standard method for digital audio in computers.
To create a digital version of a sound, the amplitude of an analog signal is sampled at regular intervals (a higher sample rate means shorter intervals). Each sample is then quantized to the nearest value within a certain range, and the number of possible values in this range is determined by the bit depth.
Simply put, every bit represents 6dB of dynamic range. So, 16-bit audio gives you 96dB of dynamic range, 24-bit gives you 144dB, and so on.
A bit depth of 24 is more than enough room to record quietly and then increase the signal level in your DAW without adding noise. At 16-bit, you might need to record at a higher level, but it’s generally recommended to use 24-bit for most recording sessions.
Bit Depth: 32-bit Float
If you export a 32-bit floating point audio file, any peaks above 0 dB will likely be preserved in the exported file. However, if you try to play back this file through your audio interface, your 24-bit fixed-level D/A converter won’t be able to reproduce any audio information above 0 dB, so that data will simply disappear during playback. This doesn’t mean the information is missing from your digital file—it’s just that your D/A converter can’t reconstruct signals above 0 dB in the analog world.
If you send a 32-bit floating point file that peaks above 0 dB to your mastering engineer, they can simply reduce the level after importing it into their DAW. The main advantage of exporting 32-bit floating point audio files is that you can send your tracks to a mastering engineer without needing to apply dither to your audio files.
To be clear, 32-bit floating point audio files aren’t meant for distribution. They’re mainly intended to help you maintain the highest possible audio quality when sharing files with an artist or engineer you’re working with online.

What is Buffer Size?
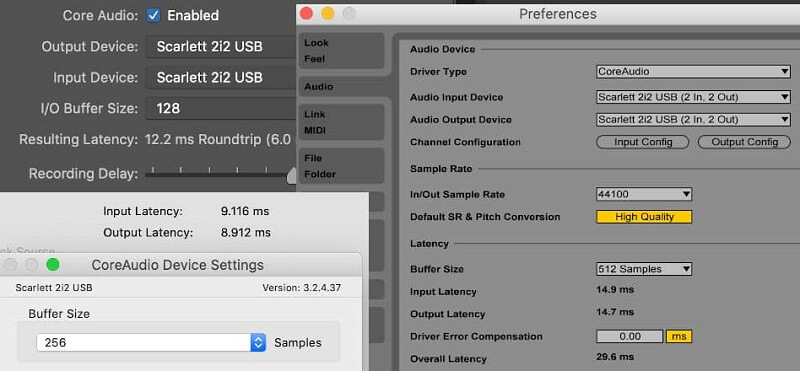
Buffer size determines how quickly your computer’s processor can handle the input and output of data. When your buffer size is set lower, your computer processes information faster, but this uses more system resources and can put a heavy load on the processor.
To use fewer system resources, you can increase the buffer size, which lets the processor handle information more slowly. This is helpful when you experience latency—a delay in processing audio in real time. You can reduce your buffer size to decrease latency, but this puts more strain on your computer and can lead to glitchy audio or dropouts.
If you’re adding more audio tracks to your session, you may need a larger buffer size to record the signal accurately, without distortion and with minimal latency. Increasing the buffer size gives your computer more time to capture audio cleanly.
When recording, set the buffer size as low as possible to reduce latency. If you start hearing clicks and pops, or if your DAW gives you an error, either raise the buffer size or reduce the number of effects plug-ins or audio tracks in your project.
When mixing, latency isn’t as important, so you can set the buffer size to its highest setting. This lowers the chance of hearing clicks and pops while you add more effects plug-ins.
A good buffer size for recording is 128 samples, but you can usually raise it to 256 samples without noticing much latency. You can also lower it below 128, but some plug-ins and effects might not work in real time.
Conclusion
We believe we’ve covered all the important points about the three topics discussed here. All the key information you need to follow is highlighted in bold, so you won’t miss anything critical. We hope this helps make things easier for you and that you now have all the basics covered.
If you have any questions about the topics, please let us know in the comment section below. We’ll be happy to explain or provide more details.