What is Gain Staging?
Intro
When it comes to producing music, one of the most challenging parts of the process is getting your mix just right.
But there’s one crucial part of mixing that often gets overlooked by producers, causing their mixes to sound unprofessional and unfinished.
We’re talking about gain staging—a critical process that can seriously level up your mix. By the end of this article, you’ll have a better understanding of what gain staging is and how to use it to improve the quality of your mixdowns.
To put it simply, a gain stage is any point in your production where you can control the volume of a device or track. Gain staging is the process of managing all these volume levels throughout your project, with the goal of achieving the cleanest mix possible.
What is Gain Staging?
To understand what gain staging is, we first need to know what “gain” means in music production. Gain is essentially the level at which your original audio signal is being amplified.
While gain might seem similar to volume, there is an important difference between the two. Gain typically controls the input level coming from your instrument, while volume controls the final output level that you actually hear from that instrument.
The audio signal starts with its initial gain stage and then moves through various stages until it reaches the final output—your track’s volume. It’s important to make sure your gain levels are balanced and don’t overlap too much with your track’s volume.
Proper gain staging is all about giving your tracks enough headroom and space for the final mixdown. If you don’t set your gain stages correctly, you might run into issues when finishing your final mix.
How Gain Staging Improves Your Mix
When you use strong gain staging, your mix ends up cleaner and ultimately louder. Your tracks blend together more smoothly, your mix breathes better, and you’ll be able to master at a higher level.
But if you don’t gain stage properly, you’re not making the most of your DAW’s full capabilities. In fact, poor gain staging can even cause frequency balance issues in your mix. This can make your music sound inconsistent across different sound systems.
Also, if your levels are off throughout your project—especially if they’re too loud—it can hurt the overall quality of your audio.
Not leaving enough headroom in your mix can easily lead to unwanted distortion, which will make your track sound muddy and weak.
Is it better to be too loud or too quiet?
This can be a tough question to answer. On one hand, if something is too quiet and we have to turn up its volume during mixing, it can introduce some noise.
On the other hand, if we record something too loud and it overloads the track, causing clipping, the audio can end up sounding harsh, unpleasant, and distorted.
The real answer is that neither option is ideal. However, if I had to choose, I’d rather have my track be a bit too quiet. While this might add some noise, there are ways to reduce it, and at least it won’t be distorted. A distorted track is basically unfixable and brings a whole set of other problems.
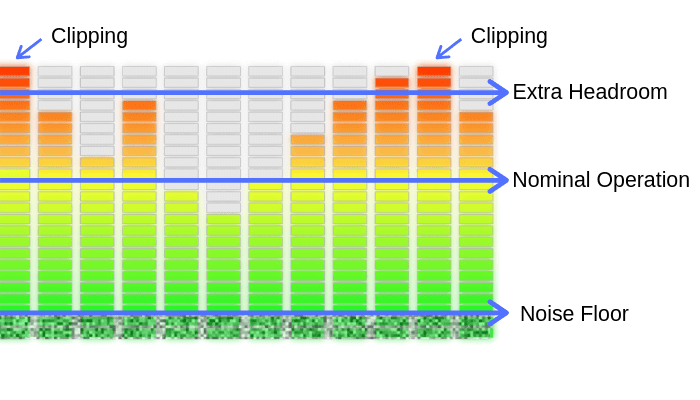
What’s headroom?
Imagine you have an empty glass in front of you and a pitcher of water ready to fill it. There’s only so much room in that glass, and even though your pitcher could fill several glasses, it wouldn’t be wise to pour the whole thing in at once. In reality, you couldn’t do it anyway — once the glass is full, any extra water would just spill over and make a mess.
Filling a glass of water is a great way to think about mixing sound and “filling up” your master bus.
The glass represents the dynamic range of your track. There’s only so much volume you can squeeze out before you hit the limit. If you push too far, you’ll go beyond the dynamic range and overload your track, which can lead to problems like clipping and distortion.
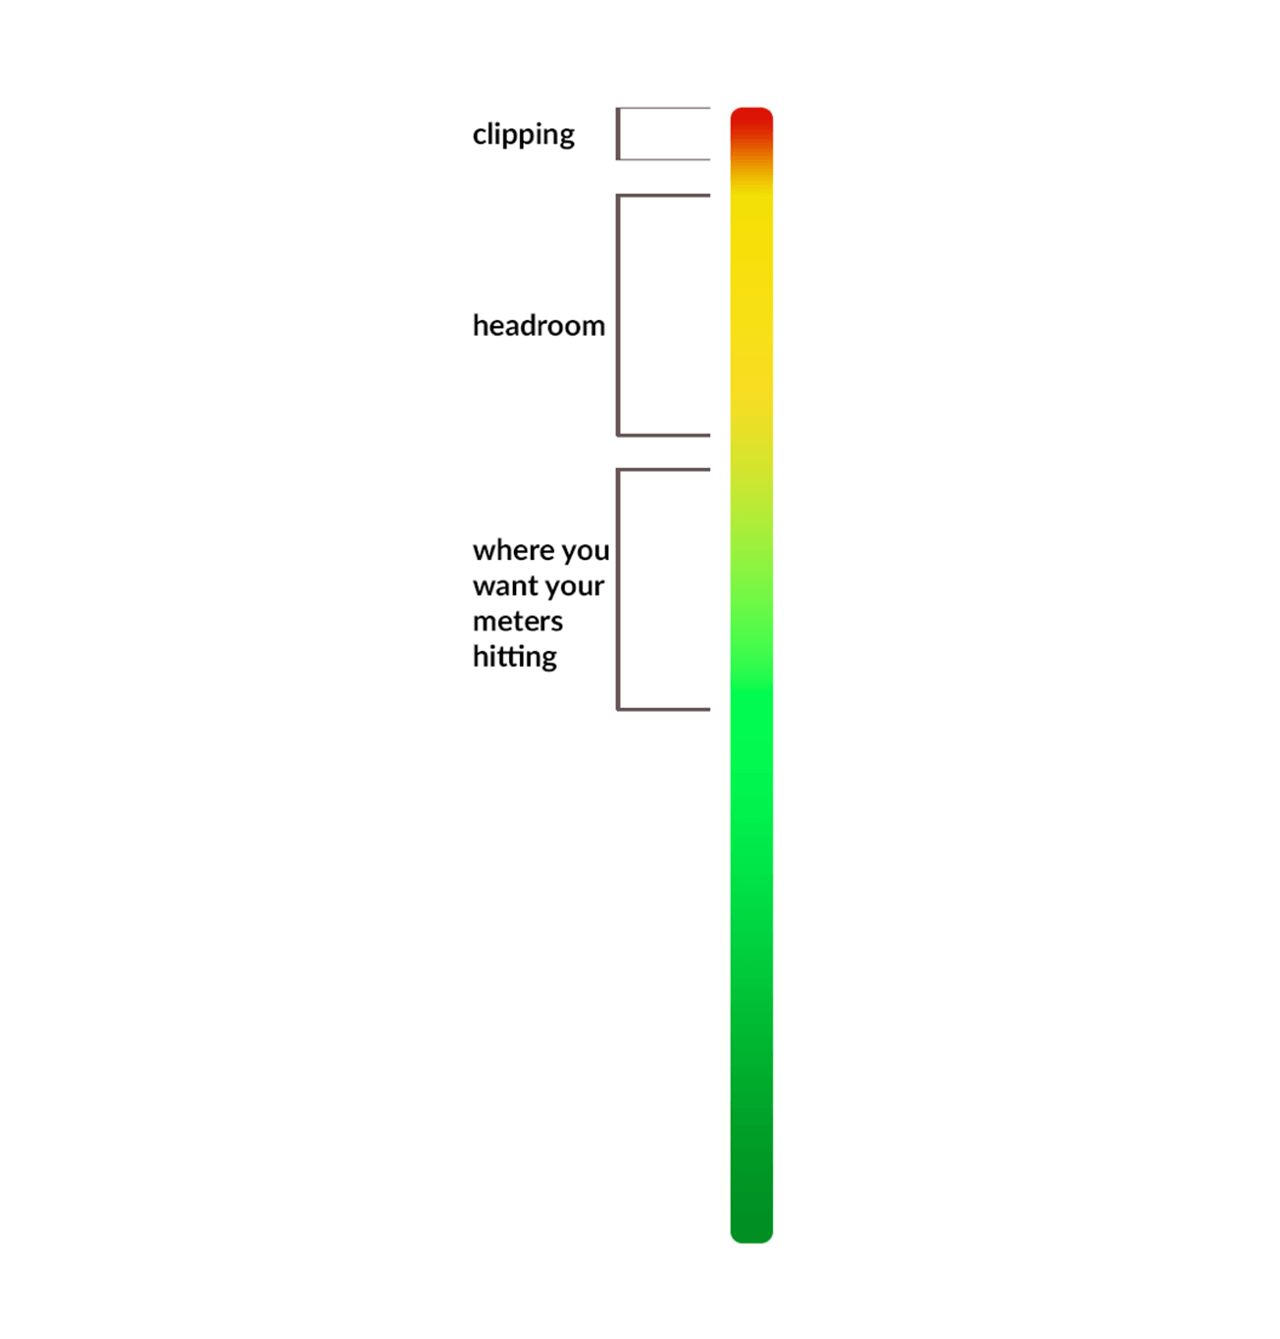
When we pour ourselves a glass of water, we usually don’t fill it all the way to the top. We could do that, but picking up the glass and drinking from it would be tricky—we’d probably spill some as we tried to grab it. So what do we do instead? We leave a little space at the top so we can sip our water without making a mess.
That space at the top of the glass is called headroom. When you’re mixing music, you need to keep some of the dynamic range of your track safe, so it doesn’t clip during loud moments or sudden bursts of sound. Headroom is like a buffer zone for those peaks and increases in volume that can happen throughout a song.
By keeping this headroom, you give yourself—or your mastering engineer—the flexibility to turn up the volume of the mix later during mastering. That’s when your track is brought up to an industry-standard loudness level.
What happens if done wrong?
If we don’t get gain staging right, our mix will never sound as good as it could. This also creates problems when it’s time to master, since we can’t turn up a mix that’s already too loud or remove noise that’s already been introduced. On top of that, mixes that are staged too hot usually end up sounding weak, thin, flat, distorted, and generally unpleasant. So, take your time and tread carefully.
Conclusion
This lesson is one I discovered later in my career, and it took me some time to fully understand. Looking back, I realize that strategic gain staging in a mix has taken me further than compression or any other processing. Once you master this as part of your workflow, you’ll be able to achieve louder and cleaner mixes all on your own.
Of course, we could dive much deeper—and spend a lot more time—exploring gain staging, but what I’ve shared here is enough to help you get familiar with the basics. Plus, that list of considerations will definitely come in handy.
So, the next time you’re at a music meet-and-greet and fellow mixers start tossing around terms like gain staging, noise floor, and headroom, you’ll have a much better idea of what they mean. After all, now that you’re in the know, you can skip the party altogether and get back to what really matters: crafting a vibrant mix, one that you control at every stage. The stage is now yours to gain!