Tips for Faster Mixes
Introduction
In today’s fast-paced world, every minute matters when it comes to being productive and effective. That’s why making quicker mixing decisions and finishing your mixes faster is so important. However, it’s crucial not to sacrifice the quality of your mix just to get it done sooner.
There are several methods you can use to speed up your mixing process without compromising on quality. In this article, we’ll share some tips that can help you achieve faster, flawless mixes.
Every engineer deals with this challenge—even the pros. But as you gain more experience and complete more mixes, you’ll develop your own routine that balances both quality and speed. Let’s take a look at some tips to help you get there.
Tip#1 – High-Quality Recordings
Don’t go into the recording process thinking you’ll fix everything later during mixing. This is a step you want to get right from the start, both for quality and to save time. If you record your vocals or instruments properly, you’ll have much less work to do when it comes time to mix.
With experience, you’ll know exactly how to set up your microphone and can offer your artists helpful tips for getting the best takes. You should also be familiar with the “starting point” settings for your gear, especially when it comes to recording levels.
It’s also important to mention that having good, or at least semi-professional, gear will make a difference. We’re not trying to discourage anyone with entry-level equipment, but it’s just a fact that the right gear will help you get better recordings.

Tip#2 – Build Your Own Routine
You’ll find plenty of tips and guides online about how to start your mix and what to do first. While these can be helpful reminders of the process, it’s important to create your own mixing routine that works best for you.
Once you have a routine that fits your workflow, your next goal should be to keep improving it. Look for small changes you can make to refine your process even more.
Get knowledge from online resources, but always trust your own instincts about how to move forward with your mix. This way, you’ll become more comfortable with your workflow and improve your timing as well.
Tip#3 – Create the Best Mixing Setting
Creating your best mixing setup means designing your creative space to fit your own style and a few key standards. If you feel more comfortable and confident mixing in a dark room, go for it. If you prefer a bright, well-lit space, then let in the light!
While making your room feel good is important, don’t forget to pay attention to the treatment and acoustics. This helps prevent problems with your mix translating poorly in different environments. Place diffusers, bass traps, and acoustic panels in the right spots to get the best sound possible.
I once read that 50% of your mix quality comes from your room’s acoustics, while the other 50% comes from your skills and gear. That might be true for some people and not for others, but everyone can agree that a well-treated mixing room is crucial. Make sure your workspace is comfortable for you.

Tip#4 – Know Your Tools
Get to know the gear you have and the plugins you use. Once you’re familiar with them and use them often, you’ll know exactly what to do with each one before you even start. For example, if you have a specific preamp or channel strip, you should already know how to set it up for your session and get the best sound possible.
The same goes for plugins. Whenever you get a new plugin, spend some time experimenting with it. Learn what each knob and parameter does. That way, you won’t waste time getting lost in a plugin’s interface, especially when you’re in a hurry.
Use your free time to explore your DAW, try different microphone placements, and adjust your studio monitors. Listen to lots of current songs and classic records. Get to know how things sound in your room so you’ll know what to expect—and what to do—when it’s time to mix your own or your clients’ projects.
Tip#5 – Learn your DAW Shortcuts
As I write this, my team and I are diving into FL Studio to learn some modern hip-hop beat-making. Honestly, we’re struggling quite a bit with all the shortcuts. Learning them is probably the next step we’ll take to speed up our mixing process. If you’re also using this DAW—whether you’re new or have years of experience—it’s worth focusing on shortcuts, too.
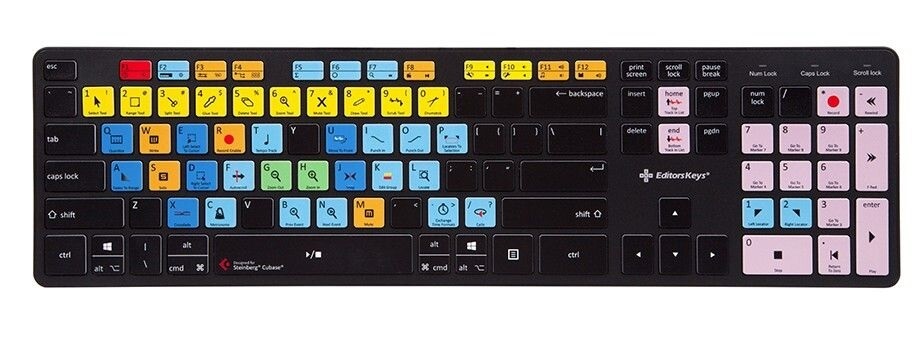
Mastering your shortcuts can seriously cut down your workflow time. In fact, we’d say learning them is one of the most important things you can do in any music program. You can even buy keyboard stickers online and stick them onto your keys to help you memorize the shortcuts more quickly.
For mixing, we use Cubase and we used to have shortcut stickers on our keyboard. That keyboard eventually broke, but by then, the stickers had done their job—we already knew the most important key bindings. Now, we’re able to save a lot of time during our sessions.
Tip#6 – Listen to Your Mix on Headphones
This is a pretty straightforward tip: listen to your mix on a variety of different systems, especially if you have a pair of mixing headphones. Doing this will help you really understand your mix and spot any areas that might need adjustment.
It might not be the classic tip for working faster, but in the long run, it will definitely save you time. Imagine sending a faulty mix to a client—they’ll just send it back for revisions, and you’ll end up spending even more time fixing it. By checking your mix on multiple systems, you can catch these issues early and avoid all those extra revisions.
Tip#7 – Use Reference Tracks
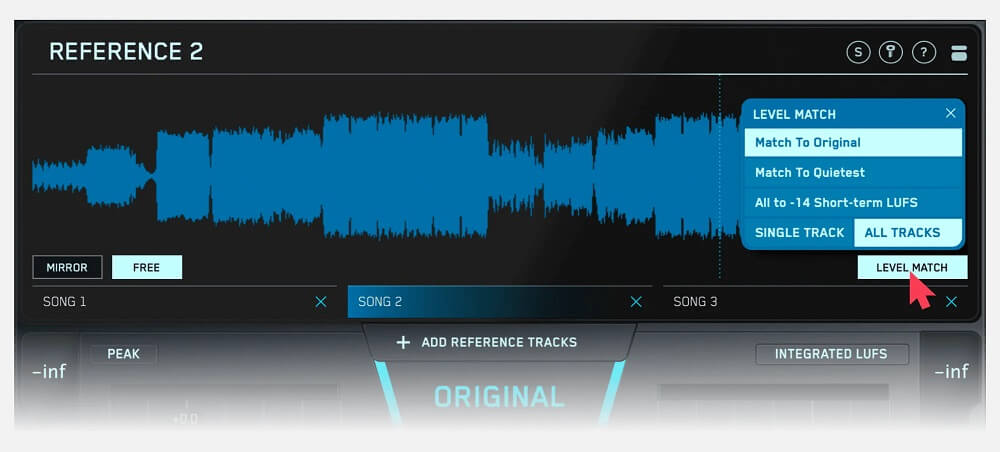
Continuing from the previous tip, using reference tracks can really help you make better decisions while mixing. Many producers and engineers use reference tracks to check their progress and ensure their mix sounds just as good as industry-standard songs.
There are also plenty of tools available to make this process easier. Several plugins let you quickly and efficiently compare your mix with your chosen reference track. Although we don’t have a guide to recommend right now, a simple Google search will help you find these tools.
Tip#8 – Use a Mixing Template
If you work within a specific genre, you probably already know which elements you’ll include in your project and how you’ll arrange them in terms of appearance and mixing. This process becomes much easier if you prepare a mixing template and simply import your tracks into it.
You can even add plugins to the tracks in advance, so they’re ready for fine-tuning to fit the song you’re working on. Just like with keyboard stickers, you can find ready-made templates to download or purchase online, but we recommend creating your own. It will likely take you about an hour to set up, but you’ll save that same hour on every future mix. Pretty cool, right?
Tip#9 – Use Mixing with Groups
Sometimes, when you’re working with a group of signals—like sound effects or percussion—it can be a good idea to mix them together in a subgroup or bus. Before you do this, make sure to balance and clean up each sound individually. Once everything is sounding good on its own, you’ll be ready to mix them as a group.
This approach might seem like a shortcut or improper mixing, but if the sounds have a similar character, grouping them can actually help you achieve a better mix. Try experimenting with different groupings and see what works best for you. Stick with the method that gives you the best results. Remember, only use this technique if it improves the quality and speed of your mix, not as a way to cut corners.
Tip#10 – Know When You Are Done
This is a common struggle for most engineers. My take is that if you’re happy with how your song sounds and you’re not sure what else to do, there’s a good chance your mix is finished.
Check in with other engineer friends or your client, and if no one has any additional comments, go ahead and move on to the next step—printing the mix and getting it ready for mastering.
Spending extra time on a finished mix is just another time-consuming trap that can leave you staring at the screen for hours. Sometimes, you just have to decide that your mix is done. Once you make that call, you’ll know when to stop mixing and move on to finishing the song.
Conclusion
We’ve put together 10 tips for faster mixes to help you finish your songs more quickly and move on to the next one. With practice, you’ll naturally speed up your workflow, but if you’re still gaining experience, these tips should be a great starting point. Trust your process!
If you have any questions about these tips, please let us know in the comment section below. We’ll be happy to answer as soon as we can!