Reverb Mixing Tricks
Introduction
You can instantly improve your mix by adding reverb to different elements. Mixing reverb in a variety of ways can have a huge impact on the quality of your sound. The point at which reverb overwhelms your mix is when it’s pushed too far, causing everything to lose focus. Sometimes, though, you may want that effect for certain elements.
You can add depth to your mix by adjusting the amount of reverb on different elements. This creates the illusion that some sounds are farther away—meaning the listener hears more of the surrounding space and less of the sound itself—while others stay up front. Varying the amount of reverb helps create space, but a mix that is “too wet” will lose its impact.
While we’ve only briefly mentioned reverb before, let’s dig a little deeper. Here are some specific tips and tricks for using reverb effectively, so you can achieve interesting results that will definitely enhance your song.
1. Abbey Road Reverb EQ Trick
We think it’s essential to begin with this classic trick: EQing your reverb to follow a specific frequency curve—one made famous by the legendary studio that produced countless world-renowned music stars.
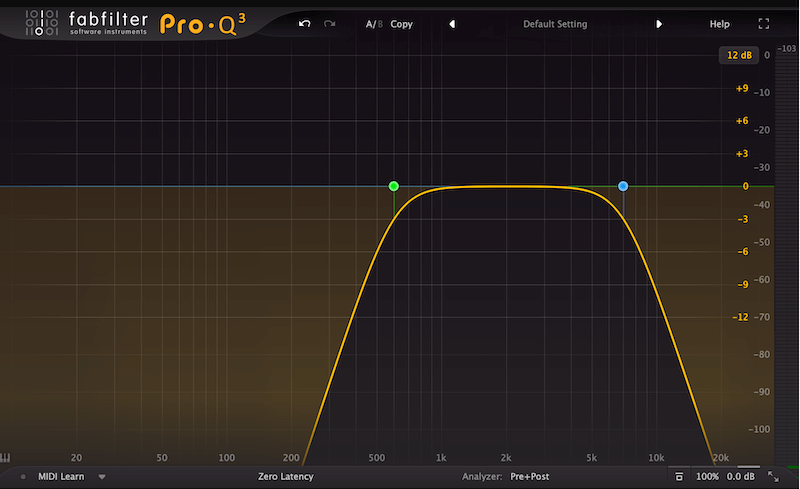
Using the Abbey Road technique can be especially helpful when working with vocals in a dense mix. It helps carve out space and removes unnecessary frequencies. In this method, you place an EQ before your reverb plugin to cut both the lows and highs, creating a bandpass effect on the reverb’s wet signal.
As a starting point, we suggest adding a high-pass filter to your EQ above 400Hz and a low-pass filter below 6kHz. This approach removes low frequencies that can muddy your mix, tames high frequencies that might compete with your vocal’s top end, and keeps the midrange, where reverb’s rich and dense harmonics really shine.
Use these frequency points as a starting guideline, and adapt them to fit your song’s needs. EQing reverb is an art form in itself, so we’ve created a dedicated article on the topic that you can check out at this link here.
2. Separate FX Channel for the Reverb Plugin
While it’s not absolutely necessary, putting your reverb on a separate FX track (also known as a reverb bus) has plenty of benefits that often outweigh the drawbacks. Here are a few key points to consider:
- Using a separate FX track for reverb gives you the freedom to add other effects before or after the reverb, letting you shape the sound exactly how you want it.
- This method also allows you to send multiple individual tracks to the same reverb, giving you precise control over how much reverb each track gets. Plus, it helps save CPU resources, which is especially helpful if you’re working on a system with limited performance.
- Combining different effects with your reverb can result in unique sounds that could become your signature style. Originality is something we all strive for, and this approach can set your music apart.
Experimenting with this setup will naturally help you develop your own tips and tricks along the way. We can’t stress enough how important this is if you want to create something fresh and truly your own.
3. Combining Two Reverbs
Combining two types of reverb on a single signal is a really interesting technique, especially if you already have a vision for how you want that sound to come across. You can use this trick on any track, but it’s most commonly applied to vocals.
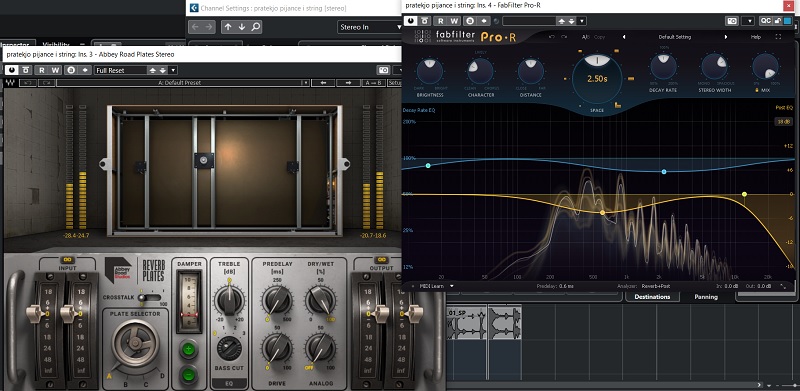
To achieve that familiar vocal reverb sound, you’ll often want to blend a plate reverb with a hall reverb. Typically, this means using one reverb with a shorter decay time and another with a longer decay time. Here’s how we like to do it: apply the shorter reverb throughout the entire vocal track, and bring in the longer reverb only at the ends of phrases.
This approach gives the vocals a sense of presence from start to finish, while the longer reverb at the ends adds that bit of “ear candy” that makes the vocals stand out as they trail off. Just be careful not to overdo it—overusing reverb can quickly make your vocals sound messy and confusing.
Always compare the track before and after adding reverb to see what changes you’ve made, and adjust your settings as needed. Reverb is an effect that requires a delicate touch, so take your time and mix it with care, no matter what audio track you’re working on.
4. Sidechaining The Reverb
Adding a sidechain to your reverb can give you the best of both worlds: a dry, in-your-face vocal plus a long, harmonically rich reverb. To do this, place a compressor after your chosen reverb plugin on the vocal send channel. Then, set the compressor to sidechain from your main vocal track. This way, the compressor will reduce the reverb’s volume whenever the vocal is present.
If you want to preserve the feeling of the original performance, try using the uncompressed vocal as the sidechain input to duck a bus reverb. You can also experiment by creating a parallel vocal track, pitch-shifting it, and using it only for the reverb effect. Your creativity is the only limit here! Most stock DAW plugins now support sidechaining, so you have endless room to play around and experiment.
In addition to adding a nice rhythmic bounce to the dry vocal, this technique creates depth and separation without muddying the main signal, keeping it dry and clear in the mix. Both mono and stereo reverb plugins work well for this approach, so don’t stress too much about which one you use. Just remember to find the right balance between the dry and reverb tracks—so use your critical listening skills at this stage.
5. Reverb Pre Delay
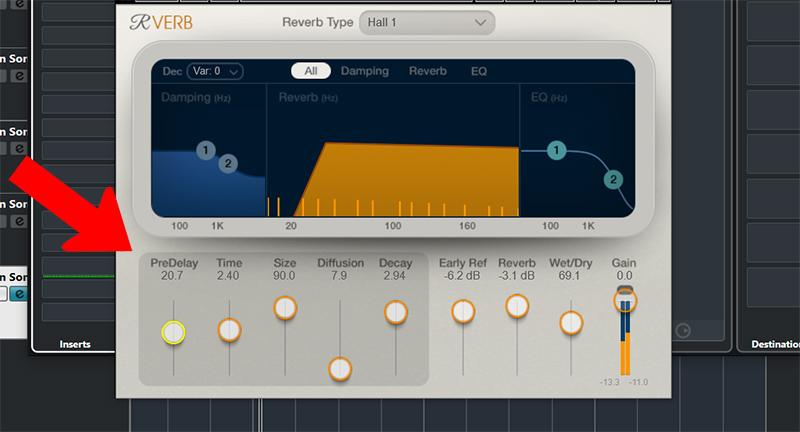
Reverb plugins come with lots of parameters, but pre-delay is one of the most important. If you get this wrong, your reverb effect can sound very strange. Pre-delay is usually measured in milliseconds. You can set it anywhere from just a few milliseconds up to two seconds or more. This means there is a brief wait—those milliseconds or seconds—before your reverb kicks in.
When you set the pre-delay above 30ms, it can sometimes create a “flaming” effect because of how the early reflections blend with the original sound. Matching your pre-delay time to your track’s tempo subdivisions can help enhance your song’s rhythm. A longer pre-delay not only adds a rhythmic feel but can also smooth out any abrupt reverb transients.
Imagine you want a big, majestic hall reverb on your vocal, but it ends up sounding muddy and hard to understand. Instead of adding another reverb or a delay, try increasing the pre-delay. By adjusting it just enough, your vocals can stay upfront and clear, with the reverb following right behind—without any obvious gap.
Experiment until you find the right sound. Pre-delay helps separate your dry sound from the reverb, giving your mix clarity and a lush, professional feel. Try different settings before locking in your pre-delay, and you’ll get the results you want.
6. Play With The Decay Time
Reverbs create an effect that lasts for a certain amount of time, depending on their decay setting. The lingering wash of sound produced by the reverb is called the reverb tail. A longer decay time will give you a longer reverb tail. By adjusting the decay settings, you can control the sense of front-to-back depth in your mix.
Music that unfolds slowly often benefits from longer reverb tails. On the other hand, faster-moving sounds usually work better with shorter reverb tails. Sometimes, you may find that a pronounced reverb tail isn’t needed at all. In some cases, just the first few reflections—known as “early reflections”—are all you need to achieve the right feel.
In the mastering phase, reverb tails are often amplified. But you shouldn’t wait until the end to make sure you haven’t overdone the reverb. After mastering your track, use a quick mastered mix reference to double-check your reverb choices. Let your master guide your reverb decisions, so you don’t have to go back and fix things later.
We’re sharing this from our own experience, where we had to revisit the mix to fix reverb intensity. Adding reverb isn’t just about throwing it on the mix—you also need to think ahead and consider what might go wrong after mastering.
7. Reverse Reverb Trick
The classic reverse reverb trick is a great way to create an interesting transition or build-up. Most of the time, we use this technique right before the drop, where we want to highlight the impact sound effect that hits on the first beat after the drop. Here’s how to do it:
- First, add a long-tail reverb to the impact sound. Use a long decay time and set the pre-delay to zero, so you get one big, complete reverb tail.
- Next, export only the reverb effect and bring it back into your track. Place it before the main hit, so it plays during the build-up.
- Now, reverse the reverb tail. This makes the reverb swell as it leads up to the impact.
- Be sure to cut out the original hit from the exported reverb, to avoid doubling up on the sound.
- Add a nice fade-in or use filter automation to make it even more interesting—and that’s it!
We hope this makes the process clear. This trick is pretty common, and if you set up the reverb correctly, you’ll get a nice effect using just the wet signal from the original reverb.
Conclusion
Here are some interesting points and great reverb mixing tips and tricks you can use in your next mixing session. Sometimes, using less reverb—or even little to no reverb—can actually make your music sound better. In our experience, using reverb in Hip Hop mixes is usually enough, and we often stick with delays at that stage.
However, if your music genre relies heavily on reverb, these tips might help you make better decisions. Mixing with reverb is a skill in itself, so use it carefully and avoid drowning your signals in too much reverb.
If you think we missed something or want to add your own tips, feel free to let us know in the comments below and we’ll be happy to help. Until then—remember to ADD REVERB ON A SEPARATE FX TRACK! 🙂