Mixing Hip Hop Vocals
Introduction
Over the past several decades, hip-hop has gone through many changes. Still, one thing has always stayed the same: hip-hop is all about the vocals.
Sampling, drum patterns, and, especially these days, bass grooves are all crucial to hip-hop’s sound. But the vocals are still the most powerful way to deliver a message.
Hip-hop just wouldn’t be hip-hop without a story to tell, a catchy hook stuck in your head, or a phrase that sets off a new trend. That’s why it’s so important for the vocal mix to sound just right in any hip-hop track. In this article, we’ll talk about how to mix rap vocals so they meet today’s industry standards.
We won’t be covering the recording process here, since we’ve already talked about how to record vocals in another article (which you can find here). Now, let’s dive into what really matters when it comes to mixing great hip-hop vocals.
Preparing the Vocals
One of the most common places for beginner hip-hop artists and engineers to record is their bedroom. Usually, these bedrooms aren’t professionally treated, and there’s little to no acoustic treatment, so the vocals end up being recorded in a less-than-ideal environment.
This means we have to pay extra attention when preparing the vocals for the final mix. With poorly recorded vocals, you’ll likely deal with unwanted sounds from around the room leaking into the recording, and sometimes the vocals are recorded louder than they should be.
The best thing to do here is to isolate and remove any parts of the recording you don’t need at all. Try softening the harshness in the vocals with a de-harshing plugin or something that tames clipped signals. If there’s a lot of room sound baked into the vocal, use a plugin that reduces reverb so you’re left with a dry vocal track.
Once you’ve finished cleaning up the vocals, it’s time to start mixing rap vocals that will really hit hard in your song.

EQing
You’ve probably seen us talk about this topic in other articles, but it’s such an essential part of shaping a song’s sound that we can’t skip it. Vocal equalization works best when you break it down into two clear stages.
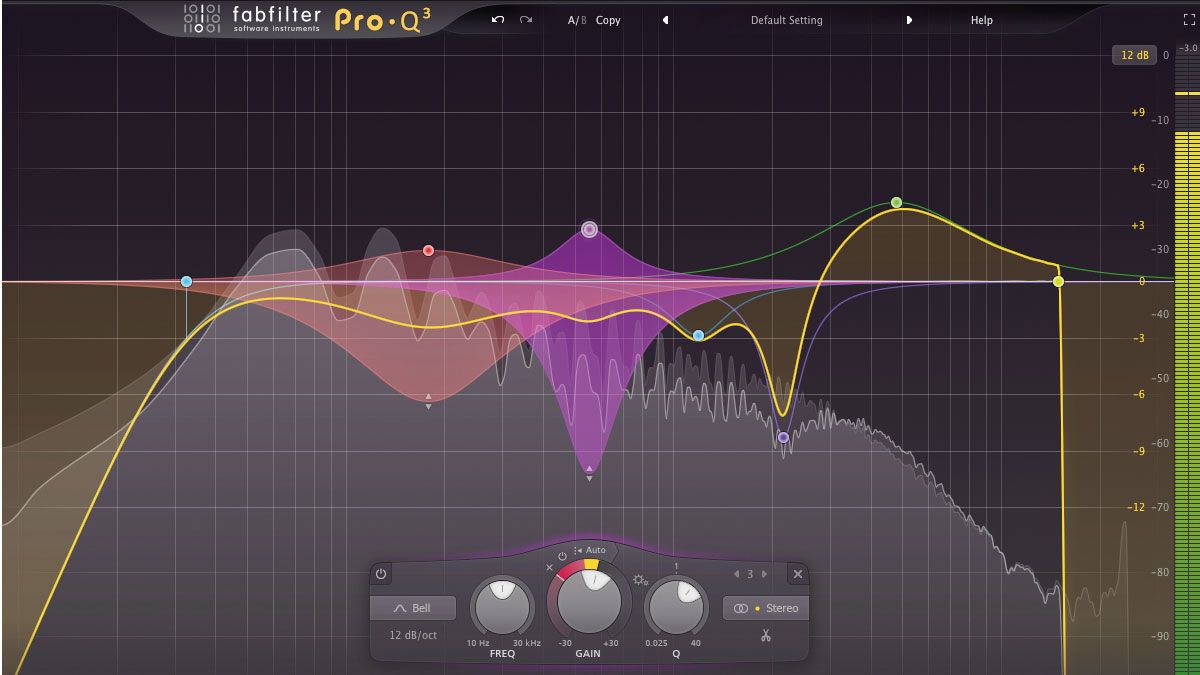
The first stage is all about fixing any issues like muddiness, harshness, nasality, or boominess in the vocal. This is often called surgical EQ or subtractive EQ. Usually, you’ll want to do this step before adding any compression or saturation.
For this, use a precise EQ plugin that lets you select your own frequencies—something like the FabFilter Pro-Q is our favorite. With this VST, just find the problematic frequencies, cut them by however many decibels you think works, and move on.
After compression and saturation, you might want to add another EQ to bring out the best in the voice and help it stand out in the mix.
This is also a great chance to try out analog emulation EQ plugins, which can add warmth and extra harmonics to the vocal. This step is often called tonal EQ.
When it comes to analog EQ plugins, we usually suggest the Maag EQ4 or a Pultec emulation. For a modern sound, we tend to choose the Maag or sometimes an SSL EQ. If we’re after a vintage vibe, we go for the Pultec emulations.
Compression
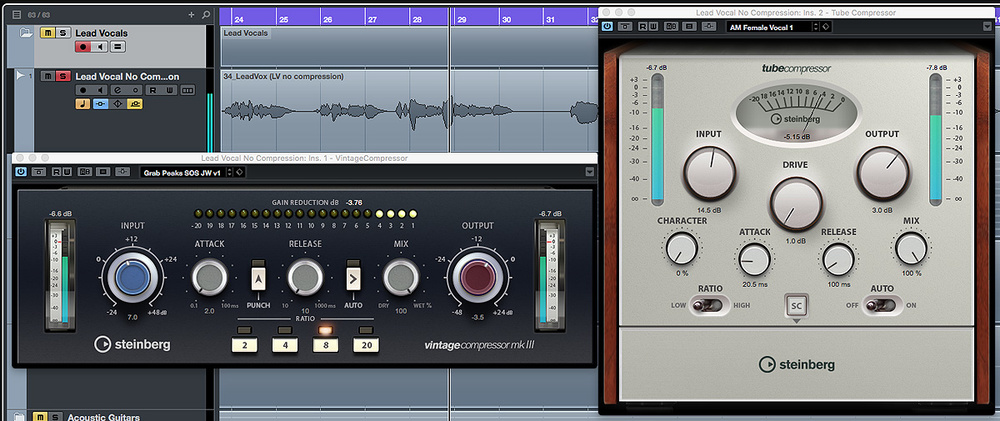
This is a process you really don’t want to mess up. Rap vocals are loaded with dynamics, peaks, and punchy transients, so keeping them under control is crucial for your track. Even if your meters show heavy compression and significant gain reduction, don’t be afraid to leave it that way if it results in even, controlled vocals. But before you start compressing, it’s time for some manual work.
First, make sure your vocals aren’t compressed yet. Listen closely for any words or lines that stand out as noticeably louder than others. Whenever you hear these spikes, manually reduce their gain. Only after you’ve evened out the volume by hand should you bring in the compressor.
Start with a compression ratio between 1.5:1 and 2:1. Lower the threshold so the compressor’s input meter hovers around the peaks of the transients—sometimes right at the line, sometimes just below—depending on how hard you want to compress. This approach works well for thin or harsh voices that need more warmth and less high end. Once you’ve found the sound you like, settle on a ratio that suits your taste.
If you’re dealing with a rapper whose delivery is very percussive and full of sharp transients, lower the threshold and use a higher ratio (like 4:1) to tame those harsh peaks. For artists whose volume rises and falls more gently, a lower ratio and threshold will smooth things out more naturally.
To let initial transients pop through—especially if the vocals sound dull after compression—have the compressor clamp down mainly on the decay of the words. For rap, which is a fast-paced genre, keep the release time short. If it’s too long, the compressor will continue to suppress the next syllable’s transients, making everything sound dull or soft.
If you want to keep some of the transients while still controlling the levels, go for the best of both worlds: use parallel compression like a pro. This lets you maintain both the peaks and the overall evenness of the vocal. To dive deeper into this technique, check out our full article on parallel compression.
De-Essing
Once we’ve finished the two most important steps in mixing any vocal—EQ and compression—we can move on to other processes that help polish the sound even further. At this stage, adding a de-esser is usually the next step.
Even after EQing and compressing, sibilance can still be present in the vocals. It might not be as obvious as before, but it can still be noticeable. Insert a de-esser and set it to target the specific frequency range where the sibilance occurs.
Lower the threshold just enough to control the sibilance and achieve a natural-sounding vocal. Be careful not to overdo it, though—too much de-essing can make the artist sound like they have a lisp, which you definitely want to avoid.
Additional Effects
When it comes to adding effects to vocals, let’s group them all under one heading and go over them briefly. This way, you’ll get a good idea of the different possibilities available.
Starting with time-based effects, let’s talk about reverb. Our personal preference is to use little to no reverb when mixing rap vocals. The only time we use reverb is if the track really calls for it, and even then, we use it with sidechaining so the reverb ducks out as soon as the dry vocals come in. Otherwise, keeping the lead vocal almost dry works best for us.
What we use most often is a stereo delay. Delay doesn’t muddy up the vocal as much, but it does add a bit of playfulness to the sound—almost like a melodic effect that complements the vocal nicely. Experiment with different delay settings to find what works best for your song.
Finally, let’s talk about saturation—which is definitely not the least important effect. In fact, we use this on our vocals 100% of the time. Saturation helps round out the vocal and adds fullness. Our favorite tool for this is the SPL TwinTube VST. Give it a try—you’ll be amazed by the results!
Other Points To Have In Mind
When mixing vocals—regardless of the genre—you want them to sit right in the center of the stereo field. Avoid making the main vocal track too wide. If you’re working on a melodic rap song, feel free to get creative with the backing vocals, but keep the lead vocals strictly in the center.
Surround those centered vocals with the beat and other elements. Doing this creates separation between the vocals and the music, making sure everything stays clear and audible on any playback system.
You may also need to time-align your vocal layers to prevent phasing issues. Try nudging the vocal tracks slightly forward or backward to get the phase just right, avoiding any cancellation that can make vocals sound thin. This attention to detail is a hallmark of a well-treated, professional vocal mix.
Ultimately, your goal is to have the vocals front and center, grabbing the listener’s attention. Achieving this all comes down to how you set up your plugins and vocal chain.
Conclusion
We believe this handy article will help set you on the right path to getting radio-ready rap vocals. You can achieve all of these processes using just stock plugins, so don’t worry if you don’t have any premium ones—those won’t make you a better mixing engineer.
What will truly take you to the next level is practice and experimentation, and that’s something we always encourage. If you have any questions about the topics we’ve covered here, or if you think we missed something, please let us know in the comments below!