Harmful Gain Staging Mistakes
Introduction
Everyone wonders how to start mixing a track and what steps to follow next. Some people begin by mixing the drums, others start with the vocals, and there are plenty of other ways to approach it. However, there’s one crucial step you should always take before adding any processors or effects to your tracks—and that’s gain staging.
To put it simply, gain staging is the process of setting the initial balance for your mix using the faders on your mixer, making sure each track’s loudness is set just right. Once you’ve done this, it’s important to stick to the levels you’ve established and not stray from them. If you’d like to dive deeper into the gain staging process, check out our full article on the topic.
The truth is, many people either skip this step entirely or forget about it after doing it once—and that’s exactly what we’re here to talk about today. In this article, we’ll highlight some of the most common and harmful gain staging mistakes so you can spot any issues in your own process and improve your mixes. Let’s kick things off with the most important mistake to avoid:
Mistake #1 – Not Doing Gain Staging At All
Skipping gain staging entirely is actually the real mistake here—not something you’re doing during the process itself. Ignoring this step can lead to some pretty terrible results. It doesn’t matter if you’re mixing while creating your song or working with bounced-down stems; gain staging is absolutely essential in both situations.
It also makes no difference which DAW you’re using—whether it’s Ableton, FL Studio, Cubase, or any other software—and it doesn’t matter what style of music you’re making, either.
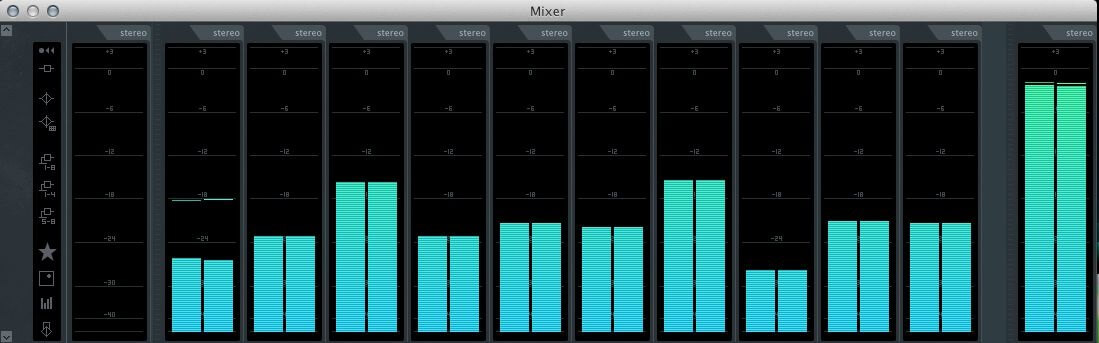
Most importantly, you want to make sure you have enough headroom. This means leaving space before your mix hits the point of clipping, where things start to sound distorted. Ideally, when all your tracks are playing together, your master channel should be peaking at around minus six decibels.
Finally, it’s a good idea to do some basic research or remind yourself of the gain staging process. Doing it incorrectly can be just as damaging as not doing it at all.
Mistake #2 – Ignoring Plugins Input and Output Gain Knobs
Most plug-ins have input and output gain controls that allow you to adjust the signal level coming into the processor, as well as the level leaving the plugin. By default, these controls are set to Unity Gain, so you usually don’t have to change them.
If the incoming signal is at a good level and the processing doesn’t significantly change the output, it’s best to leave these settings as they are. However, sometimes the incoming signal isn’t at the ideal level, or the plugin’s processing changes the volume quite a bit. In those cases, you’ll want to use these controls to adjust the levels.
For example, if the signal coming in is too hot, it might be more than the plugin can handle. Lowering the input gain can help the plugin work better, especially with compressors or any dynamics processors.
Let’s say you’re used to setting certain threshold values that usually sound good. If the signal is much hotter or quieter than normal, your settings might not work as expected, making it harder to dial in the right amount of effect.
When the incoming level is off, you should fix it at the first step in your plugin chain using the Input Gain control. Once you’ve set the optimal input level, you want to keep that level consistent from one insert to the next. This way, if you remove or bypass an effect, the track’s volume in the mix stays the same.

Mistake #3 – Forgetting to Maintain the Stage Between Plugins
Alright, so you’ve already set everything up and started your mixing process. As you add more and more plugins to shape your sound—whether it’s a compressor, equalizer, or any time-based effect—every boost you make will add to the overall level of that signal.
At the end of the chain, your signal will likely be louder than it was after your initial gain staging. Here’s what you need to do: always keep an eye on your meters and check your signal’s level after you’ve made changes. If it’s louder than before, use the output knob to trim it down. If it’s gotten quieter, boost it to match the level you set during gain staging.
This is a mistake we’ve made ourselves in the past. In the heat of mixing, you might not pay close attention to your levels, and after adding processors and effects to every channel, your track can end up sounding cluttered, almost as if you never did any gain staging at all.
So, the key takeaway here is to always trim your levels back to the initial stage you set at the beginning of your mix. This helps you maintain the sonic balance you worked hard to create.
Mistake #4 – Not Adjusting the FX Tracks to the Signal Tracks
This mistake often happens when you add parallel processing to a signal. When you set up parallel processing, you create a separate channel for the effect you want to blend in with your original sound. One thing you’ll notice right away is that the overall volume of the track changes once you route the effect alongside the dry signal.
Here’s where the issue comes in. After dialing in the effect to your liking, it’s easy to just blend it with the original track and move on. However, this is exactly when you should double-check how much louder the combined signal has become.
To fix this, you need to rebalance both the original and the processed (FX) signals so that their combined output matches the original gain staging for that track. For example, if you add reverb, tweak it to taste, and blend it with the dry track, the overall signal might still be a few dB louder. In this case, simply lower the levels of both channels together until the loudness matches what you started with, and you’re good to go.

Mistake #5 – Messing with Master Fader
The Master fader should always be left at Unity Gain. It might be tempting to use it as an easy way to control your listening volume, but you should avoid this at all costs!
Not only will this prevent you from getting an accurate readout of your mix’s overall level, but it’s also very easy to accidentally bounce your track at a lower volume. This mistake can go unnoticed until you run into problems later on.
When you’re preparing a 16-bit master for CD duplication or distribution—and you’ve inserted a Dither plug-in in the final slot—you need to be especially careful not to move the Master Fader from Unity Gain. Doing so can undo the benefits of dithering.
If you watch out for all these common mistakes, you’ll have no trouble with the levels on your individual tracks, groups, or master fader meter. Don’t overlook this process, as it can make or break your song.
Conclusion
That wraps it up! We’ve highlighted what we believe are the most common gain staging mistakes that both beginners and even experienced engineers can make. The bottom line is simple: always pay attention to your levels.
If you have any questions about what we discussed in this blog post, feel free to leave a comment below. We’ll be more than happy to explain further!