Best Stereo Miking Techniques
Introduction
Are you looking for a way to make your recordings sound more lively and open? Try making stereo recordings by using two microphones on certain instruments. You can angle or space the microphones apart to create a stereo effect. In this article, we’ll look at several techniques for stereo recording.
Usually, a single microphone is placed on an instrument, the track is recorded, and then it’s panned somewhere between the two monitor speakers. This gives us a sense of where each instrument sits—left, center, half-right, and so on. However, simply panning mono tracks does not create a true stereo image.
Stereo recording uses two microphones to capture an instrument or even an entire ensemble. This adds ambiance and depth to the recording, making it sound more realistic. When you record members of a musical group in stereo, it helps create the impression that they are all sharing the same space.
You can also do stereo overdubs in a live room by setting up a pair of stereo microphones. Record each instrument you want to overdub in stereo, placing them in different locations. When you mix these stereo overdubs together, it will sound as if a group of musicians is playing together in the same room.
Stereo Recording: What is it and Why is it Important?
In a stereo recording, two microphones are used to capture one instrument at the same time. A stereo track includes both left and right channels—one for each microphone—creating a sense of width and a stereo spread.
This technique produces a stereo effect by changing the sound level between the left and right studio monitors. There are two main ways these differences can be noticed:
- Difference in timing – Placing the microphones in different positions means the sound from the instrument reaches each mic at slightly different times. Even a timing difference of just a few milliseconds can create a stereo effect.
- Difference in frequency balance – Angling the microphones differently toward the instrument allows each mic to pick up a unique blend of frequencies. The more you increase the angle, the more pronounced the stereo effect becomes.
Without this approach, a stereo recording would lack the pleasing sense of width that comes from hearing one microphone through the left monitor and the other through the right.
Select Your Microphone Pair
The most important piece of equipment you’ll need is a pair of microphones, or a stereo microphone, which can make setup much easier. It’s important to note the difference between stereo microphones that use a single microphone in a stereo configuration and those that actually have two separate microphones inside.
If you choose to use a pair of microphones, make sure you get the same model and make. This helps ensure you get a frequency-balanced signal from both sides. That said, there’s no rule against using two different microphones—sometimes, you might find the results are still perfectly acceptable for your needs.
For most instruments, a pair of small-diaphragm condenser microphones (often called “pencil microphones”) set to a cardioid polar pattern will give you the best results, though omnidirectional microphones can also work well in certain situations.
If you want both microphones to have the exact same response, look for a factory-matched pair. However, don’t worry too much about this—unmatched microphones can also deliver great results.
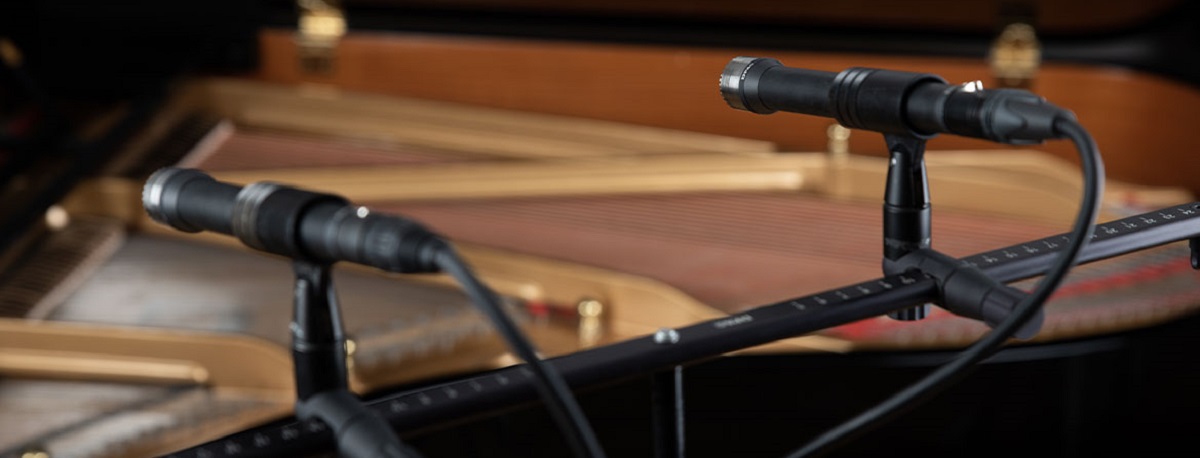
It’s a good idea to get a stereo bar, although it’s not absolutely necessary. A stereo bar is a small holder that attaches to a microphone stand, allowing you to mount two microphones and easily adjust their distance from each other and their angle to the sound source.
There are also microphone stands with a single, non-swiveling bar and adjustable posts, which let you arrange the microphones side by side.
Stereo Microphone Techniques
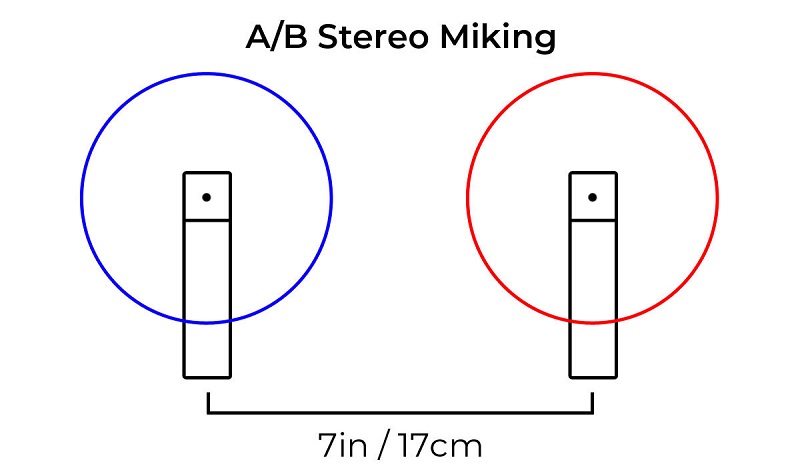
1. AB Stereo Pair – Spaced Pair Technique
The spaced pair, or AB stereo technique, is a popular way to record in stereo. It uses two microphones—either cardioid or omnidirectional—placed at a moderate distance from the sound source and aimed straight ahead.
To get the best recording quality, use a pair of matched microphones. Matched mics are made one after another at the factory, so they have as similar a sound as possible.
Although it might look simple—just two microphones set up—it’s actually more complex. To avoid phase issues, follow the 3:1 rule: the microphones should be at least three times farther from each other than they are from the sound source.
For example, if one microphone is one foot away from the sound source, the other should be at least three feet away from the first. This technique works especially well with large or mid-sized groups like choirs or orchestras, as both microphones pick up a lot of room sound when pointed straight ahead.
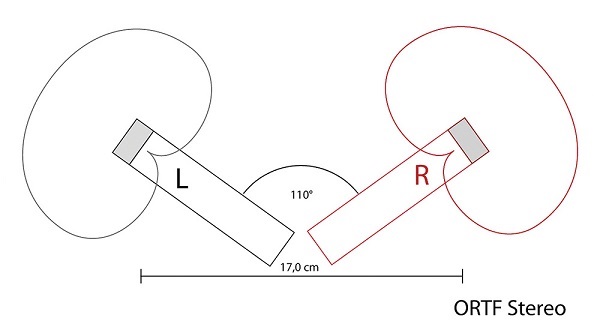
2. ORTF Stereo Technique
ORTF, or Office de Radiodiffusion Télévision Française, developed the “Side Other Side” microphone technique in the 1960s. In ORTF, the microphone capsules are angled exactly 110 degrees apart from each other.
You also need to keep a precise distance of 17 cm between the microphones. Diagrams of this setup show that it closely mimics the way human ears are positioned on a head (but don’t confuse it with true binaural stereo recordings). Setting up this configuration is simple and quick with a mic stand adapter.
Because the microphones are so close together, you shouldn’t run into many phase problems—the sound will likely reach both mics at the same time, which helps prevent issues. You also generally won’t have to worry about mono compatibility with this setup.
Like X/Y, the ORTF placement should be fairly close to the sound source. With this method, you get a wider stereo image than with X/Y, and the central information remains relatively clear and strong.
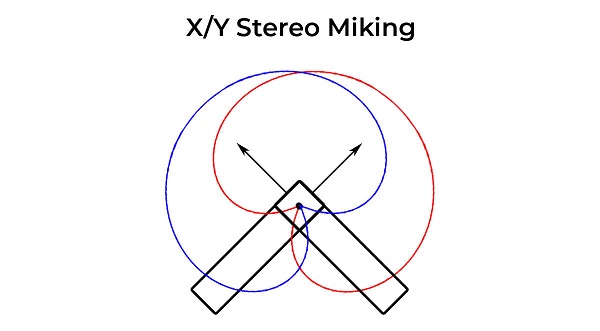
3. X-Y Stereo Mic Techniques
This setup uses two directional microphones (cardioid type) arranged in a near-coincident pair. X-Y is ideal for close-miking applications and is less suitable for distant or room miking. While it produces a narrow stereo image, the result is clear and crisp.
It is recommended to position the two microphone capsules at an angle between 90° and 135°, with the capsules as close together as possible (a coincident pair). In most cases, the microphones’ polar patterns should be parallel to the ground or placed horizontally.
Both top-address “pencil” microphones and side-address microphones work well for the X-Y stereo technique. Pencil mics, with their smaller diaphragms, can usually be placed closer together, making them more “coincident” as a pair.
If you want to set up mics in the X-Y configuration, using a stereo bar microphone mount is helpful for simplicity and stability. Start with a 90° angle between the microphones; if you want a wider stereo image, increase the angle to 135° (be mindful of the possible “hole-in-the-middle” effect). X-Y works best in close-miking situations.
4. Blumlein Sterep Pair Technique
In the Blumlein technique, bi-directional (figure-eight) microphones are used instead of cardioid ones, and they are positioned at 90 degrees to each other.
This means that the microphone capturing audio from the front and left of the room (away from the source) will also pick up sound from the back right of the room. It is possible to capture voices from behind and to the right of the mic, just as you do from the front and right.
As a result, the recorded audio has a stereo image of the sound source, along with extra ambiance picked up from the back of the recording studio. To get the best results, you’ll need a room with good acoustics to enhance the size and depth of your recordings.
To achieve this, you’ll need a microphone with a figure-eight polar pattern, such as the NT2-A, or a valve microphone like the K2. If you want to mount two microphones close together, you can use a set of pencil microphones.

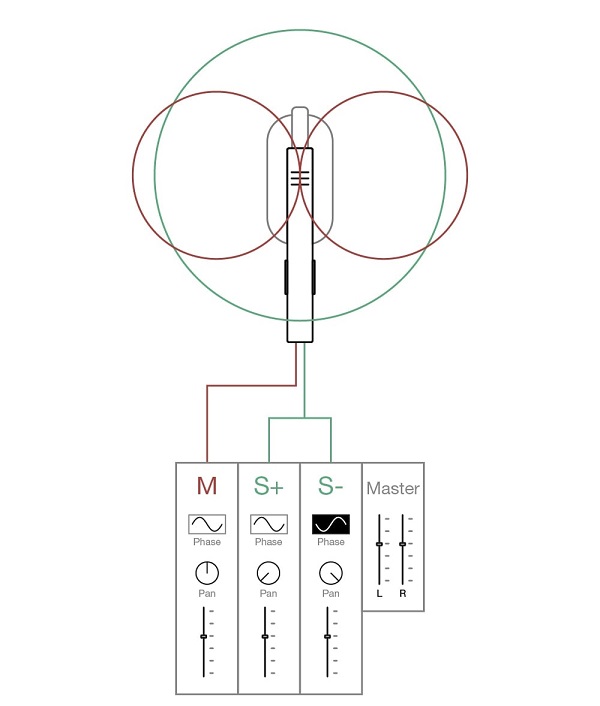
5. Mid/Side Recording Technique – Our Favorite!
A very interesting stereo miking technique is the mid-side, or MS, technique. This technique uses a cardioid microphone, called the “mid” mic, placed at the center and pointed toward the stage. The microphone picks up a mono sound, but it can be processed to create a stereo image.
For the “side” microphone, you use a bi-directional (figure-8) microphone. This mic should be positioned just below the mid mic and oriented so it faces left and right. The side microphone captures the ambient sound and positional information from the environment.
A small matrix circuit combines the signals from the mid and side microphones, giving you a left channel output and a right channel output.
You can make mid-side recordings with two separate microphones (one cardioid and one bi-directional) or with a dedicated stereo microphone that contains both elements and built-in processing circuitry.
Mid-side recording makes it easier for listeners to visualize exactly where the players are on stage because both microphones are placed at the same point in space.
You can control the stereo image by adjusting the level of the side microphone, allowing you to change the sense of spaciousness—even during post-production. The setup is also more convenient and less distracting for musicians and the audience, since only one microphone stand is needed.
6. Decca Tree
With this setup, the spaced pair configuration (A-B) is enhanced by adding a central microphone to the mix. As with traditional spaced pairs, it’s best to position the left and right microphones at roughly equal distances from the sound source.
However, the spacing ratio can vary depending on your needs. Generally, Decca Trees use a 2:1 or 4:3 ratio, meaning the distance from each outer microphone to the center microphone is about twice the distance between each outer microphone and the left (or right) microphone.
In this arrangement, height becomes important because the Decca Tree was originally designed for recording orchestras and large ensembles. Ideally, the center microphone should be placed directly above the source, about 10 feet high. Omnidirectional microphones are recommended for this technique.
This approach is similar to the Mid/Side technique: the left and right microphones help create a wide stereo image, while the center mic provides a strong mono foundation.
The Decca Tree was first developed for orchestral sessions, but it works just as well with any ensemble—even drum kits—and is especially effective in studios with high ceilings.

Conclusion
There are six classic stereo mic techniques that work best for different recording situations. If you want your stereo sound to be both phase coherent and wide, try experimenting with various configurations.
Always adjust the microphones, patterns, placements, and distances to achieve the best possible result. Think of a stereo microphone technique as a helpful starting point, not a set of strict rules.
If you have any questions or concerns about this topic, please let us know in the comments. We’ll be more than happy to explain further or go into more detail.