What is Knee in Compression
Introduction
Understanding the knee setting on a compressor
In this article, we’ll learn how to use the knee setting on a compressor. Alongside other important controls—like threshold, ratio, attack, and release—the knee is a great tool to fine-tune how your compressor applies compression to audio.
Some compressors let you switch between ‘hard knee’ and ‘soft knee’ settings, while others allow you to dial in exactly how hard or soft you want the knee to be, often measured in decibels. There are also compressors that don’t let you adjust the knee at all. Still, we think the knee setting is very useful, because it lets you change an aspect of compression that the other settings can’t.
Both hard knee and soft knee compression have their advantages. For example, if you want to quickly squash a signal’s transients, you’ll want to use hard knee compression. On the other hand, if you want your compressor to gently glue a mix together by subtly tightening up transients, a soft knee setting is the way to go.
Lastly, if you have a compressor like the Dyn3 Compressor/Limiter, which comes free with Pro Tools, take a look at the knee image on the interface—it actually looks like a human knee!
What Is Knee About?
If you haven’t yet read the article about compression ratio—and you’re new to compression—now would be a great time to check that out. Understanding ratio is an important first step before diving into the concept of the knee. In essence, the knee describes how the compressor’s threshold and ratio settings interact.
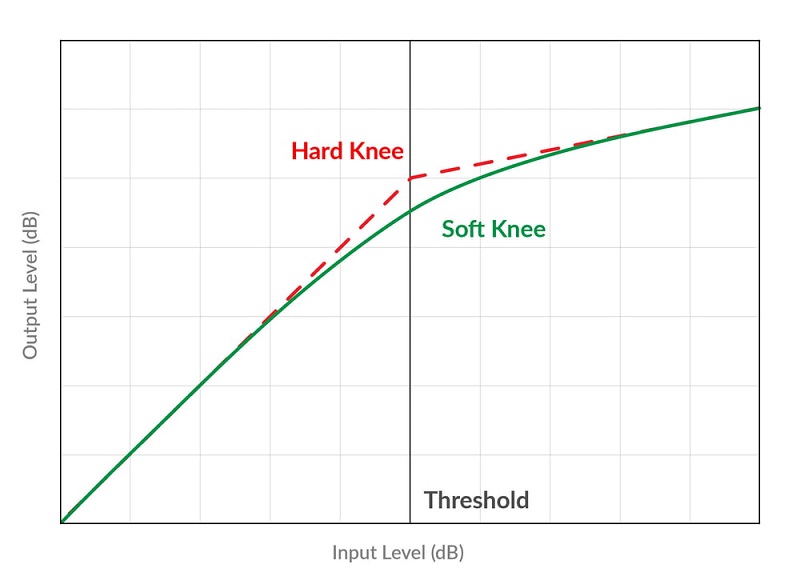
While the knee is often shown with a numerical value on compressor controls, we usually talk about it more in terms of feel: hard, soft, or somewhere in between. Hard knee compression works exactly as you might expect—when the audio crosses the threshold, gain reduction happens right away at the set ratio. Below the threshold, there’s no compression at all.
With soft-knee compression, the ratio still controls how much gain reduction you get, and compression still starts as the signal approaches the threshold. But instead of the reduction happening suddenly when the threshold is crossed, the compressor eases into it gradually. It starts applying a lower ratio just below the threshold, gently increasing the compression as the signal gets closer to and then passes the threshold.
Using Hard Knee
In most standard compressor models, a Hard Knee setting is usually the default option, and in these cases, you can’t just switch it over to Soft Knee.
However, with higher-quality compressors (like the FabFilter Pro-C2), you not only get the option to switch between knee settings, but you can also fine-tune and precisely define the knee value for the best response to your incoming signal.
Of course, the hard knee setting has its own advantages, especially when you’re working with audio material that has little or no sustain—think of a snare or kick drum, for example!
One thing you can try is setting a high ratio along with the hardest knee setting. Listen closely to how the compression changes the sound of your material.
Then, if your compressor allows, ease off the settings a bit to find that perfect “sweet spot” that processes your audio in the best possible way.
There are no strict rules here. Trust your ears and pay attention to how the hard knee setting affects your sound!
Using Soft Knee
While hard knee compressors only start working the moment the input signal level goes above the compression threshold, soft knee settings begin applying small amounts of gain reduction even when the audio is still just below the threshold.
The main advantage of soft-knee compression is that it makes the onset of gain reduction much less noticeable, helping the musical phrasing sound more natural.
Soft-knee compression is especially appealing to audio engineers and studio pros because it isn’t the default setting—or even an option—on most compressors, with only a few exceptions.
While hard knee compression is better for “attacky” sounds full of transients, using a soft knee setting on your compressor gives you smoother, more gradual compression. This is perfect for situations where you want a cleaner, more transparent result!

Tips on using Knee in Compression
Drums
Percussive elements like drums are a perfect example of when and why to use a Hard Knee setting on your compressor. As always, start by setting the compressor’s main controls—Threshold, Ratio, Attack, and Release—then listen to how the sound changes from clean to compressed.
In most cases, drum sounds benefit from a hard knee. This is because drum hits have sharp peaks and very quick transients. Given their nature, it makes sense to choose a hard knee setting for drums.
Vocals
When we set up a great-sounding compressor on the vocals, the knee is usually set to ‘Hard Knee’ by default.
This simply means that when the vocals in our song reach the threshold level, the compression kicks in right away—at the exact moment the audio crosses the threshold.
You can experiment with the knee settings by switching to Medium or Soft Knee, or by adjusting the decibel values to lean toward higher decibels for a softer knee. With vocals, you’ll start to notice that a rounder curve gives us a more gradual compression.
This means the compressor will start working just below the threshold as well. It will pick up some of the quieter signals, since there isn’t a precise, sharply defined point where the compressor kicks in.
Synth
If your compressor allows you to set the ‘hardness’ and ‘softness’ of the knee using a decibel value, make use of this feature. Lower dB values give you a steeper curve, resulting in a hard knee, while higher dB values create a rounder curve and a soft knee.
Using a soft knee on a synth part results in a smoother transition from uncompressed to compressed signal. This gradual change helps the overall compression sound much cleaner and more transparent.

Some details on using Knee setting
- Not all the compressors have the switchable Knee setting.
- There are two primary varieties of Knee settings: Hard Knee and Soft Knee (there are some exceptions, like Medium Knee as well).
- Some extra advanced compressors can have the Knee values expressed in decibels, with smaller values denoting Hard Knee, and higher values denoting Soft Knee.
- Soft knee values will end in an extra homogenous and refined sound of your mix components, whereas Hard Knee values will make the sound of your compression extra obvious.
- Experiment with varied Knee and Attack combos for fascinating mix results and sounds.
- Examples of the mix parts Soft Knee is usually most well-liked: Vocals, Guitars, Bass Guitar, Piano, Strings, Synthesized Pads, and different non-percussive elements.
- Examples of mixed components Hard Knee is usually most well-liked: Drum Elements (Snare drum, Kick Drum, Toms…), all different types of Percussion.
- Keep in mind that there aren’t any hard and quick guidelines relating to defining the knee value. It should all the time rely on your materials, and what you’re attempting to achieve with compression. There positively are cases while you may have to make an otherwise non-percussive component sound extra aggressive if that’s its operate in a mix. Piano-only music is usually a good instance of this! In this case, reasonably than flattening the influence of the piano sound that carries the music, utilizing soft-knee compression, you may wish to emphasize it with Hard Knee as a substitute.
Conclusion
When you’re dialing in compression, the knee setting is usually a bit less critical than, say, the attack and release times. That said, it can sometimes be the factor that determines how “musical” a compressor sounds, so it’s worth paying attention to.
Next time you reach for a compressor, remember to ask yourself whether “smooth” is the quality you want. If you have a clear idea of what you’re aiming for, it’s not hard to find the right knee setting for the job.