What is Parallel Compression?
Introduction
In the world of music production, compression is a widely used technique. Its main purpose is to boost the overall level of a certain signal, making specific elements stand out in the mix, and it’s an extremely effective tool for this. However, most beginners aren’t quite sure how to use this method properly without negatively affecting the final sound of their mix.
A lesser-known technique that comes directly from traditional compression is parallel compression. This approach can deliver results that are just as satisfying—if not better—than standard compression. In this article, we’ll clearly explain what parallel compression is, why you should consider using it, its pros and cons, and how to apply it correctly during a mix-down.
What’s Parallel Compression?
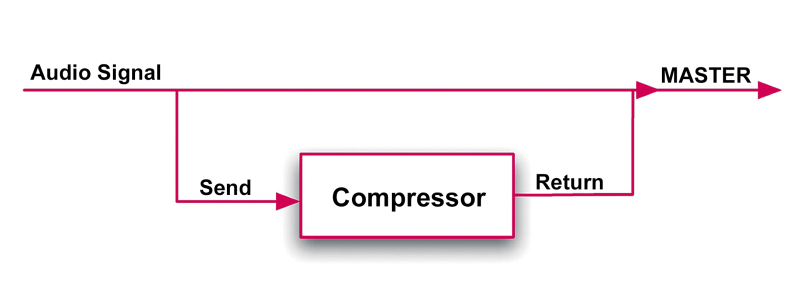
Parallel compression uses a send-and-return setup, similar to how you’d send a signal to an effects processor. It works by blending the dry signal with a compressed version. In this type of setup, you need to use heavier compression to pull more depth out of the source signal. However, because the dry signal is still mixed in, you don’t hear as much obvious compression.
The art of parallel compression plays a big role in making modern mixes sound full and loud. Some people argue that this isn’t always a good thing, and it’s true that parallel compression isn’t meant for every genre. Overdoing compression can crush a lot of the dynamics, but if you want your song to be as loud as possible without blowing up the speakers, you’ll need to use heavy compression.
If you want to compete in today’s market, understanding both standard and parallel compression is essential—you don’t want to get left behind. When you use parallel processing in the right way, you can achieve a dynamic mix that’s really loud, while also reducing the amount of overall compression on your master bus.
Tips on how to set up parallel compression in your DAW
Start with your dry channel and assign an internal bus output from the channel sends—let’s use bus one for this example. Set the send’s output to unity gain in pre-fader mode if you want it to work like a console bus send. If you leave pre-fader off, you can adjust the amount you want, just like a typical auxiliary send setup.
Next, create a mono aux channel inside your DAW. On the insert of this aux channel, load up the compressor you want to use, and set the input of the aux channel to bus one.
Now you have the uncompressed signal on your original channel and a compressed version on your aux channel. Blend them together to get as much parallel compression as you want, helping that element stand out in your mix.
With the advancements in plug-ins lately, and more people using parallel compression, many software companies are starting to add a “Mix” knob right inside the plug-in. This knob lets you blend your dry and wet signals without using any external buses.
While this setup is simpler and can still give you great parallel compression results, many of us old-school engineers still prefer the classic send and return method. We feel you have more flexibility with the traditional send and return setup compared to just using the mix knob inside a plug-in.
Widespread Uses of Parallel Compression
Vocals – Probably the most common use of parallel compression is on vocals. It helps create standout vocals that cut through the mix without sounding overwhelming. Since the human voice is such a dynamic and versatile instrument, parallel compression is often needed to keep it present and consistent.
Drums – Applying standard compression to every drum track can ruin the groove and dynamics of a song. Instead, parallel compression on individual drums or even on groups of percussion can give certain elements the punch they need, while still keeping a balanced feel within the track.
Subtle Compression – Parallel compression can also be used on any track to give it a more polished sound, while still allowing backing vocals, keyboards, and other instruments to remain natural. It adds a layer of complexity for the listener, enhancing the mix without making the effect too obvious.
Above all, parallel compression gives us more control as engineers. Like standard compression, it helps a song sound cohesive, but also preserves the fluid, natural quality our ears love. With more options to shape the sound, the creative possibilities are endless. Try using parallel compression in your next mix!

Tips for Parallel Compression
#1 Don’t Parallel Compress Vocal Breaths
Breathing is an essential part of any vocal track, giving it a natural and human feel. However, when you over-compress vocals, the breaths can become much louder and distracting.
To avoid this issue, place a gate before the main compressor on your parallel track. Set the gate so that it only lets the sung vocals through, not the breaths. Alternatively, if you’ve duplicated the vocals onto a separate track for parallel compression, you can manually remove the breaths from that track.
#2 Extremely-Natural Bass
Unless you’re working in a particularly quiet or delicate style—like folk, jazz, or classical—bass compression is pretty much essential in modern mixes.
Many producers and engineers prefer to use heavy compression on bass, and it’s easy to see why: inconsistent low end can sap a track of its power and drive. The fastest way to get strong, consistent bass is often by applying a solid dose of compression. Plus, the natural saturation from many compressors helps the bass stand out on audio systems that struggle to reproduce low frequencies.
However, too much compression is a surefire way to end up with squashed, lifeless bass. Maybe you’ve experienced this: the bass gets lost in the mix, and when you turn it up, you just can’t find a sweet spot where it doesn’t feel too loud.
#3 Compress A Vocal Double
Instead of sending the same vocal to a separate track for parallel compression, another method is to use a vocal double. Have your vocalist sing the same lead line on a second track, then apply heavy compression to the double while only lightly compressing the main vocal.
You might want to bring in the double only for certain parts of the song, like the chorus. This can help thicken the vocal and make it stand out in sections with denser arrangements.
#4 Use Delay Compensation
When you use a compressor plugin on your computer, it takes a few milliseconds for the sound to be processed. Most of the time, this delay is so small that you don’t notice it. However, if you’re doing parallel compression, you need to pay attention to this delay.
If you have two versions of the same track playing at the same time—one with compression and one without—the compressed track will play back a few milliseconds later. When these two versions are combined, they are slightly out of sync. This causes something called comb filtering, which sounds unpleasant and is definitely not what you want.
The solution is to turn on delay compensation in your DAW. This feature will fix the timing differences, so all the tracks in your session play perfectly in sync.

#5 De Essing The Compression
Intense parallel compression often makes vocal sibilance stand out in a harsh way. This is usually why beginner engineers struggle to use parallel compression effectively.
To avoid this, place a very aggressive de-esser before your parallel compressor. You can be much harsher with the de-esser than you normally would, since the main vocal track will still provide all the sibilance you need. This way, your parallel compression will only add thickness to the vocals without making the sibilance more pronounced.
#6 Vocal Presence & Dynamic Management
The human voice is an incredibly dynamic instrument. While a recording of a highly dynamic vocal performance can be challenging for engineers—especially if the singer’s microphone technique needs improvement—simply flattening out all the dynamics can make the performance less interesting and natural. On top of that, the vocal might have trouble staying prominent in front of the instrumental track.
Instead of applying heavy compression directly to the main vocal track, try using aggressive parallel compression. You can do this by duplicating the lead vocal track and applying the compression there, or by creating an aux buss and sending the lead vocal there along with any backup vocals you want to include.
A standard vocal compressor like an LA-2A works well, or you can use your favorite buss compressor for a larger group of vocals. Set the compressor for more reduction than you normally would for a vocal (more than 5 dB), and blend the compressed track in subtly. This way, you achieve clear dynamic control—the quieter moments are brought forward without making the louder moments overwhelming.

#7 Less is More
Less is more. Too much parallel compression can make a track sound flat, one-dimensional, and tiring to listen to.
If you’re unsure, step away from your mix for a few minutes. When you come back, play the track and ask yourself—does this sound too aggressive? Listen for unwanted artifacts like distortion or harshness. If you notice these issues, you’re probably using too much parallel compression.
Conclusion
Understanding what parallel compression can do for your mix will help you know when and why to use it, instead of just adding it to your drums—or anything else—without a clear purpose.
We hope this guide helps you achieve your desired results more quickly and gives you a deeper understanding of what each control can do. There’s a lot you can experiment with in this area, thanks to the many different compressors available, so we encourage you to play around in your DAW and discover some cool new sounds.