What Is Multiband Compression?
Introduction
Using a multiband compressor allows you to divide a track into different frequency ranges, known as “frequency bands,” and compress them independently.
You can choose to compress only a specific part of a track’s frequency spectrum or apply various types of compression to multiple areas of the spectrum.
Why might this be useful? Well, I’m glad you asked.
What is multiband compression? It is a more advanced form of compression. A multiband compressor functions by splitting the frequency spectrum into separate bands. Each frequency band also has its own dedicated compression settings.
Applying different amounts of compression to the separate frequency ranges gives you more control. A multiband compressor acts as both an EQ and a compressor in one.

The Fundamentals of Multiband Compression
Multiband compression is a technique that involves dividing the frequency spectrum into two or more bands and applying different compression settings to each one. Think of it as a combination of an equalizer (EQ) and a compressor.
This approach allows for more precise compression. For example, you might apply heavy compression to the high frequencies above 10kHz, while using a gentler touch on the low frequencies. But why would you want to do this?
Often, a sound may have what we call tonal inconsistencies. This means that a narrow or wide range of frequencies might have a lot of dynamic variation, while the rest of the sound remains more constant. A standard compressor might not address this issue effectively, as the inconsistent tones might not be strong enough to activate the compressor.
Instead, imagine being able to isolate a specific frequency range and compress it independently. That’s exactly what multiband compression allows you to do, and it’s why it can produce such clear results. You can leave the rest of the sound unaffected.
But why not just use an EQ to adjust that frequency range? While you can certainly try, remember that EQ adjustments are always static, meaning the change is applied consistently regardless of the dynamics of the sound.
Related Articles:
- What is Serial Compression? Quick and Easy Guide to Learn it!
- What is Knee in Compression: 3 Best Practices Of It!
- What is Parallel Compression? 7 Great Tips To Do It Right!
- How To Compress Bass Guitars: Great Guide For All!
Tonal Inconsistency Stability
When you’ve tried using an EQ to fix some problem frequencies in the mix but find that a regular EQ just isn’t cutting it, it might be because the frequency range in question is especially dynamic. A static band change won’t sound good unless you automate the gain, which can be tedious.
You’re most likely dealing with an acoustic or natural sound or instrument, like an acoustic guitar or vocal, as these sources tend to have more dynamics than synthesized or digital ones.
This is when you can bring in a multiband compressor. The goal here is to use the minimum number of bands to solve the issue by focusing only on the specific frequency and leaving everything else untouched.
This approach maintains the integrity of the audio while addressing the problem.
Here’s a straightforward step-by-step workflow you can try:
- First, try to solve the issue with EQ.
- If that doesn’t work, target the same frequency range with your multiband compressor of choice.
- Use a compression ratio around 4:1 and set the threshold so that the incoming audio triggers it at the time of the inconsistency.
- Balance the attack and release times so it sounds natural, depending on the material. Attack and release times are crucial here!
- Adjust the ratio and threshold to make the adjustment more transparent (you may need to ease back the ratio and increase the threshold, or vice versa).
A/B test the signal to see if the issue is resolved. Use the dry/wet knob if the effect is too noticeable.
Why use Multiband Compression?
Why use Multiband compression? It’s more versatile than traditional one-band compression, resulting in a sound that is more natural and clear. You also have greater control over shaping and managing dynamics.
For instance, standard compressors affect the entire frequency spectrum of an audio signal, whereas multiband compressors allow you to target specific ranges within an audio signal. That’s why we prefer multiband compression—because it lets you focus on a particular frequency range.
For example, you can compress the low frequencies while preserving the high frequencies, or vice versa.
Another example: Suppose the top end of your snare is too harsh, but standard compression causes it to lose its punch. In this case, multiband compression is the better option.
You can compress the high-frequency band more than the mid and low bands. As a result, the top end will sound less harsh and more dynamic.
You’ll also retain the snare’s punch because the mid and low bands will have less compression. It’s a method of ultimate sculpting for your audio.
The advantages of multiband compression are endless. This is why top producers and audio engineers use it to achieve the sound they desire.
Related Articles
- SSL BUS+ Review: Great New Addition from SSL!
- Heritage Audio Herchild 670 Review: Amazing Fairchild 670 Clone!
- Rupert Neve Designs MBC Review: A Master Buss Converter and Limiter!
- Lindell Audio LiN76 Review: Another Amazing Unit from Lindell!
- Heritage Audio Tubesessor Review: Great Opto Tube Unit!
Don’t Use All of the Bands at Once
One reason you might hesitate to use multiband compression is that things can quickly become overwhelming when dealing with multiple bands, each being compressed differently.
The best way to avoid this is by using only one band at a time. Instead of thinking of it as a multiband compressor, consider it as a band-specific (or bandpass) compressor.
Bypass all the individual bands except for the range you want to focus on — for example, 20Hz–60Hz to emphasize the low thump of a bass drum or 4kHz–8kHz to highlight the attack of the beater.
This is where the real magic of a multiband compressor lies — its ability to control the dynamic range of a specific frequency range to enhance tone or manage troublesome resonances or noises.
Start with a single band engaged, rather than all of them, and you’ll be in a better position to make adjustments that improve your mix instead of harming it.
Repair Sibilance and Other Troublesome Sonic Artifacts
If you’ve ever used a de-esser plug-in, then you already have experience with the concept of band-specific compression — a de-esser is essentially a compressor tuned to the frequency band responsible for harsh sibilance.
For de-essing, set your compression to cover the range between 2kHz and 10kHz, approximately. Solo that band and then adjust the range to zero in on just the most troublesome frequencies — we want to use the compressor to reduce the sibilance while leaving the rest of the sonic spectrum untouched.
Once you’re focused on sibilance and little else, adjust the threshold and ratio controls to achieve whatever level of gain reduction your situation requires — 5dB–10dB of gain reduction could be a good starting point.
Here’s the key — don’t apply any make-up gain. Our goal is for the compressor to ignore everything that isn’t sibilance and to only reduce sibilant frequencies once they’ve crossed the threshold.
Multiband Compression – Top 5 Plugins
Before diving into our preferred multiband compression techniques, we thought it would be helpful to share our top five favorite multiband compressors. This list is by no means exhaustive, but rather a selection of our personal favorites, along with a few notes on what makes each one stand out.
FabFilter Pro-MB: Incredible user interface with extraordinarily clear outcomes. Nice for both mixing and mastering.
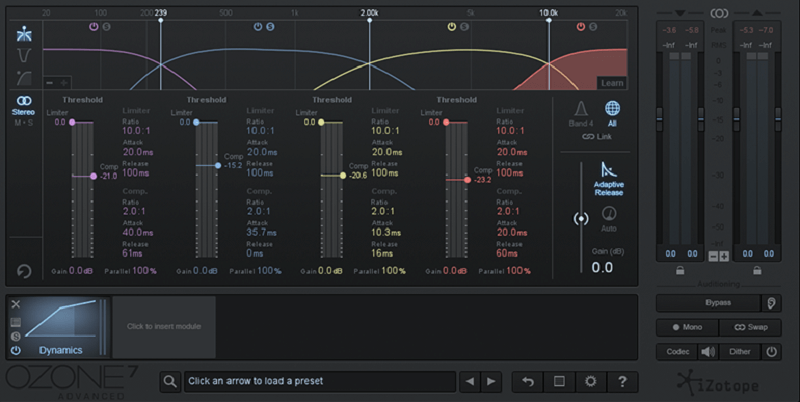
iZotope Ozone Dynamics: Does an amazing job balancing out the low end, getting your sub to sit right within the mix.
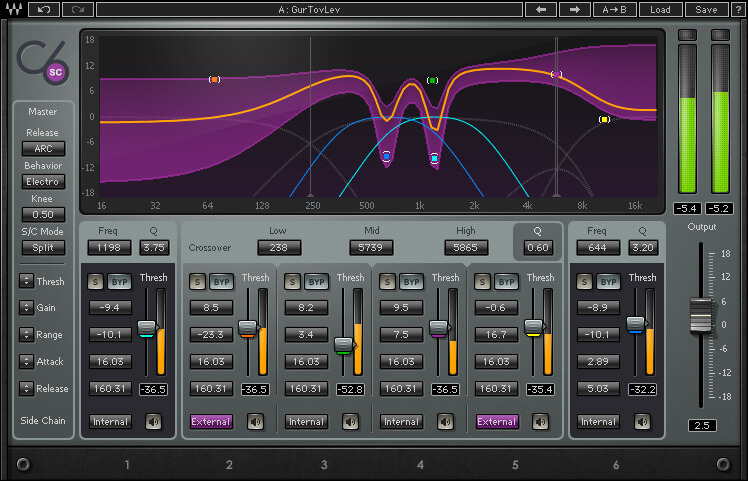
Waves C4 Multiband Parametric Processor: Wonderful for vocals to reign in a dynamic range from the tone.
Ableton Multiband Compressor: CPU savor without any lacking quality. The tremendous easy interface as well.
UAD Precision Multiband: Nice analog taste of multiband compression. Good on real instruments.
While the tools you use can be helpful, the concepts behind them are even more important. Sure, some of these plugins can enhance your sound, but that doesn’t mean you should rush to buy them before you have a solid understanding of how to use your DAW’s built-in multiband compressor. Start with mastering that, and then gradually expand your toolkit.
Multiband Compression – Three Fundamental Usages
1. On Vocals
In the previous example, we discussed how vocals became boomy and muddy during louder sections due to the acoustics of the recording room. Just as you can address unwanted low and mid-frequency characteristics, you can also target high frequencies.
For instance, sibilance occurs when certain sounds, like “S” and “T,” create sharp bursts of air. Reducing these sounds is the job of a de-esser, which is essentially a single-band multiband compressor. Another way to think of a de-esser is as a compressor side-chained to an equalizer.
2. Drum bus
Achieving balance between the kick and bass can often be challenging since they occupy similar frequency ranges. Sidechain compression is a great option to duck the bass, but it’s not always the best choice. With a multiband compressor, you can target that specific frequency range (usually between 40 Hz to 100 Hz).
Imagine you only have stems to work with and you need to turn down the kick, but you can’t EQ it without affecting the bass too. You can use a multiband plugin to focus on the kick, applying a slower attack so the transient pops through, and avoiding changes to the harmonics of the higher frequencies. This approach temporarily leaves the bass untouched.
3. Mastering
Many newbie musicians at home are likely to try their hand at mastering their own tracks. This often involves placing a compressor on the master bus, achieving about 3-5 decibels of gain reduction, and then pushing it into a limiter.
This is the most common scenario where you will use this type of compression. Multiband compression on the master track? It is probably the best thing that can happen to help the song flow smoothly if used correctly.
With multiband capabilities, you can specifically target problem areas, shape entire sections to tighten them, and provide cohesion to the music, or redefine areas like the bass region only. This is a complete skill set to master, and you’re better off leaving it to an expert.
Conclusion
Multiband Compression is a powerful tool that might seem intimidating at first, but once you get the hang of it, you’ll unlock a whole new world of mixing possibilities. If you have a specific frequency you want to adjust without affecting the entire spectrum, this is the perfect tool to use.
Learning how to utilize multiband compression will help elevate your tracks to a professional level. It allows you to preserve dynamics and shape the sound in ways that other audio effects cannot.
While standard compression may get the job done, multiband compression excels when you need to make precise adjustments.
Many mixes have been saved using this tool, and unfortunately, many have been ruined when placed in inexperienced hands. But that’s okay, as making mistakes is part of the learning process.
However, don’t send these tracks out to your listeners. Leave it to a professional! By studying various books and tutorials, you can gain a deep understanding of multiband compression, so be patient and stay focused.
While a parametric EQ lets you target specific frequency ranges, it does so consistently, affecting the track even when it’s not needed. Only one tool surpasses this, giving you temporary control, and that is multiband compression.
If you have any questions about multiband compression, feel free to ask us on Instagram or in the comments. We understand that this can be challenging for many, so we’re here to help you out.
Related Articles
- Top 10 Compressors: Best Compressor Units You Can Get!
- Best Mastering Compressors: Top 9 Units For Your Mastering Studio!
- What Are Optical Compressors: Top 5 Opto Compressors Listed!
- What is FET Compressor: Best 5 Models, Guide, and Plugins!
- What Is VariMu Compressor: Key To Achieve Classic Sound!
- Top 10 Best 500 Series Compressors: Best Models Shown!