How To Reduce Harshness In Vocals
Introduction
Many mixers struggle with harsh vocals. There are several common vocal issues that can be solved with basic microphone placement and tracking techniques, especially if you’re not involved in the original tracking process.
While mixing music, you’ve probably run into this problem many times: certain frequencies in your vocal tracks sound piercing or grating, and it’s difficult to blend them smoothly into the rest of the song.
Compression often isn’t enough to tame these harsh vocals, and you might not know what steps to take next. So, how can you effectively and musically remove harsh vocal frequencies from your tracks?
How do you completely eliminate harshness, how do you identify it, and where is it usually found? Removing harsh vocal recordings can make a professional mix sound even better. Here are some tips and guidelines to help you.
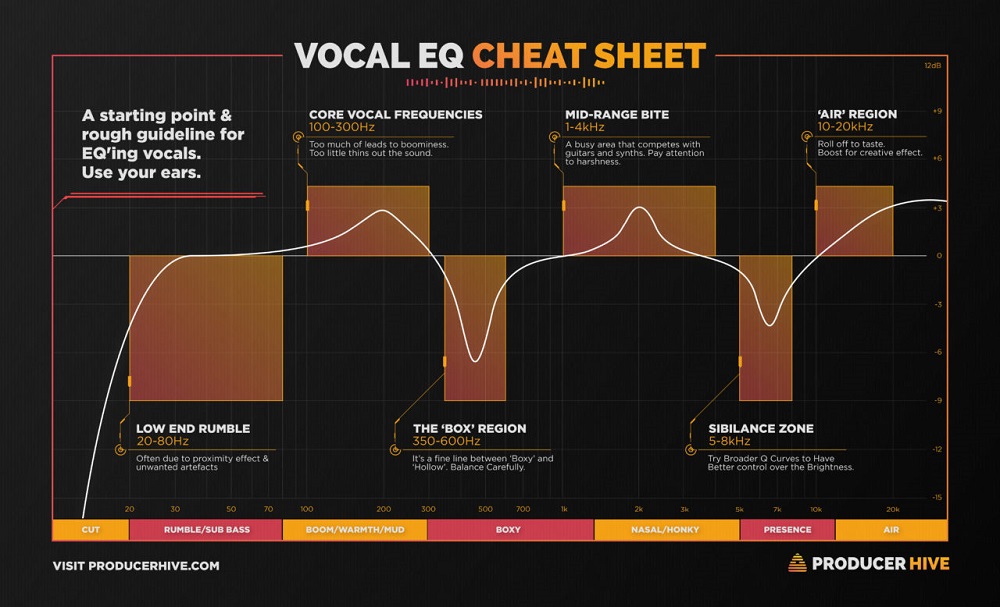
1. Locate The Problematic Frequencies
When it comes to harsh vocals, the root of the problem is often a specific frequency resonance in the higher frequencies of the song. These resonances usually show up when certain consonants, phrases, or notes are sung.
To fix harsh vocals, it’s important not to affect the parts that sound fine. You’ll need to use your best judgment to decide which approach works best for your session and how to structure your process for the best results.
There are several ways to tackle this issue, such as using compression or EQ. The goal is to address the harshness as easily as possible, without changing the sections that don’t need fixing.
Remember, treating just one frequency might not solve the problem. Along with that main frequency, you should also consider its harmonics. For example, if your vocals are harsh around 2.5 kHz, you may also need to check for harshness at 5 kHz and 10 kHz.
The importance of each issue will vary from case to case, but here are some ideas you can use to tame harshness, whether it’s in one spot or throughout the track.
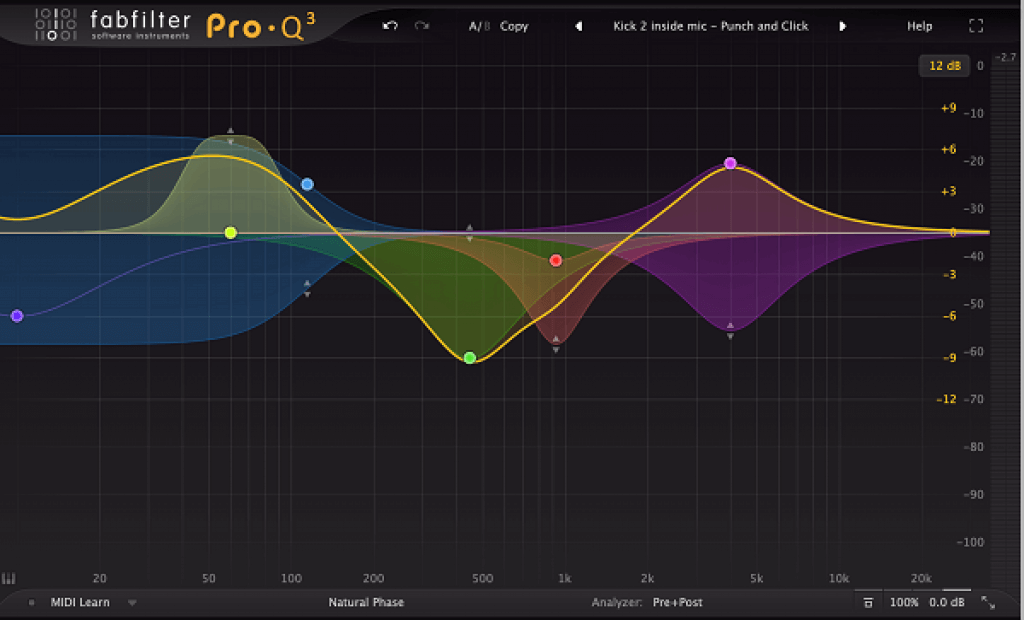
2. Subtractive EQing
You can reduce harsh frequencies by using an equalizer. Think of EQ as having a volume control for each frequency that makes up a sound. This lets you lower unwanted frequencies and boost the ones you want to hear more.
By sweeping a narrow Q across the high-end, you can find harsh resonances—usually between 4–10 kHz—and reduce them based on what you hear. Keep in mind that cutting these frequencies will affect their presence throughout the entire song.
For example, you might notch out 3 dB at 4.5 kHz to fix harshness in the verse. However, if there’s a key change in the chorus, removing 4.5 kHz could hurt its overall presence.
Because of side effects like this, we usually turn to EQ only after trying all other ways to fix the problem.
Additionally, automation can help you bypass the EQ when it’s not needed, so you only reduce harsh frequencies when necessary.
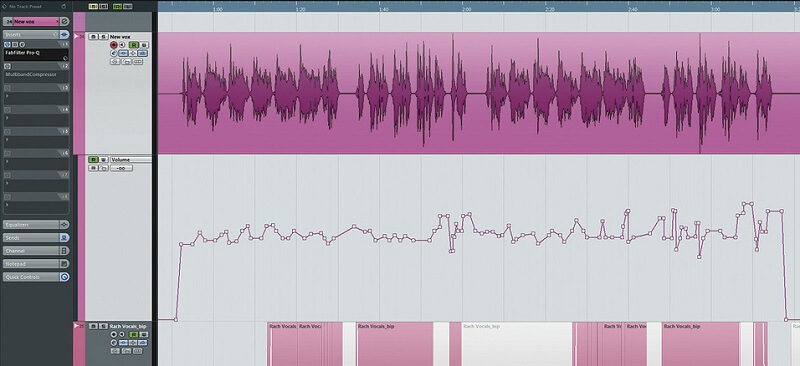
3. Gain Automation
Once you’ve finished recording your vocals, it’s time to start processing them. To make your vocal track sound its best, we recommend automating the gain. When automating gain, there are two important things to keep in mind. First, you need to even out the entire vocal track—this will make general compression much easier.
Second, try to reduce any consonants in the vocal track that are still too pronounced. This extra effort will make your de-esser work less hard and perform better. Although this process can take a while, the results are definitely worth it.
4. Dynamic EQ
Another great way to tame harsh vocals is by using dynamic EQ, which is our favorite method. As mentioned earlier, using regular EQ can sometimes harm your source material because the sound changes throughout a song—even in sections where the frequencies you’re cutting are actually needed. While you can fix this by automating the EQ, setting that up properly takes extra effort.
That’s where dynamic EQ comes in as a better solution. Dynamic EQ only kicks in when a certain frequency gets louder than a set volume threshold. In other words, it only reduces the targeted frequency when it gets too loud, based on the threshold you set. This makes your adjustments more precise and less likely to negatively affect the overall track.
5. De-Essers
De-essers work by compressing the frequencies between 8 and 10 kHz, which is where sibilance is usually found. By reducing transients in this range, you can effectively control sibilance. One of our favorite de-essers is FabFilter’s Pro-DS—it’s very transparent and provides a wide range of controls.
Using de-essers is straightforward. Simply select the frequency range you want to affect and lower the threshold level to get your desired results. Whenever there’s a peak above the threshold, the gain is reduced. That means all those “s” and “p” sounds won’t stick out anymore.
With a de-esser, these sounds are tucked into the mix so they sound more natural. It’s also common to use more than one de-esser in a vocal chain, sometimes even back to back.
No matter which solution you choose, the important thing is to resolve the problem. Many de-essers offer different detection modes, which can be helpful for reducing harsh vocal frequencies.
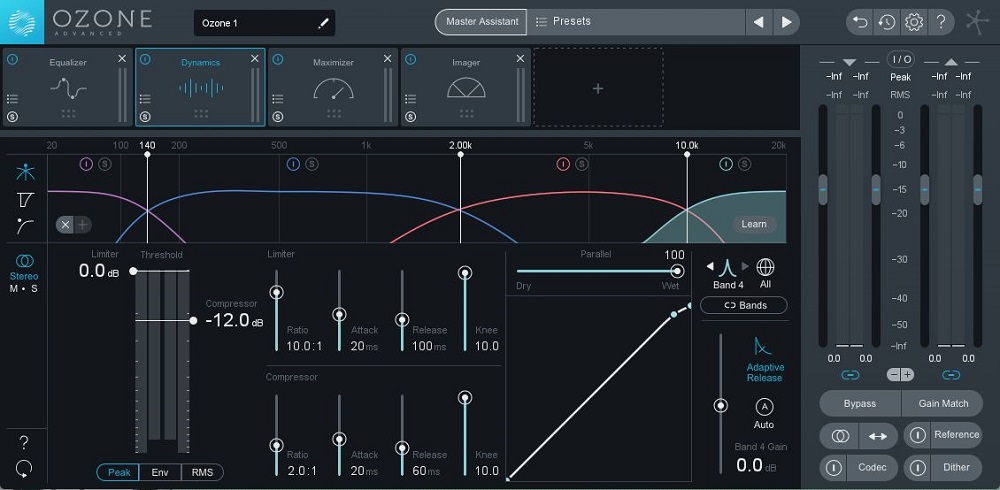
6. Multiband Compression
This technique is especially effective on vocals. While we often use it when mixing sub-mixes, it can be just as useful for vocals. However, keep in mind that multiband processing can introduce a variety of issues, so it’s important to proceed with caution and use a conservative approach. The best way to find the right crossover point is to use a multiband tool to target the upper mids and highs.
When working with a multiband compressor, we usually prefer lighter ratios. If you have a range of ratios to choose from, avoid using high ratios. You don’t want to act too quickly, too aggressively, or too frequently. Medium-length time constants are recommended, and if you’d like, you can even sync them to the melody’s tempo for a more subtle effect.
Using this technique helps to mellow out harsh frequencies. In a way, this process can be thought of as simulating the way analog tape naturally softens the high end in the analog domain.
Conclusion
Once you’ve tamed a harsh vocal, you have plenty of production options to explore. A great vocal mix isn’t just about a strong melody and a controlled performance—it’s also about knowing how to arrange and produce your track effectively.
To fix harsh vocals and tame unwanted frequencies, you need to analyze your frequency spectrum and aim for a natural vocal sound. Every vocal recording has its issues, but with the right tools, you can address them easily.
Whether you use multiband compression, volume automation with clip gain, or a static EQ, as long as your process fixes the problem without losing the good qualities of the vocal, you’ve done your job well!
If you think we missed anything on this topic, please let us know in the comments below. We’ll be happy to update and add more details!