Top 8 Best Patchbays
Introduction
As your recording setup grows—from a simple laptop with a few plugins to a desk filled with outboard gear—changing cables to adjust your signal path can become increasingly time-consuming.
Audio patch bays are a great solution for both professionals and amateurs, making it quick and easy to change connections on the fly. In this article, we’ll give you an overview of what patch bays are, how they work, and the different types available.
The best way to set up your patch bay is to first determine how many inputs and outputs you’ll need. Next, decide what kind of normalization you want, and then sketch a wiring diagram to plan your connections.
Some patch bay manufacturers even offer blank templates you can download, which help you visualize and organize your signal routing. Make sure you choose a patch bay that supports microphones requiring phantom power if you plan to use them.
Patch bays not only keep your signals clean, but they also help reduce cable clutter around your workspace. Don’t overlook the power of simple organizational tools—they can prevent headaches and save time. One easy trick is to use scribble-strip tape to label the equipment or output assigned to each jack.
You can also label the cables and the connections themselves. To further cut down on clutter behind your desk, use split looms and cable ties. Investing in a cable holder for unused cables will help keep your space tidy and your cables accessible.
The Patching Process
Input and output conventions can be confusing when dealing with patchbays. Synths and microphones generate signals, but they connect to “inputs” on a patchbay, which then become “outputs” at the other end. This setup can be misleading, as there are no true, exclusive inputs or outputs—there are just connections.
From a technical standpoint, any connection could be thought of as an input or an output. To help clarify things, let’s define a few general terms that make the patching system easier to understand:
A “sound source” is anything that sends out sound. This could be a sound generator (like a synthesizer or drum machine), a sound transformer (such as a microphone, preamp, or effects unit), or simply a device that carries sound (like the line out on an audio interface). In short, any device that transmits sound through a cable is a sound source.
Any device that can receive sound through an input is considered an input. Examples include a mixer channel, audio interface, effects unit, or speakers. In patchbay systems, effects units also process sound, so while they can act as inputs, they are not considered primary sound sources.
It’s important to remember that a reverb unit receives input from a sound source and then becomes a source of sound itself, so it has both an input and an output. In contrast, the input of an interface or mixer is typically just an input, since it doesn’t process or alter the sound in the same way as an effects unit. Sound often ends up at these kinds of inputs.
A connection (jack) is simply any place you can plug something in. Patchbays just connect one thing to another. So, whether a connection is an input or output depends on the source and destination you’re hooking up.
Configuring Patchbays
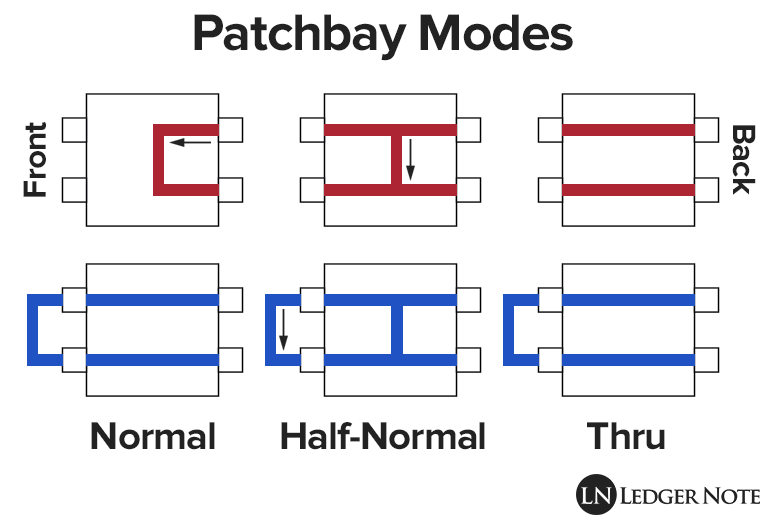
If every connection in the patchbay had to be made by hand, we’d probably end up with a tangled mess of cables. Luckily, patchbays can be set up in different ways to keep things organized and simple. Usually, you can adjust the configuration for each pair of vertical connections using a switch. In general, there are three main types:
Full-normal
If there’s no audio source plugged into the front of the patchbay, any device connected to the top rear jack will automatically connect to the rear jack directly below it.
For example, the first top rear jack will be routed to channel 1 on your interface, as long as the jack right below it is connected to channel 1. So, if you have your favorite synth plugged into the first top rear jack, it’ll go straight to channel 1 on your interface—no extra steps needed!
This setup keeps your default routing in place without needing to add any extra cables. If you want to change the connection, just plug something into the front top jack, and that will break the default signal path.
Half-normal
As long as you don’t connect anything to the top front jack, this setup works just like a full-normal configuration. With half-normal wiring, the signal flows to both connections instead of breaking the connection to the lower jack. This lets you send the dry signal and a separate, fully affected signal to an effect at the same time.
Non-normal (Thru)
Signals can only be transmitted when cables are connected. This setup is typically used when there’s no direct relationship between the top row and the bottom row. For example, a studio microphone line and a channel mic input are usually normalized. Since the mic is always plugged into a preamp, there’s no need to split the signal at this stage.
Returns from multitrack recorders are generally half-normalized to channel line or monitor inputs, as you may need to split these signals for mixing purposes. Half-normalizing insert sends to insert returns allows the signal to continue flowing while you complete your patch.
Design of a Patchbay
A typical patchbay has 24 channels. Each channel handles both an input and an output, which means there are 48 connection “points” in total. Most modern patchbays use TT (bantam) connectors. However, some models use 1/4″ TRS or even XLR connectors. To save space, many units have DB-25 connectors on the back, but you may also find some that use 1/4″ TRS or XLR connections instead.
A DB-25 cable, sometimes called a D-sub, is a multi-pin connector that can carry eight analog audio signals at once. One end of the D-sub cable has a single DB-25 connector, while the other end splits into an 8-channel “whip” with either XLR or 1/4″ TRS connectors. This design is a great space-saver. For example, you can connect console channel outputs 1 through 8 to the patchbay with a single cable, instead of using eight separate TRS cables.
Every patchbay is set up differently, depending on the studio’s needs, so no two patchbays are exactly alike. By letting you make common connections quickly, a patchbay can really speed up your workflow. For example, if your studio is set up for recording, you might use the patchbay to easily create cue sends (for headphones) or connect synthesizers.
If your studio is set up for mixing, you’ll probably need to patch in inserts and outboard compressors. Generally, patchbays are arranged according to signal flow. Inputs are usually on the bottom row and outputs on the top row, making it easier to connect different pieces of equipment.
Many studios also color-code their patchbays to help organize different sections. For instance, you might use one color for preamps, another for EQs, a third for compressors, and a fourth for effects units. Alternatively, you could use one color for all outboard gear and another for console connections. You can even use different colors to tell inputs and outputs apart.
Now that we’ve explained what patchbays are and how they work, we’re ready to share the 8 options we mentioned earlier. We’ll also provide direct purchase links to make it easy for you to get them.
Let’s take a look at the Top 8 Best Patchbays, with brief reviews for each model.
1. Black Lion Audio PBR XLR Patchbay
To achieve top-tier audio quality at every stage of your signal chain, your studio needs more than just basic patching. The Black Lion Audio PBR XLR Patchbay is a testament to Black Lion Audio’s dedication to elevating gear performance. This 16-point XLR patchbay features 32 audiophile-grade, gold-plated XLR connectors, designed for studios with the highest standards.
The front panel offers 12 female XLR connectors and 4 male XLR connectors, making it easy to patch devices without having to reach behind your rack. Black Lion’s engineers have worked tirelessly to ensure the PBR XLR delivers premium quality throughout your setup. Built to the rigorous standards of Black Lion, the PBR XLR also boasts a sleek, black-anodized aluminum faceplate for a sophisticated look.
- Equipped with 32 gold-plated XLR connectors for audiophile-grade performance
- Front panel includes 4 male XLR connectors for easy hardware patching
- Features a sturdy, black-anodized aluminum faceplate
- Includes clear front panel labels for easy identification

|
Black Lion Audio PBR XLR Patchbay |
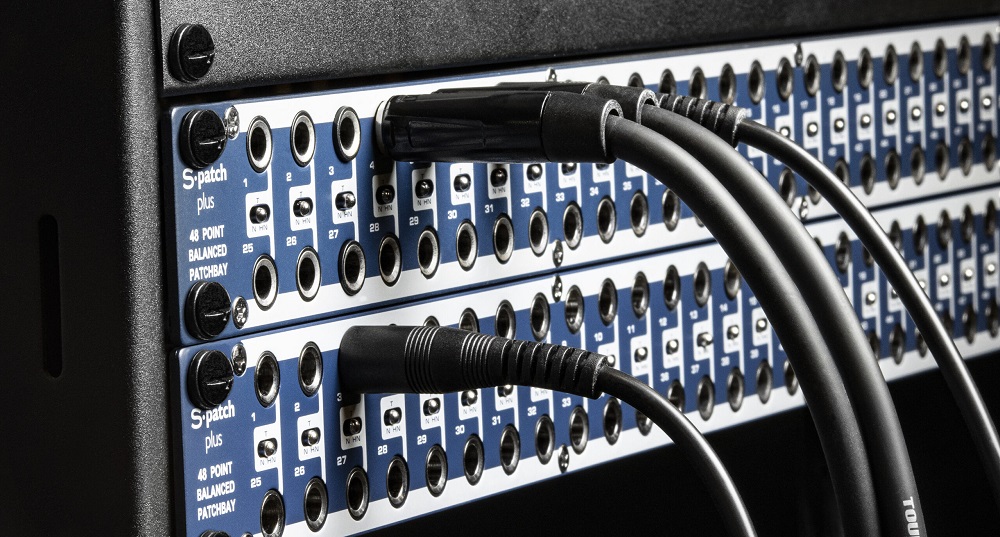
2. Samson S-Patch Plus 48-point Balanced Patchbay
The Samson S-Patch Plus 48-point patch bay provides a central hub to connect all your audio components. It features a solid and durable design with fully balanced 1/4-inch TRS connections throughout.
No need to take apart other 1/4-inch patchbays just to change the operational mode by flipping connector cards. With the S-Patch Plus, you can easily configure each channel to operate as normalled, half-normalled, or through, using high-quality miniature toggle switches.
This is a 48-point patchbay that is fully balanced and built to last.
- Three-mode switches are conveniently located on the front panel.
- Includes 1/4″ TRS connectors.
- Comes in a 19-inch rack mount chassis.
- Easily switch between Normal, Half-Normal, and Through configuration modes.

|
Samson S-Patch Plus 48-point Balanced Patchbay |
3. Hosa PDR-369 12-point XLR Balanced Patchbay
The Hosa PDR-369 Patch Module features balanced XLR male and female connectors to make routing between audio sources quick and easy. This patchbay offers twelve connection points, with female-balanced XLR inputs on the front and male XLR outputs on the back.
Whether you’re setting up a small live or studio system, upgrading your house of worship’s sound, or enhancing a DJ rig, the PDR-369 is a versatile solution. By default, it has female XLR jacks on the front and male XLR jacks on the rear, but you can easily reverse this setup to fit your needs.
With its durable construction, user-friendly design, and flexibility for a range of uses, the PDR-369 delivers outstanding value. Accessing a balanced XLR line input or a microphone input is simple—no rewiring needed.
- This patchbay features 12 XLR connectors.
- Male XLR connections are located on the back, while female XLR connections are on the front.
- The configuration is reversible for added flexibility.
- Ideal for live sound applications, DJs, and churches.

|
Hosa PDR-369 12-point XLR Balanced Patchbay |
4. Behringer Ultrapatch Pro PX3000
The Behringer PX3000 is an excellent choice for this task because it’s affordable, economical, and high-quality. Both the front and rear panels feature 48 balanced 1/4″ TRS connectors. Keep in mind, to switch modes on the PX3000, you’ll need to plan ahead, as the unit can only be switched when it’s not mounted in a rack.
Behringer is known for reliable gear, and the PX3000’s build quality is no exception. Although it’s compact, it has a surprising amount of weight to it. There is one important caution, though: if you use phantom power through any of the connections, always make sure the power is switched off before connecting anything (for example, when using an XLR to TRS cable).
If a cable is inserted incorrectly while phantom power is on, it can cause a temporary short due to grounding, which may seriously damage your equipment. For those who use phantom power frequently, it’s safer to use an XLR patchbay. If you’re careful, you can use the PX3000, but always turn off the 48V power first. The choice is yours.
- The PX3000 offers a total of 48 patch points with fully balanced TRS connectors.
- You can easily customize patchbay configurations using the top-side switches.
- Its durable, all-metal design ensures reliability.
- The PX3000 helps reduce cable clutter by consolidating all your studio’s inputs and outputs.

|
Behringer Ultrapatch Pro PX3000 |
5. ART P16 16-channel XLR Balanced Patchbay
In addition to power conditioners and microphones, Applied Research and Technology (ART) also offers affordable outboard gear. In this review, we’ll take a look at the ART P16 Patchbay and see how it can make studio connectivity easier.
Managing your inputs and outputs with XLR patchbays is simple and convenient, whether you’re installing them in a PA rack, a studio rack, or a fixed location. The ART P16 Patchbay allows you to easily connect gear with rear-panel inputs to devices with front-facing inputs.
To ensure the P16 is robust and reliable, ART uses all PCB wiring for its internal connections. Even after repeated plugging and unplugging, you don’t have to worry about components coming loose or malfunctioning. The steel enclosure adds to its durability, so as long as it’s securely mounted in a rack, it’s unlikely to get damaged.
- The P16 features a high-quality passive interface with 16 balanced channels of direct audio.
- The chassis is made entirely from black anodized steel for lasting quality and durability.
- High-quality XLR connectors are wired internally with PCB connections.
- For extra mounting flexibility, the rack ears can be reversed.

|
ART P16 16-channel XLR Balanced Patchbay |
6. Neutrik NYS-SPP-L1 48-point 1/4″ TRS Balanced Patchbay
This is a single-unit, 19″ rack-mountable Neutrik Modular 48-Point 1/4″ TRS Balanced Patch Bay, featuring a reinforced metal enclosure. The 48 PCB channels are organized into 24 pairs for the front and 24 pairs for the rear of the patch bay.
Simply attach the supplied grounding clips to each channel’s grounding pad to ground each pair individually or in groups, according to your needs. The PCBs are securely clamped between the front and back panels of the rack enclosure—no bolts or nuts required.
The patch bay is designed with improved, non-tarnishing contacts to minimize long-term wear. Flippable PC boards make it easy to configure the patch bay as needed. An easy-to-identify gray normalling jack allows for quick connection in normalled, half-normalled, or isolated configurations.
- This 48-point Neutrik TRS patchbay delivers flexibility and reliability.
- To use the product in half-normalled, split, or isolated modes, simply remove the front panel even while the unit is stacked.
- With trusted Neutrik connectors, you can count on lasting performance.

|
Neutrik NYS-SPP-L1 48-point 1/4″ TRS Balanced Patchbay |
7. Switchcraft PT16TRS2DB25 16-point 1/4″ TRS Patchbay
The Switchcraft PT16TRS2DB25 Audio Pass-Through Panel is a rack-mounted I/O solution featuring sixteen 1/4″ TRS jacks connected to two DB25 connectors. Designed for front-of-rack access, the Switchcraft PT Series audio pass-through I/O panel is perfect for anyone needing convenient I/O access in both permanent and mobile studio environments. All connections follow the standard TASCAM DTRS pinout and are hardwired to two DB25 connectors on the back panel.
Switchcraft is excited to introduce five new Audio Pass-Through Panels to the StudioPatch Series, further expanding its product line. These panels are built from anodized extruded aluminum and use 110 Ohm AES/EBU digital audio cable, along with high-quality XLR connectors and TRS jacks—each element engineered for lasting quality, durability, and reliability.
All connectors are wired according to the TASCAM DTRS standard pinout, making this product ideal for those needing simple, reliable access to inputs and outputs in studio or broadcast settings, whether permanent or mobile.
- Rack format
- Available connector types on the front: 1/4″ TRS
- Back: DB-25 connectors
- Modes of operation: Normal, Half Normal

|
Switchcraft PT16TRS2DB25 16-point 1/4″ TRS |
8. dbx PB-48 48-point 1/4 inch TRS Balanced Patchbay
With the dbx PB48, you get a patch bay that delivers reliable performance every time. This unit offers two configuration options: half-normalled and de-normalled. The front panel features 48 1/4″ patch points, while the rear panel also provides 48 1/4″ patch points.
The PB48 patch bay allows you to access your mixer and other studio gear quickly and easily. It helps reduce wear and tear on your equipment’s jacks and makes rerouting devices in your studio setup fast and efficient, thanks to its rugged, noise-free, and versatile design.
- There are 48 patch points in total.
- These are arranged as 24 pairs on 24 individual cards.
- Each pair (or card) can be configured as either half-normalled or de-normalled.
- All connections use 1/4″ TRS jacks.
- Nickel-silver contacts ensure reliable connectivity.

|
dbx PB-48 48-point 1/4 inch TRS Balanced Patchbay |
Conclusion
If you have a complex studio setup, a patchbay can be a very useful piece of equipment. While it’s not absolutely essential, you may find that using one makes your workflow much more efficient. That’s why it’s important to understand how patchbays work and decide which one best suits your needs.
After reading this article, you’ll have all the information you need to start using patchbays. If you have any questions about this topic, please let us know in the comment section below. We’re always happy to help and provide more details!