11 Most Common Reverb Mistakes
Introduction
So, what exactly is reverb? Reverberation is all around us, all the time. It’s simply the result of sound waves bouncing off every surface—hard, soft, tall, short, and everything in between. Every sound we hear is shaped by the space it’s heard in.
Our ears are used to this. Without that sense of space, sounds often seem unnatural, thin, or hollow. However, when recording in a studio, you use special techniques and tools to reduce as much external acoustics as possible, aiming to capture the purest sound.
But even people who work with reverb can make mistakes. In this article, we’ll focus on the 11 most common reverb mistakes and point them out, so you can avoid them the next time you’re mixing.
1. Decay Is Too Long
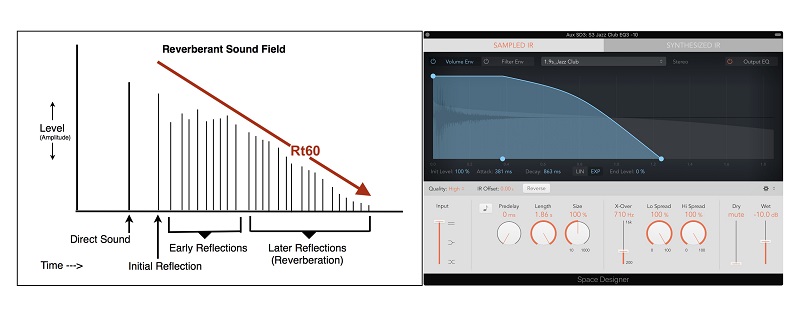
Almost all reverb units and plugins have a control for decay time, which is the length of the reverb’s tail. Reverb sounds best when the decay is matched to the song. It’s often helpful to look up millisecond values for different note lengths (like eighth, quarter, half, or whole notes) that fit the tempo of your song to help set the decay time.
If you’re not a “numbers person,” you can still time reverbs by ear. For vocals or melodic instruments, the decay should feel like it ends just before the next phrase begins. If there’s a natural pause in the part, the reverb should fade out completely in that gap. The same idea works for longer reverbs on rhythmic elements like a snare drum—make sure the reverb finishes before the next hit.
2. Killing The Lead
The more reverb you add to a dry signal, the further away that instrument or voice will seem. This is true whether you’re using reverb in-line or blending it in with Send & Return routing. If the reverb and dry signal are at the same level, that track can sound like it’s coming from the back of the (virtual) room—even if it’s turned up loud within the mix.
A common beginner mistake is adding reverb to make the lead vocal stand out, but then it starts to sink into the background. To fix this, people often raise the track’s level, which results in a very loud, overly-wet vocal. Creative and thoughtful use of reverb and ambience can help a mix sound its best. With the right balance, any mix can achieve that open, airy sense of “presence” that really draws the listener in.
Choosing a more open, echoey reverb can also help. A sparse, echoey quality—which might not work well for percussive instruments—can help keep vocal parts sounding open and airy.
3. Adding Reverb on Every Track
This is a rookie mistake that many people quickly move past, but it’s worth repeating: if you’re processing each track in a group—like drums, for example—don’t put a reverb plugin on every single track.
Instead, send all those tracks to a bus and put the reverb on the bus. It almost feels like DAW developers want you to fall into this trap, since their track presets often have reverb built in. Even experienced producers can get caught out when browsing synth presets in a hurry.
If you tend to work this way, always check if a preset already has reverb on it. Ask yourself if the sound needs reverb at all, or if it could be sent to a reverb bus you’ve already set up.
4. Using Many Kinds of Reverb in One Mix
When you start layering multiple reverbs with different densities and decay times, you’re essentially pulling listeners into several spaces at once—and the brain can sense this trickery. You also risk destroying any sense of depth by piling on too much reflective and refractive “mud.”
That doesn’t mean you should never use different reverbs in a track; variety is, after all, the spice of life. But it can easily backfire: as the reverbs bounce around each other, they interact in ways that don’t make sonic or contextual sense, revealing the artificiality of the effect.
On a ballad, there’s nothing wrong with putting the overheads in a room, the snare in a hall, and the singer in a larger room. The trouble starts when every guitar gets its own unique space with no sense of a unified soundstage—that’s when the fakery becomes obvious.
5. Not Enough Reverb
Almost every sound we hear in our lives comes with a natural sense of ambiance. Pure reflections wrap the sound we’re hearing in reverb. Reverb is so deeply woven into our subconscious understanding of the world that when we hear sounds without it, we notice right away.
Hopefully, by now, these articles are helping you see every aspect of music and sound as both an opportunity and a potential challenge. So, you might be thinking, “Maybe making a sound stand out by leaving off the reverb is actually a good thing!” And you’d be right. Sometimes, using no reverb at all can make a sound pop in the mix without covering up other parts of the track.
However, more often than not, a complete lack of reverb turns out to be more of a problem than a solution. Most people just can’t get comfortable with sounds that go from warm to cold and end up feeling sterile.
6. Using Reverb Instead of Delay
As we’ve mentioned in other articles and on our Instagram tips, reverb is essentially a type of delay or echo with a much shorter reflection time. So, you might think that using a high-quality short delay or echo could imitate reverb, right?
Not exactly, and this is a common mistake when it comes to reverb. While the effect can sound similar, delays don’t create the same level of harmonic density as reverb does. Remember, we talked about how low frequencies travel more slowly through a reverb unit than high frequencies. Delays, on the other hand, usually produce exact copies of the original sound.
Because there’s no difference in the way tones are reflected, delays tend to sound cleaner. This can mean less character, but also less clutter in your mix. For things like softening a lead vocal or adding some space to an instrument, sometimes delay is actually the best choice.
It’s also much easier to control decay times with delay, and delay rarely adds the kind of complex harmonic buildup that reverb often does.
7. Inappropriate Reverb Placement
Reverb is a powerful effect, but it needs to be used in the right context. Some tracks simply don’t need extra reverb. Most of the time, and on most instruments in a mix, any reverb should feel natural and balanced. In many cases, your recorded tracks already have enough natural ambience to achieve this.
So don’t add reverb to parts just because you think you’re “supposed to.” Make it a habit to listen to how different rooms and spaces sound. Try recording and playing instruments in a variety of rooms to learn how different frequencies respond to their environments. Also, listen to hit records, especially older ones where the production has stood the test of time.
8. Shaping Reverb Tone
Usually, when we reach the end of the static mix, the instrument levels sound good, but the overall tone still feels off. Maybe the drums aren’t bright enough, or the guitars need to sound moodier.
EQing each instrument can help, but sometimes spending time shaping the reverb is just as effective. By adjusting the tone of the reverb, you can actually influence the tone of your entire mix. As you shape the reverb’s sound, you might notice that the tone of every instrument sent to the reverb changes as well.
Try adding a reverb bus to some instruments in one of your mixes. Use a high-shelf filter and listen to how the song changes as you turn it up or down. If you boost the reverb’s highs, the instruments will sound brighter. Turn it down, and everything should become much darker and moodier.
9. Reverb and Imaging Issues
When you’re mixing, your main goal is to create the right balance within the ‘stereo image,’ ensuring everything sounds great on both mono and stereo playback systems. To make your mix translate well, you should use a combination of both mono and stereo signals. This approach lets you create a stereo mix that still sounds good when played back on mono devices.
A vectorscope can also provide a visual reference for your overall stereo image, and you’ll find one in almost every stereo imager plugin. Remember: if you put any low-frequency elements in the stereo field, your low end will become messy and unfocused. Always keep your bass elements in mono to maintain a clean and tight low end.
Additionally, avoid making a stereo source even wider or turning a mono signal into stereo—this is often a side effect of adding reverb. Doing so can cause phase and imaging problems. Instead, try making stereo sources a bit more narrow for a cleaner mix. If you really need to make a signal wider, use a multiband imager to do it carefully and with control.
10. Resting Your Ears
We can’t even begin to explain just how important it is to give your ears a break. At the very least, not doing so will cause you to create an unbalanced mix. Why? Because when your ears are exposed to a full range of frequencies for long periods, they start to lose their natural sensitivity. With rested ears, you’ll be able to listen to the reverb and other details much more clearly.
When your ears get tired, they become desensitized to certain frequencies—especially in the mid-high range. That’s why you’ve probably experienced moments when what sounded perfect at first turns out to sound completely different the next morning or even later that same night after your ears have had a chance to ‘reset.’
Once your ears have recovered, it becomes much easier to notice mistakes or problems in your mix—not to mention all the other benefits of taking a break. The bottom line: your ears will deceive you if you expose them to constant sound for too long, no matter how much experience you have or how well-trained you think your ears are.

11. Not Listening Before Mixing
One of the most essential—and unfortunately most often overlooked—steps is listening to your track before you start mixing. This should always be your first move in the mixing process. If you don’t know what your song actually sounds like, you can’t mix it properly.
By listening all the way through, you’ll get a feel for the track, notice where it has issues, and identify any problematic frequencies. This gives you a clear idea of how to approach mixing the song, since every track needs a unique touch. While listening, you might catch all kinds of problems, like bad recordings, wrong notes, timing issues, and more.
The same idea applies to reverb. Take the time to analyze your track and find the exact places where reverb will enhance the sound, instead of just adding it everywhere by default. This is one of the most common mistakes made by beginners and even some intermediate engineers. So, always listen to your song before you do anything else. It’ll make your work much easier.
Conclusion
Reverb adds space and depth to your mix, but it also provides important clues for the listener about where the sound is happening and where they are in relation to it. With reverb, you can transport your audience to a concert hall, a cave, a cathedral, or an intimate performance space.
Reverb also lets the natural (or enhanced) harmonics of a sound source stand out, giving your mix extra warmth and spaciousness. It’s truly one of the most versatile effects in mixing, useful both as a practical tool and a creative one. Reverb brings that elusive sense of depth, richness, and interest that draws listeners in and holds your mix together.
If you have any questions or suggestions about this topic, please let us know in the comment section below. We’ll be happy to explain further!